Have you been dreaming of adding a touch of elegance to your home with beautifully stained wood shelves? Whether you’re a DIY enthusiast or a homeowner looking to personalize your space, this guide will walk you through everything you need to know about how to stain wood shelves. Let’s turn those bland pieces of wood into stunning focal points that enhance your home’s decor.
Why Stain Wood Shelves?
Staining wood shelves not only brings out the natural beauty of the wood but also provides a protective layer that extends their lifespan. A well-stained shelf can transform an ordinary room into a designer space. Additionally, staining offers customization options to match your existing furniture and decor.
Choosing the Right Wood for Staining
Before you start, it’s crucial to select the right type of wood for your shelves. Hardwoods like oak, maple, and cherry are excellent choices because they absorb stains well and offer a rich texture. Softwoods like pine and cedar can also be stained but may require more preparation.
- Oak is known for its durability and prominent grain, making it a favorite among woodworkers.
- Maple provides a smooth finish and absorbs stains evenly, ideal for a sleek look.
- Cherry adds warmth with its reddish tones, perfect for a cozy ambiance.
Preparing Your Workspace
Creating a clean and organized workspace is vital for a successful staining project. Ensure you have adequate ventilation, as staining products can emit strong fumes. Lay down drop cloths to protect your floors and gather all necessary tools and materials.
Tools and Materials You Need
- Sandpaper (80, 120, and 220-grit)
- Wood conditioner
- Stain of your choice
- Brushes, rags, or foam applicators
- Protective gear (gloves and masks)
- Drop cloths or old newspapers
Sanding Your Wood Shelves
Sanding is a critical step that ensures the stain adheres properly to the wood. Start with 80-grit sandpaper to remove any rough spots or imperfections. Follow up with 120-grit sandpaper to smooth out the surface, and finish with 220-grit for a fine, polished feel.
- Start with Coarse Grit: Begin with 80-grit sandpaper to tackle rough areas.
- Smooth with Medium Grit: Use 120-grit sandpaper to even out the surface.
- Finish with Fine Grit: Complete the sanding process with 220-grit for a smooth finish.

Applying Wood Conditioner
Applying a wood conditioner before staining helps achieve an even color. This step is especially crucial for softwoods like pine, which can absorb stain unevenly. Use a brush or rag to apply the conditioner, following the manufacturer’s instructions, and allow it to dry completely.
Why Use Wood Conditioner?
- Prevents blotchiness
- Ensures uniform stain absorption
- Enhances the final appearance
Choosing the Perfect Stain
Selecting the right stain color can be overwhelming with so many options available. Consider the overall color scheme of your room and the look you want to achieve. Oil-based stains are durable and penetrate deeply, while water-based stains are easier to clean up and have a shorter drying time.
Types of Stains
- Oil-Based Stains: Long-lasting and deep-penetrating, ideal for high-traffic areas.
- Water-Based Stains: Quick-drying and easy to clean, perfect for indoor projects.
- Gel Stains: Thick consistency and good for vertical surfaces.
Applying the Stain
Now comes the fun part—applying the stain! Use a brush, rag, or foam applicator to apply a thin coat in the direction of the wood grain. Wipe off any excess stain with a clean rag to prevent blotches and streaks. Allow the stain to dry according to the manufacturer’s instructions.
- Apply Thin Coats: Start with a light coat to avoid over-saturation.
- Wipe Off Excess: Use a clean rag to remove any extra stain.
- Allow to Dry: Follow the recommended drying time for the best results.
Adding Additional Coats
For a deeper color, you may need to apply additional coats of stain. Always allow the first coat to dry completely before adding another. Lightly sand the surface with 220-grit sandpaper between coats for a smooth finish.
Tips for Multiple Coats
- Test on a scrap piece of wood first
- Apply evenly and wipe off excess
- Lightly sand between coats
Sealing Your Stained Shelves
Sealing your stained shelves adds a layer of protection and enhances the color. Polyurethane is a popular choice for its durability and ease of application. Apply a thin coat with a brush, following the direction of the wood grain, and allow it to dry. Lightly sand with 220-grit sandpaper and apply a second coat for added protection.
Types of Sealers
- Polyurethane: Durable and water-resistant, great for high-use areas.
- Lacquer: Fast-drying and provides a beautiful sheen.
- Wax: Offers a natural finish but requires regular maintenance.
Maintenance Tips for Stained Wood Shelves
Maintaining your stained wood shelves ensures they stay beautiful for years to come. Dust them regularly with a soft cloth and avoid using harsh chemicals. Periodically check for any signs of wear and apply a fresh coat of sealer if needed.
Simple Maintenance Steps
- Dust with a soft cloth
- Avoid harsh cleaners
- Reapply sealer as needed
Things to Consider When Staining Wood Shelves
When embarking on your wood staining project, there are several key factors to keep in mind to ensure the best outcome.
- Wood Type and Grain: Remember that different woods absorb stains differently. Take the time to understand the specific properties of the wood you are using, as this will help you achieve a more uniform finish.
- Environmental Conditions: The temperature and humidity levels can significantly affect the staining process. Ideally, you should work in a controlled environment where temperatures are moderate, and humidity is low to facilitate proper drying.
- Color Sample Testing: Always test your stain on a small, inconspicuous area or spare wood piece before fully committing. Stain can appear different on various wood types, so this step is essential for ensuring the desired hue.
- Safety Precautions: Staining products can release harmful fumes. Always wear appropriate protective gear, such as gloves and masks, and ensure your workspace is well-ventilated to promote safety during the staining process.
- Time for Drying: Plan your project timeline accordingly, as stained wood requires ample drying time. Rushing the drying process can lead to imperfections in the finish.
By considering these factors, you can enhance the quality and longevity of your stained wood shelves, ultimately achieving a beautiful and functional addition to your home décor.
Common Mistakes to Avoid for How to Stain Wood Shelves
Staining wood can be tricky, and mistakes can happen. Avoid common pitfalls like skipping the wood conditioner, applying too much stain, or not sanding adequately. Taking your time and following each step carefully will yield the best results.
Mistakes to Watch Out For
- Skipping wood conditioner
- Over-applying stain
- Inadequate sanding
Expert Tips for a Professional Finish
Want that professional look? Here are some advanced tips to elevate your staining project. Use high-quality brushes and applicators, work in a dust-free environment, and always test the stain on a scrap piece of wood before applying it to your shelves.
Pro Tips
- Invest in quality tools
- Work in a clean space
- Test stain on scrap wood
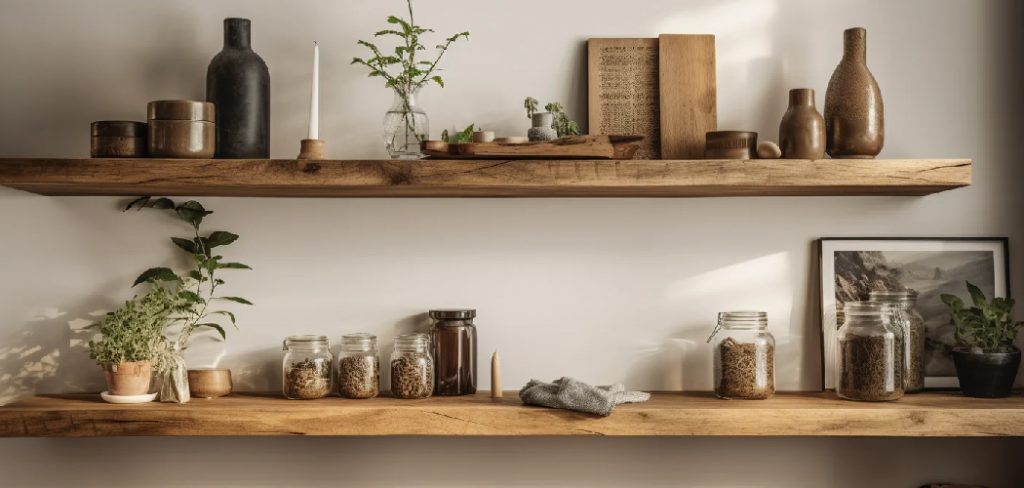
Showcasing Your Finished Shelves
Once your shelves are stained and sealed, it’s time to showcase them in your home. Arrange your favorite books, decor items, and plants to create a visually appealing display. Share your finished project on social media, and don’t forget to tag us!
Styling Ideas
- Mix books and decor
- Add greenery for a fresh look
- Use lighting to highlight features
Safety Precautions for Staining Wood Shelves
When undertaking a staining project, ensuring safety must be a top priority. Here are essential precautions to keep in mind:
- Personal Protective Equipment (PPE): Always wear safety goggles, gloves, and a mask to protect your eyes, skin, and respiratory system from harmful chemicals and dust particles.
- Ventilation: Work in a well-ventilated area to disperse fumes. Open windows or use fans to ensure a constant supply of fresh air while staining and sealing.
- Proper Storage of Materials: Store staining products in a cool, dry place away from heat sources or open flames, as many stains are flammable.
- Dispose of Waste Properly: Follow local regulations for disposing of rags and materials soaked in stain or solvent, as they can spontaneously combust if not handled correctly.
- First Aid Kit: Keep a first aid kit nearby for any accidents, and know the proper response for chemical exposure or skin irritation, including rinsing with water or seeking medical attention if necessary.
By following these safety precautions, you can protect yourself and create a safer environment for your wood staining project.

Conclusion
Staining wood shelves is a rewarding project that can transform your living space. With the right tools, preparation, and techniques, you can achieve a stunning finish that highlights the natural beauty of the wood.
Don’t be afraid to experiment with different stains and finishes to create a look that’s uniquely yours. Hopefully, this article gave you some helpful tips about how to stain wood shelves successfully, so now that you have the proper knowledge on how to get the job done, why not give it a try today?
About the Author
Adrian Green, a lifelong woodworking enthusiast, shares his passion for the craft through The Woodenify Blog. With a foundation built on years of hands-on experience in his father’s woodworking shop, Adrian is dedicated to helping others learn and grow in the world of DIY woodworking. His approach to woodworking combines creativity, practicality, and a deep appreciation for the art of building with your own hands. Through his blog, he inspires individuals of all skill levels to embark on their own woodworking journeys, creating beautiful, functional pieces of furniture and décor.
Professional Focus
- Specializes in DIY woodworking projects, from furniture to home décor.
- Provides step-by-step guides and practical tutorials for woodworkers of all skill levels.
- Dedicated to helping readers build confidence and skill through easy-to-follow instructions and tips.
- Passionate about fostering a community of makers who can share, learn, and grow together.
Education History
- University of Craft and Design – Bachelor of Fine Arts (BFA) in Woodworking and Furniture Design
- Woodworking Apprenticeships – Extensive hands-on training with skilled craftsmen to refine carpentry and furniture making techniques.
- Online Courses & Masterclasses – Continued education in advanced woodworking techniques, design principles, and specialized tools
Expertise:
- DIY woodworking, carpentry, furniture making, and home décor projects.
- Creating accessible tutorials and guides for beginner to advanced woodworkers.
- Sharing the joys and satisfaction of woodworking, from raw materials to finished products.