An extension table is an essential piece of furniture that offers flexibility for dining and workspaces, adapting easily to various needs. Its ability to expand allows for accommodating additional guests during gatherings or creating an extra surface area for projects, making it ideal for both intimate and large-scale activities. The versatility of an extension table is unmatched, as it can blend seamlessly with various décors and be tailored to fit different spaces—from small apartments to expansive dining rooms.
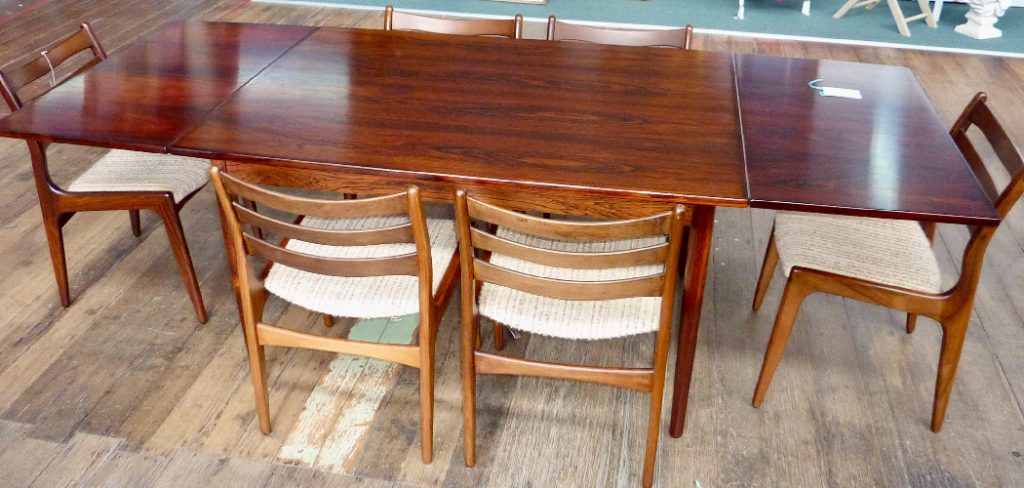
This project enhances your living space and allows you to develop woodworking skills. By following the steps outlined, you will learn how to build an extension table that meets your specific requirements while gaining valuable experience in design, construction, and finishing techniques. Whether you are a novice or an experienced DIYer, this project is achievable and rewarding.
Materials and Tools Needed
Materials
To build your extension table, you’ll need the following essential materials: high-quality lumber, which can be either hardwood or softwood, depending on your preference and budget. You’ll also require extension slides to facilitate the table’s expansion, screws to secure various components, wood glue for added support, and table legs to provide stability.
To finish your table, select a protective coating such as paint or stain to enhance the wood’s appearance. Additionally, consider optional materials like decorative trim to add aesthetic appeal and extra hardware for increased stability.
Tools
Having the proper tools is crucial for completing your extension table. Essential tools include a saw for cutting the lumber, a drill for making holes and securing components, and a measuring tape for accurate dimensions.
Clamps are necessary for holding pieces together during assembly, while a sander helps achieve a smooth surface finish. Lastly, a screwdriver is important for driving in screws. Don’t forget to equip yourself with safety gear, including goggles, gloves, and ear protection, to ensure a safe working environment throughout the project.

Planning and Design
Choosing the Design and Size
Consider the available space and intended use when determining your table’s dimensions and extension length. Start with a standard size that suits your dining area or workspace, typically 60 to 72 inches in length for a dining table, and adjust based on how many people you aim to accommodate.
The extension length should be ample to serve additional guests comfortably; a typical extension can add 12 to 24 inches. Additionally, ensure that the table design complements your interior style, whether it’s modern, traditional, or rustic, allowing you to create a functional yet aesthetically pleasing piece.
Creating Detailed Plans and Sketches
Detailed plans with precise measurements are vital for a successful build. Start by sketching your design, incorporating the overall dimensions, the legs’ configuration, and the extension mechanism’s placement. This visual guide will help streamline the construction process, reducing the likelihood of errors. Ensure that notes are included on the table’s regular and extended lengths, as well as any unique features such as built-in storage or decorative elements, reinforcing the functionality and beauty of your extension table in your home.
How to Build an Extension Table: Preparing the Lumber
1.Selecting and Cutting Lumber
Choosing high-quality lumber is paramount for the durability and longevity of your extension table. Look for hardwoods such as oak, maple, or walnut for a robust and appealing finish, while softer woods like pine can be more budget-friendly once you’ve selected the right type of wood, measure and cut your pieces for the tabletop, leaves, and frame according to the dimensions outlined in your plans. Ensuring precise cuts will facilitate smoother assembly and result in a more professional-looking finished product.
2.Sanding and Smoothing
After cutting your lumber, sanding is essential to remove any rough edges and surfaces that can hinder assembly or compromise the finish. Begin with coarse sandpaper to smooth out any major imperfections and transition to finer grits for a sleek surface. Ensuring a smooth finish makes assembly easier and enhances the final appearance when the protective coating is applied. Pay attention to the edges of each piece, as these areas will be most visible in the completed table.

3.Constructing the Tabletop
Assembling the main tabletop sections is a critical phase in the construction process. Start by laying out your boards side by side, ensuring that the grain lines and patterns align for a cohesive look. To join the boards securely, apply wood glue along the edges before clamping them together, allowing time for the adhesive to set. Consider using biscuits or dowels for added strength in the joints. Once everything is clamped, double-check for any gaps and ensure that the surface is flat; this will provide a sturdy foundation for the rest of the table.
How to Build an Extension Table: Building the Extension Mechanism
1.Installing Extension Slides
Selecting the right type of extension slides is crucial to facilitate the expansion of your table, as they allow the tabletop to extend smoothly and securely. Common types include mechanical slides, which provide a simple pull-out mechanism, and ball-bearing slides, offering a smoother operation. When choosing the right slide, consider the weight capacity, ease of installation, and compatibility with your table’s design.
Once you have selected your slides, follow these steps for installation: First, measure the placement of the slides on the underside of your table’s frame to ensure they are evenly spaced; mark the mounting holes. Next, drill pilot holes to prevent splitting the wood, then attach the slides using screws, ensuring they are level and securely fastened. Finally, check that the slides operate smoothly before proceeding with the construction of the extension leaves.
2.Constructing Extension Leaves
To create the extension leaves that will seamlessly expand your table, start by measuring the dimensions of the existing tabletop. When installed, the leaves must match the tabletop perfectly in length and width, so accurate measurements must be taken. Cut the lumber for the extension leaves based on these dimensions, ensuring that both leaves will create a flush surface with the main table when positioned.
To maintain the aesthetic continuity, sand down the edges similarly to the main tabletop, achieving a consistent finish. For an added touch, consider using the same type of wood and finish on the leaves as you did on the tabletop to enhance harmony in design and prevent visual jarring.

3.Attaching Leaves to the Extension Mechanism
Once the extension leaves are constructed, securely attaching them to the extension slides is the next step. Begin by aligning the leaves with the slides to ensure they are fitted properly. Once aligned, use compatible hardware such as brackets or L-shaped connectors to attach the leaves to the ends of the extension slides, allowing them to slide in and out freely.
Check the alignment as you secure them; they should move easily without any friction or obstruction. After attaching, pull the leaves out and settle them into place to test the operation. Adjust the positioning if necessary, ensuring that the leaves align perfectly with the tabletop surface and operate smoothly for effortless adjustments. This attention to detail guarantees a functional and elegant extension table that meets your needs and enhances the overall dining experience.
Assembling the Table Frame
Constructing the Table Base
Building the table frame begins with cutting the lumber for the base, which typically includes the long apron pieces and shorter end pieces that connect the legs. Use your detailed plans to ensure accurate measurements and angles to prevent structural weaknesses.
Assemble the frame by joining the apron pieces with the legs using sturdy joinery techniques, such as pocket holes, mortise, and tenon joints, which will add strength. Using a framing square, it’s essential to check for square corners as you go to ensure the frame is balanced and level. Once the frame structure is completed, confirm that it is sturdy enough to support the weight of the tabletop and any additional items that may be placed on it.
Attaching the Tabletop to the Frame
To secure the tabletop, carefully center it on the frame you’ve just assembled. Use clamps to hold the tabletop in place while you drill pilot holes through the tabletop into the aprons below. Attach it with screws, making sure they are adequately spaced to provide even support across the entire surface.
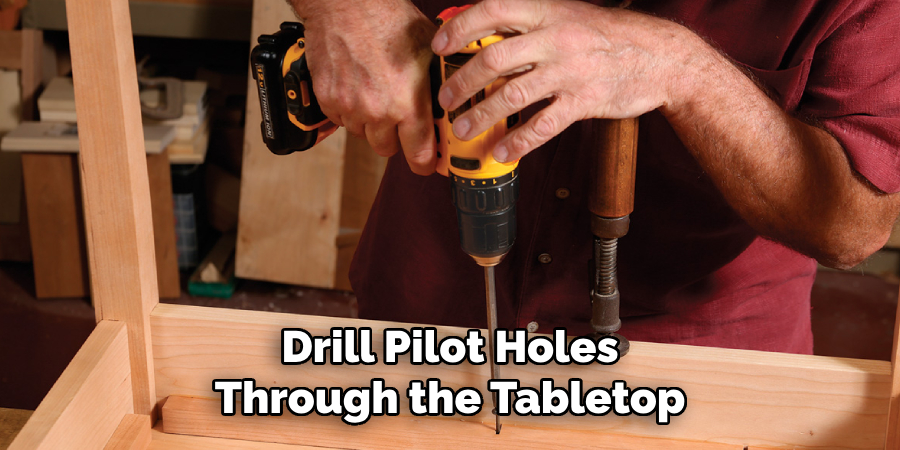
This is crucial for ensuring the tabletop remains stable and does not warp over time. After securing the screws, double-check that the tabletop is perfectly centered and level, adjusting as needed to achieve a flawless finish.
Reinforcing the Structure
If your design allows for it, consider adding additional supports, such as a cross brace or diagonal supports, which can significantly enhance the table’s stability. These reinforcements will help prevent wobbling and ensure the table can withstand movements or pressure without compromising the structure.
Additionally, inspect all joints and connections to make sure they are secure and tight. If necessary, use wood glue at joints for added strength, particularly where the legs meet the apron, as this will contribute to the durability and longevity of your extension table.
Finishing Touches
Sanding and Smoothing
After assembling your extension table, it’s time to focus on finishing touches that will elevate its appearance. Begin by thoroughly sanding the entire surface with progressively finer grit sandpaper, starting with a coarser grit (around 80-120) and moving up to a finer grit (220 or higher).
This process helps eliminate any rough spots, ensures smooth edges, and prepares the surface for the finish application. Pay attention to corners and crevices, making sure all areas are evenly smoothed to create a flawless tabletop.
Applying Finish
Choosing the right finish is crucial for protecting your table and enhancing its natural beauty. Options range from paint, which can provide vibrant color, to stains that accentuate the wood grain or varnishes that offer a durable protective layer. Once you’ve selected your finish, prepare the area by ensuring it’s well-ventilated.
Using a clean brush or cloth, apply the chosen finish in thin, even coats, following the direction of the wood grain. Allow sufficient drying time between coats, usually recommended by the manufacturer, and apply two to three coats for optimal protection and appearance. Finally, enjoy your beautifully crafted extension table, which is now fully ready for use!

Testing and Final Adjustments
With the extension table fully assembled and finished, testing the extension mechanism is essential to ensure it operates smoothly. Begin by pulling the leaves in and out several times to assess their movement; they should glide effortlessly without any sticking or misalignment. If any issues arise, check the alignment of the leaves with the slides and make necessary adjustments. Additionally, inspect the overall stability of the table; ensure all joints are secure and the table does not wobble. If needed, tighten hardware connections or add extra supports to enhance stability, ensuring a reliable and functional extension table.
Conclusion
In this guide on how to build an extension table, we’ve walked through essential steps, including constructing the table base, attaching the tabletop, reinforcing the structure, and applying a beautiful finish. Each phase is crucial in creating a sturdy and elegant piece of furniture tailored to your unique style and space requirements.
We encourage you to take on this rewarding DIY project, as building your own table allows for customization and fosters creativity and a sense of accomplishment. The satisfaction of completing such a project is unmatched, as you get to enjoy the fruits of your labor every time you gather around the table with family or friends. Embrace the challenge, and revel in the joy of creating a beautiful, functional extension table that will serve you for years to come!
About the Author
Adrian Green, a lifelong woodworking enthusiast, shares his passion for the craft through The Woodenify Blog. With a foundation built on years of hands-on experience in his father’s woodworking shop, Adrian is dedicated to helping others learn and grow in the world of DIY woodworking. His approach to woodworking combines creativity, practicality, and a deep appreciation for the art of building with your own hands. Through his blog, he inspires individuals of all skill levels to embark on their own woodworking journeys, creating beautiful, functional pieces of furniture and décor.
Professional Focus
- Specializes in DIY woodworking projects, from furniture to home décor.
- Provides step-by-step guides and practical tutorials for woodworkers of all skill levels.
- Dedicated to helping readers build confidence and skill through easy-to-follow instructions and tips.
- Passionate about fostering a community of makers who can share, learn, and grow together.
Education History
- University of Craft and Design – Bachelor of Fine Arts (BFA) in Woodworking and Furniture Design
- Woodworking Apprenticeships – Extensive hands-on training with skilled craftsmen to refine carpentry and furniture making techniques.
- Online Courses & Masterclasses – Continued education in advanced woodworking techniques, design principles, and specialized tools
Expertise:
- DIY woodworking, carpentry, furniture making, and home décor projects.
- Creating accessible tutorials and guides for beginner to advanced woodworkers.
- Sharing the joys and satisfaction of woodworking, from raw materials to finished products.