Staining a wood fence is essential in maintaining its beauty and durability. A well-stained fence not only enhances the overall appearance of your property but also protects against weathering, rot, and damaging UV rays.
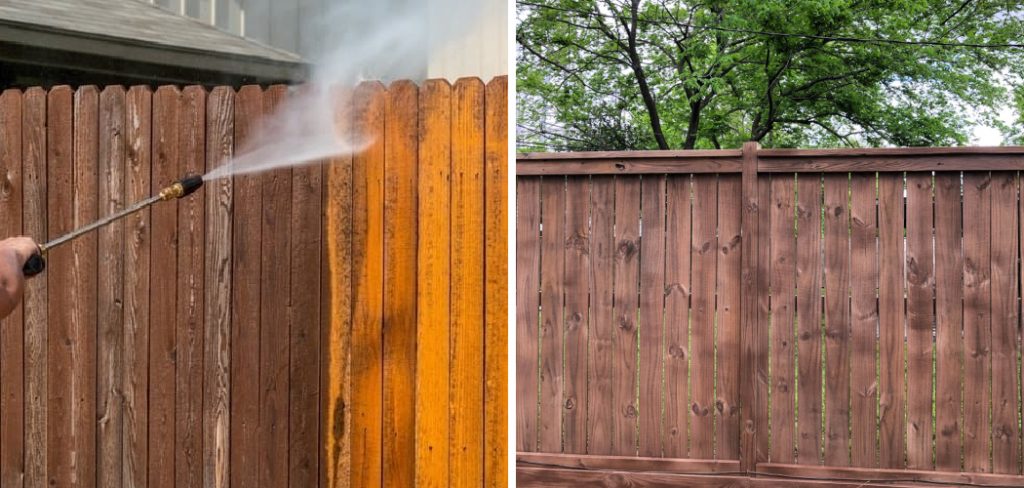
Over time, exposure to the elements can cause wood to weaken, discolor, and lose its charm. Staining helps prolong the lifespan of your fence, prevents unsightly discoloration, and ensures your home maintains its attractive curb appeal.
This guide will provide a comprehensive overview of how to stain a wood fence, covering everything you need to know. We’ll walk you through the entire process, from gathering the right tools and preparing the surface to selecting the best stain and mastering application techniques. By the end of this article, you’ll have all the information needed to protect and beautify your wood fence for years to come.
Benefits of Staining a Wood Fence
Protection Against Elements
Staining your wood fence provides essential protection against the elements. Preventing moisture absorption reduces the risk of wood warping and swelling, which can compromise the structural integrity of your fence. A quality stain shields the wood from harmful UV rays, preventing sun damage and fading that can leave your fence looking aged and weathered.
Improves Aesthetic Appeal
Staining enhances the natural beauty of your wood fence by bringing out its grain and texture. With a wide range of finishes to choose from—clear, semi-transparent, or solid color—you can customize the appearance of your fence to match your style and complement your property. A well-stained fence can elevate the overall look of your outdoor space.
Increases Lifespan
A properly stained fence is more resistant to cracking, splintering, and decay, significantly extending its lifespan. By protecting the wood from the adverse effects of weather and wear, staining ensures your fence remains durable and functional for years to come.
Easy Maintenance
One of the practical advantages of a stained fence is easier maintenance. Stains form a protective layer that simplifies cleaning dirt, grime, and mildew. With routine care, a stained fence maintains its polished appearance and saves you time and money on repairs or replacement.
Choosing the Right Stain and Tools
Selecting the appropriate stain and tools is crucial for achieving the desired look and longevity of your fence. When choosing a wood stain, consider the following options:

Types of Wood Stains
- Transparent: Provides a natural look with minimal pigmentation, highlighting the wood’s inherent beauty.
- Semi-transparent: Balances color and wood-grain visibility, offering a moderate tint with some grain still visible.
- Solid: This delivers heavy pigmentation, fully covering the wood grain for bold color and maximum UV protection.
Additionally, you’ll need to decide between oil-based and water-based stains:
- Oil-based Stains: These penetrate deeper into the wood, offering enhanced durability but requiring longer drying times.
- Water-based Stains: Eco-friendly and quick-drying, these stains are easier to clean with water and ideal for many modern applications.
Tools You’ll Need
Preparation and application are key to a professional finish, so gather the proper tools before starting:
- A power washer or hose and scrub brush are needed to clean the surface.
- Sandpaper or a sander is used for smoothing rough areas.
- Drop cloths and painter’s tape are used to protect the surrounding areas.
- Paintbrush, roller, or sprayer for stain application.
- Gloves, eye protection, and stir sticks for safe and effective handling.
Selecting the right stain and tools sets the foundation for a successful and long-lasting fence staining project.
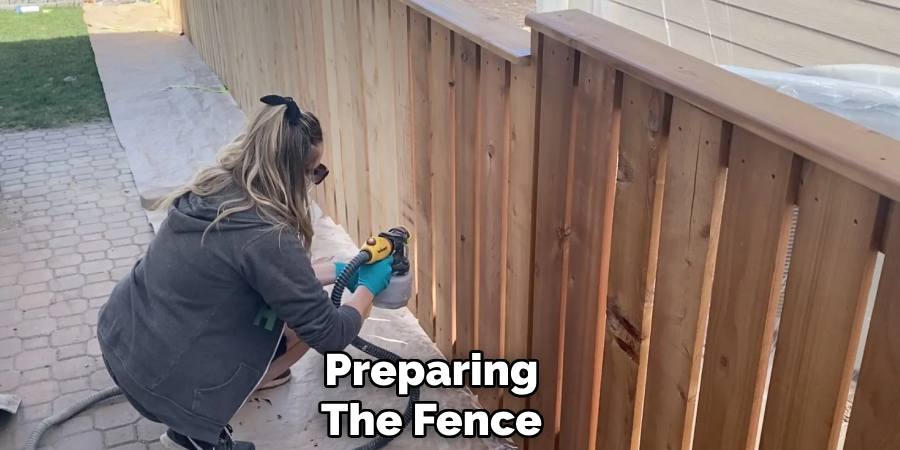
Preparing the Fence
Proper preparation is essential for achieving a smooth and even finish when staining your fence. Follow these steps to ensure the fence is ready for staining:
Step 1: Cleaning the Fence
Begin by removing dirt, mildew, or any remnants of old stains. Use a power washer for an efficient and thorough clean, or opt for a wood cleaner if a power washer is not available. Be sure to cover every inch of the fence, particularly in hard-to-reach areas where debris may accumulate. Once cleaned, allow the fence to dry completely for 24–48 hours to ensure the stain adheres properly.
Step 2: Sanding
Next, identify any rough patches or splinters along the fence’s surface. Use medium-grit sandpaper or a sander to smooth out these imperfections. This step creates a uniform surface, promoting an even application of the stain and enhancing the overall appearance of the finished product.
Step 3: Protecting the Surroundings
To avoid staining unintended areas, lay down drop cloths near plants, pathways, or any nearby structures. Painter’s tape can also be used to cover fixtures or surfaces close to the fence, safeguarding them from accidental splatters or drips. Taking time to protect the surroundings will ensure a clean and professional outcome.
Step 4: Inspect for Repairs
Lastly, carefully inspect the fence for any signs of damage. Replace broken or rotting boards, tighten loose nails or screws, and stabilize any wobbly sections. Repairing these issues before staining will help extend the life of your fence and improve its overall durability. Addressing repairs early sets the stage for a successful staining project.
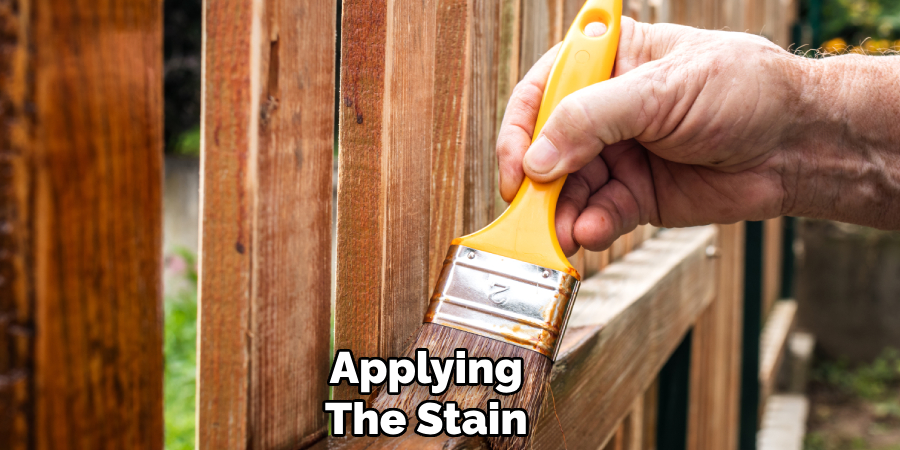
How to Stain a Wood Fence: Applying the Stain
Step 1: Test the Stain
Before staining the entire fence, it’s crucial to test the stain on a small, inconspicuous area. This step allows you to check the color and absorption rate to ensure it matches your expectations. Different wood types and conditions can affect how the stain appears, so taking this precaution helps avoid disappointment or the need for rework.
Step 2: Application Method
Choose the application method that works best for your project. Using a brush provides precision and control, making it ideal for detailed areas, edges, and corners. Conversely, a roller is perfect for covering large sections quickly, but it may not fully reach into cracks or crevices. A sprayer offers fast and even coverage for larger fences or if efficiency is a priority. However, ensure you use the proper technique to avoid overspray and uneven finishes.
Step 3: Apply Even Coats
When you’re ready to stain, work in small sections to ensure an even application. Keep a wet edge as you move along to prevent noticeable streaks or overlaps. Apply the stain consistently and take the time to wipe away any excess to avoid blotching or runs. This attention to detail will result in a smooth and uniform finish.
Step 4: Let It Dry
Once the stain is applied, allow it to dry thoroughly. Most stains require 24–48 hours to dry completely, but always consult the manufacturer’s instructions for the most accurate guidance. Proper drying time is essential for a durable and lasting finish.
Second Coat and Finishing Touches
Deciding If a Second Coat Is Needed
Whether or not to apply a second coat depends on the type of wood, the stain used, and the depth of color you’re aiming for. Lighter woods, such as pine or cedar, or older fences that have absorbed a great deal of the first coat may require a second application to ensure a rich and even finish. If the color appears patchy or lighter than desired after the first coat has dried, a second coat is likely necessary.
Applying the Second Coat
Before applying a second coat, ensure that the first coat is completely dry. This step is crucial to avoid uneven application or smudging. Use the same application method as the first coat—a brush, sprayer, or roller—to maintain consistency and avoid streaks. Apply the stain evenly, taking the same care to wipe away any excess to prevent blotches or drips.
Final Cleanup
After finishing the staining process, clean your tools—brushes, sprayers, or rollers—immediately to prevent the stain from drying on them. Remove any tape or drop cloths used during preparation. Scrutinize the fence for any missed spots, drips, or uneven areas, and touch up as needed to achieve a flawless finish.
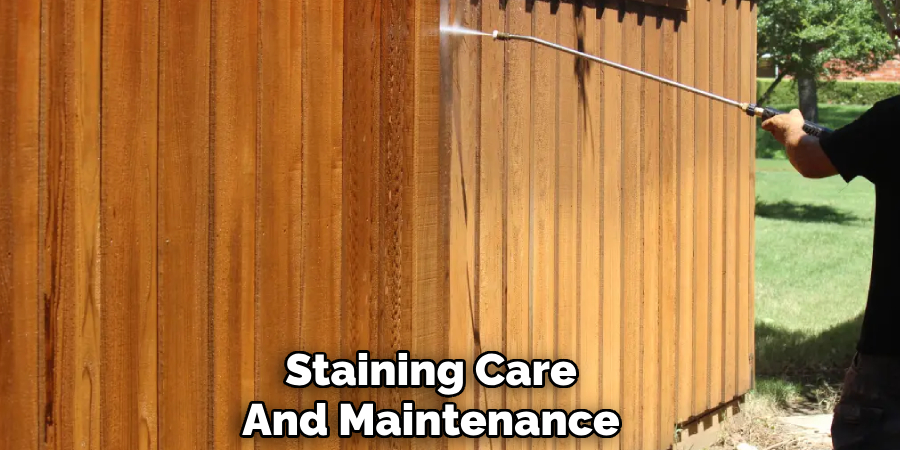
Post-Staining Care and Maintenance
Proper care and maintenance are essential to ensure the longevity and beauty of your newly stained fence.
Curing Time
After staining, allow the fence to cure fully before exposing it to harsh conditions. Avoid heavy rain or touching the surface until the stain is completely set, which may take several days, depending on the type of stain and the weather. This curing period is vital to achieving a durable and even finish.
Routine Maintenance
To keep your fence looking its best, clean off accumulated dirt or mildew at least once a year using a mild detergent and water. Depending on your climate, level of sun exposure, and the stain type, plan to re-stain the fence every 2–5 years to maintain its protective layer and color vibrancy.
Preventative Tips
Take simple preventative measures to extend the life of your fence. Keep plants and shrubs trimmed back to prevent them from trapping moisture or causing abrasions. Avoid sprinkler overspray, as consistent water exposure can lead to uneven wear and discoloration over time. By following these steps, your fence will remain a functional boundary and an aesthetically pleasing feature of your property for years to come.
Wood Fence Ideas
Wood fences come in a variety of styles to complement any home or yard. For a classic and timeless look, consider a traditional picket fence painted white or natural wood tones. If privacy is a priority, opt for a tall board-on-board design that ensures minimal gaps between slats. Horizontal plank fences provide a modern and sleek aesthetic, perfect for contemporary homes.
To add a touch of elegance, incorporate lattice tops or decorative post caps. Mixing wood with other materials like metal or stone can create a unique and sturdy structure. Personalize your fence with stains or paints to match your outdoor décor.
Conclusion
Staining your wood fence boosts its longevity, appearance, and resistance to the elements. By learning how to stain a wood fence properly, you can achieve professional-looking results without hiring a contractor.
The key lies in thoroughly preparing and selecting the right stain for your needs. Regular upkeep will ensure your fence remains visually appealing and well-protected for years to come. Take your time during the prep and staining process, as attention to detail will yield the best outcome. With proper care, your wooden fence will continue to enhance the beauty and value of your property.
About the Author
Adrian Green, a lifelong woodworking enthusiast, shares his passion for the craft through The Woodenify Blog. With a foundation built on years of hands-on experience in his father’s woodworking shop, Adrian is dedicated to helping others learn and grow in the world of DIY woodworking. His approach to woodworking combines creativity, practicality, and a deep appreciation for the art of building with your own hands. Through his blog, he inspires individuals of all skill levels to embark on their own woodworking journeys, creating beautiful, functional pieces of furniture and décor.
Professional Focus
- Specializes in DIY woodworking projects, from furniture to home décor.
- Provides step-by-step guides and practical tutorials for woodworkers of all skill levels.
- Dedicated to helping readers build confidence and skill through easy-to-follow instructions and tips.
- Passionate about fostering a community of makers who can share, learn, and grow together.
Education History
- University of Craft and Design – Bachelor of Fine Arts (BFA) in Woodworking and Furniture Design
- Woodworking Apprenticeships – Extensive hands-on training with skilled craftsmen to refine carpentry and furniture making techniques.
- Online Courses & Masterclasses – Continued education in advanced woodworking techniques, design principles, and specialized tools
Expertise:
- DIY woodworking, carpentry, furniture making, and home décor projects.
- Creating accessible tutorials and guides for beginner to advanced woodworkers.
- Sharing the joys and satisfaction of woodworking, from raw materials to finished products.