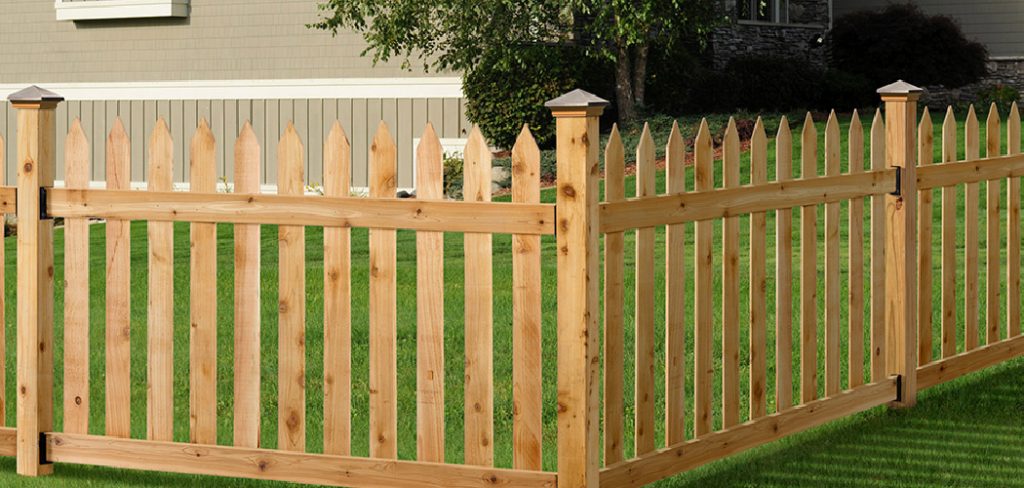
Building your own fence panels can be a cost-effective and rewarding DIY project. Fence panels not only enhance the security and privacy of your property but also add a touch of style to your outdoor space. With the right tools, materials, and a step-by-step approach, you can create sturdy and attractive panels that suit your needs and preferences. This guide will walk you through the process of how to make fence panels, ensuring you achieve professional results.
Planning Your Fence Panel Project
Before you begin building your fence panels, thorough planning is essential to ensure the success of your project. Start by assessing the purpose of your fence—whether it’s for privacy, security, decoration, or a combination of these. Next, measure the area where the fence will be installed and determine the number of panels required. Consider the design and materials that best suit your needs, such as wood for a traditional look or metal for durability. Additionally, check with your local authorities to understand any regulations or permits needed for your fence. Proper planning will save time and prevent potential challenges as you move forward with your project.
Materials and Tools Needed
To build your fence, gather all the necessary materials and tools before starting the project. Common materials include fence panels, posts, post caps, screws, nails, concrete mix (for securing posts), and any additional hardware specific to your chosen design. Depending on the material, you may also require wood preservative, paint, or a rust-resistant coating.
For tools, ensure you have a tape measure, level, post hole digger, hammer or nail gun, power drill, saw, and a shovel. A string line and stakes will help with alignment, while safety gear such as gloves, goggles, and ear protection is essential for safe handling of tools. Preparing everything in advance will help streamline the installation process and make your project more efficient.
10 Methods How to Make Fence Panels
1. Choose the Right Materials for Your Fence Panels

Selecting the appropriate materials is fundamental when making fence panels, as this will determine their longevity and aesthetic appeal. Common choices include pressure-treated wood, cedar, redwood, and composite materials. Pressure-treated wood is durable and resistant to rot, making it a cost-effective option.
Cedar and redwood are naturally resistant to decay and insects, offering a beautiful, rustic look. Composite materials, while more expensive, are maintenance-free and weather-resistant. Your choice should reflect both your budget and the environmental conditions of your location. Investing in quality materials at the start will save you from costly repairs and replacements down the road.
2. Measure and Plan Your Fence Panel Layout
Proper measurement and planning ensure that your fence panels fit seamlessly and provide consistent coverage. Start by determining the total length of your fence and decide on the height based on your needs—whether for privacy, decoration, or security. Typically, panels range from 4 to 8 feet in height and 6 to 8 feet in width. Mark the positions of each post with stakes and measure the distances carefully to maintain uniformity. Accurate planning helps you calculate the number of panels and materials required, preventing errors during construction and reducing material waste.
3. Gather the Necessary Tools and Supplies
Having the right tools at hand simplifies the construction process. Essential tools include a circular saw, drill, screwdriver, tape measure, level, post-hole digger, and a hammer. You’ll also need wood screws, galvanized nails, wood stain or sealant, and safety gear like gloves and goggles. Pre-gathering tools saves time and ensures a smooth workflow. In addition to hardware, you may also want to invest in a miter saw for precise angled cuts and a power sander to smooth rough edges. With proper tools, you’ll achieve a professional-looking finish that is both sturdy and attractive.
4. Build the Fence Panel Frame for Stability

The frame serves as the skeleton of your fence panel, so constructing it robustly is crucial. Use 2×4 pressure-treated lumber to form the frame. Cut the horizontal rails to the desired panel width and the vertical supports to match the height. Assemble the rectangular frame by securing the horizontal pieces between the vertical ones using galvanized wood screws. Reinforce corners with L-brackets for extra stability. Double-check for squareness using a carpenter’s square. A well-constructed frame will prevent warping and sagging, keeping your fence panel structurally sound for years.
5. Attach Vertical Pickets or Boards to the Frame
Vertical pickets are the face of your fence panel, giving it character and functionality. Choose between overlapping, butt-jointed, or spaced pickets based on your privacy preference. Start by laying the frame flat on a level surface. Position the first picket flush with one end of the frame, and use a spacing jig to maintain even gaps if needed. Secure each picket with two screws at the top and bottom rail. Work across the frame methodically to keep spacing consistent. This meticulous attachment process ensures a neat, uniform appearance that enhances your fence’s visual appeal.
6. Reinforce the Fence Panel with Diagonal Bracing
Diagonal bracing significantly increases the panel’s rigidity, preventing it from sagging over time. Cut a 2×4 board to fit diagonally from one corner of the panel to the opposite, forming a supportive crossbeam. Attach it using screws at each intersection with the vertical and horizontal members. This simple yet effective reinforcement technique distributes weight more evenly, maintaining the panel’s shape despite external forces like wind or heavy snow. Including diagonal bracing is especially important for taller or wider panels that are prone to bowing.
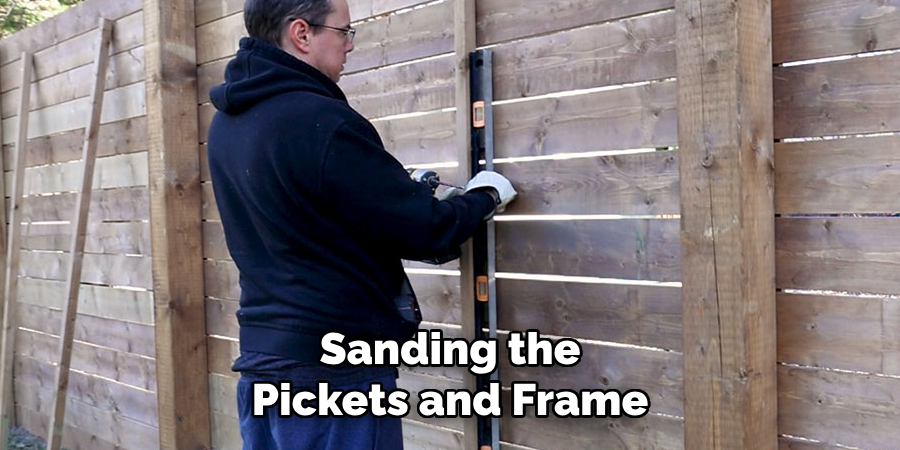
7. Sand and Smooth the Wood Surfaces
Sanding the pickets and frame is vital for both safety and aesthetics. Use a power sander with medium-grit sandpaper (around 120 grit) to smooth rough edges and splinters. Pay special attention to the tops of pickets and areas where cuts were made. Once the initial sanding is complete, switch to finer grit (around 220) to achieve a polished finish. Dust off any residue with a tack cloth before moving on to staining or painting. Smooth surfaces not only look professional but also reduce the risk of splinters, making the fence safer, especially around children and pets.
8. Stain or Paint the Fence Panels for Durability
Protecting your wooden fence from the elements is essential for longevity. Choose an exterior wood stain or paint that contains UV blockers and water-repellent properties. Apply the finish using a brush or sprayer, starting from the top of the panel and working your way down to prevent drips. Allow the first coat to dry thoroughly before applying a second coat for deeper color and protection. Staining highlights the wood grain, while painting offers solid color coverage. Regular maintenance, including re-staining every few years, keeps your fence looking fresh and resilient.
9. Install the Fence Panels Between Posts
Once your panels are ready, it’s time to install them. Dig post holes approximately 2 feet deep and set the posts in concrete, ensuring they are level and aligned. Allow the concrete to cure for 24 hours before attaching the panels. Lift the panel into place between the posts, ensuring it is level. Secure the panel to the posts using stainless steel screws or heavy-duty brackets. Repeat this process for each panel, periodically checking alignment to maintain a straight fence line. Proper installation guarantees stability and longevity, even in harsh weather conditions.
10. Inspect and Maintain Your Finished Fence Regularly
After completing your fence, inspect it periodically for signs of wear, such as loose pickets, rusting screws, or peeling paint. Tighten or replace any loose components and reapply sealant as needed. Clean the panels with a mild detergent and water annually to remove dirt and mildew. Applying a fresh coat of stain every few years will maintain the wood’s integrity and appearance. Consistent maintenance not only preserves the fence’s structural integrity but also keeps it visually appealing, adding value and charm to your property.
Things to Consider When Installing a Fence
When installing a fence, several factors should be taken into account to ensure functionality, durability, and aesthetic appeal. First, determine the primary purpose of the fence—whether it’s for privacy, security, or simply enhancing the property’s appearance. Next, consider the materials. Wood, vinyl, metal, and composite all have distinct benefits and maintenance requirements.

Additionally, always check local zoning laws and HOA regulations to avoid potential conflicts. Marking your property lines accurately is essential to prevent disputes with neighbors. Lastly, think about the design and height of the fence to ensure it complements your home’s style while meeting practical needs.
Conclusion
Building decorative fence panels yourself allows you to customize the design, height, and material quality according to your preferences. By carefully planning, using quality materials, and reinforcing the panels correctly, you can construct a long-lasting, aesthetically pleasing fence that withstands the elements. From creating a stable frame to finishing touches like staining, each step contributes to the final product’s durability and charm. Whether for privacy, security, or purely decorative purposes, your handmade fence will reflect craftsmanship and dedication, adding both function and style to your outdoor space.
About the Author
Adrian Green, a lifelong woodworking enthusiast, shares his passion for the craft through The Woodenify Blog. With a foundation built on years of hands-on experience in his father’s woodworking shop, Adrian is dedicated to helping others learn and grow in the world of DIY woodworking. His approach to woodworking combines creativity, practicality, and a deep appreciation for the art of building with your own hands. Through his blog, he inspires individuals of all skill levels to embark on their own woodworking journeys, creating beautiful, functional pieces of furniture and décor.
Professional Focus
- Specializes in DIY woodworking projects, from furniture to home décor.
- Provides step-by-step guides and practical tutorials for woodworkers of all skill levels.
- Dedicated to helping readers build confidence and skill through easy-to-follow instructions and tips.
- Passionate about fostering a community of makers who can share, learn, and grow together.
Education History
- University of Craft and Design – Bachelor of Fine Arts (BFA) in Woodworking and Furniture Design
- Woodworking Apprenticeships – Extensive hands-on training with skilled craftsmen to refine carpentry and furniture making techniques.
- Online Courses & Masterclasses – Continued education in advanced woodworking techniques, design principles, and specialized tools
Expertise:
- DIY woodworking, carpentry, furniture making, and home décor projects.
- Creating accessible tutorials and guides for beginner to advanced woodworkers.
- Sharing the joys and satisfaction of woodworking, from raw materials to finished products.