Raising turkeys can be a rewarding experience, whether for meat production, egg collection, or simply as a hobby. A well-designed turkey coop is essential to ensure the health, safety, and comfort of your birds.
This guide will walk you through the basics of how to build a turkey coop, covering important aspects such as space requirements, materials, and essential features. By following these steps, you’ll create a suitable environment for your turkeys to thrive.
Planning Your Turkey Coop
Before you start building, careful planning is crucial to ensure your turkey coop meets the needs of your birds. First, consider the number of turkeys you plan to raise, as this will determine the size of the coop. Each turkey requires approximately 4-5 square feet of indoor space and 10-15 square feet of outdoor space in the run.
Next, choose a suitable location that provides protection from extreme weather conditions, predators, and excessive noise. Good drainage and access to sunlight are also essential for the health and hygiene of your flock. Additionally, decide on the materials you want to use for construction—wood, wire mesh, and roofing materials are common choices. Make a list of the necessary tools and supplies, and draw out a floor plan to guide your construction process. Proper planning is key to ensuring your coop is functional, durable, and comfortable for your turkeys.
Tools and Materials Needed
When building a turkey coop, having the right tools and materials is essential to streamline the process and ensure a sturdy structure. Below is a comprehensive list of items you’ll need:
Tools:
- Measuring tape
- Hammer or nail gun
- Saw (hand saw or electric saw)
- Drill with assorted drill bits
- Screwdriver
- Level
- Utility knife
- Wire cutters
- Pencil or marker for marking measurements
Materials:
- Wooden planks or pallets for the frame and walls
- Wire mesh or hardware cloth for ventilation and predator protection
- Roofing materials such as corrugated metal or shingles
- Screws and nails for assembly
- Hinges and latches for doors and access panels
- Weatherproof paint or wood sealant
- Gravel or concrete for the foundation (optional)
- Bedding materials such as straw, wood shavings, or sand
- Feeders and waterers designed for turkeys
By gathering these tools and materials ahead of time, you’ll save time and make the construction process smoother. Prioritize quality and durability to ensure the coop can withstand various environmental conditions and keep your turkeys safe and comfortable.
10 Methods How to Build a Turkey Coop
1. Plan Your Turkey Coop Based on Space Requirements
Before you pick up a hammer, planning the size and layout of your turkey coop is critical. Turkeys are large birds that need significantly more space than chickens. As a general guideline, allocate at least 10 to 15 square feet per turkey inside the coop and 20 to 30 square feet per bird in the outdoor run area.
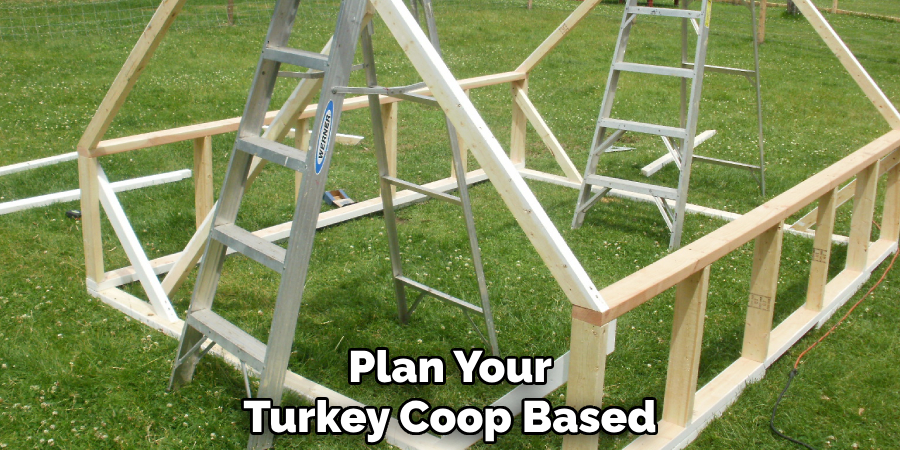
This ample space prevents overcrowding, reduces stress, and lowers the risk of disease spread. Take time to sketch your design, considering the coop footprint, door locations, ventilation points, nesting boxes, and access for feeding and cleaning. A thoughtfully planned layout saves time and materials in the long run.
2. Choose Durable, Weather-Resistant Materials
Turkeys spend much time indoors, so your coop needs to withstand the elements year-round. Select durable materials like pressure-treated lumber or rot-resistant cedar for framing to resist moisture and pests. Exterior-grade plywood or weatherproof siding can form the walls, providing insulation and structural integrity. For the roof, use sturdy materials like asphalt shingles or metal roofing, both effective in shedding rain and snow.
Avoid cheaper wood options prone to rotting or warping. Hardware cloth with ½-inch mesh is recommended for all ventilation and run fencing to keep out predators like raccoons, foxes, and birds of prey, which can easily breach weaker chicken wire.
3. Construct a Raised Floor for Protection and Drainage
A raised floor coop is ideal for turkeys because it keeps them dry and away from wet ground, reducing the risk of disease and wood rot. Elevate the floor about 12 to 18 inches above the ground using concrete blocks, sturdy posts, or a wooden frame foundation. This elevation also deters predators and improves airflow beneath the coop.
Build the floor frame with strong 2×6 or 2×8 lumber, then cover it with thick plywood or planks, ensuring it is solid and level. If you live in a colder climate, consider insulating the floor to keep turkeys warm during winter.
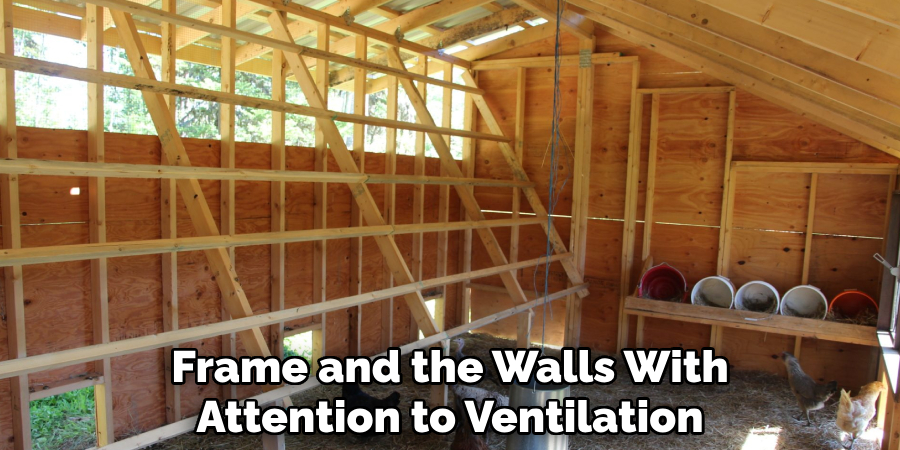
4. Frame and Enclose the Walls With Attention to Ventilation
After constructing the base, build the wall frames using 2×4 studs spaced 16 to 24 inches apart. Once framed, install exterior sheathing such as plywood or oriented strand board (OSB). Turkeys need fresh air but also protection from drafts.
To balance ventilation and weatherproofing, incorporate screened vents near the top of the walls or along the roofline to allow warm, moist air to escape. Cover all vents with hardware cloth to prevent predator entry. Insulate walls if you live in a region with cold winters to maintain a comfortable temperature inside the coop.
5. Design a Sloped Roof to Shed Water and Snow
A properly constructed roof is vital for keeping your turkeys dry and safe. Design the roof with at least a 4:12 pitch (meaning it rises 4 inches for every 12 inches of horizontal run) to efficiently shed rain and snow. Use sturdy rafters spaced about 16 inches apart and cover them with weatherproof plywood or OSB.
Next, install roofing felt as an underlayment and finish with asphalt shingles or metal roofing panels. Overhanging eaves help prevent rain from running down the walls and allow for additional shade in summer. Adding gutters can help divert water away from the coop’s foundation.
6. Build Spacious Nesting Boxes and Sturdy Roosts
Turkeys require comfortable nesting areas to lay their eggs and roosts to sleep on at night. Construct nesting boxes inside the coop, sized around 14 inches by 14 inches and about 12 inches deep. These boxes should be placed off the ground at about 18 inches height and in a quiet, darker part of the coop to encourage usage.
Provide one nesting box for every 4 to 5 hens. For roosts, install thick wooden poles or beams 2 to 3 feet off the floor, wide enough (about 4 inches) for turkeys to perch comfortably. Turkeys prefer wider, sturdier roosts than chickens, so reinforce the supports well.
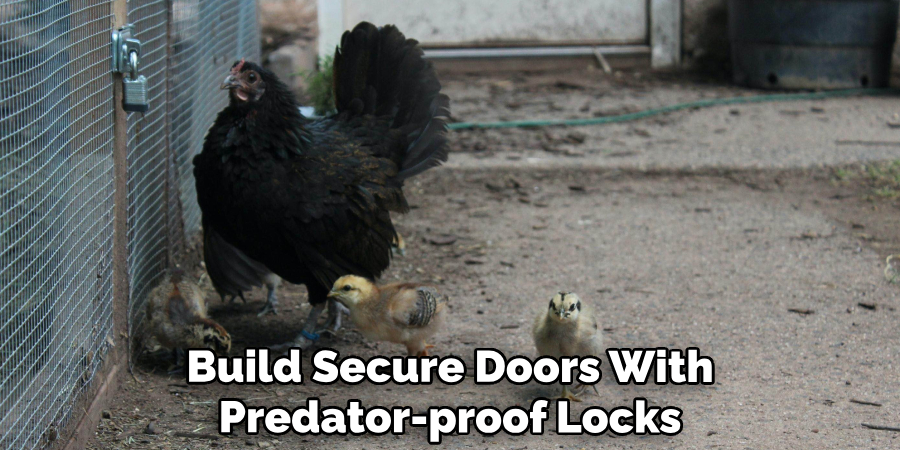
7. Build Secure Doors With Predator-Proof Locks
Doors are the most vulnerable points in your coop, so building them securely is crucial. Use solid wood or plywood doors framed with 2x4s for strength. Heavy-duty hinges and locks, such as slide bolts or carabiner clips, prevent raccoons, foxes, or even curious neighbors from gaining access.
Consider installing double-layer doors or an inner gate to provide an extra security barrier. Make sure doors fit snugly with no gaps where predators could squeeze through, and regularly check locks for wear and tear.
8. Construct a Large Outdoor Run with Strong Fencing
Turkeys need ample outdoor space to forage, exercise, and enjoy sunlight. Build an attached run using pressure-treated posts and hardware cloth fencing with at least ½-inch mesh. The fence should be at least 6 feet high to prevent turkeys from flying out and to deter predators.
To stop digging predators, bury the fencing 12 inches underground or bend it outward in an L shape. Covering the top with wire mesh protects turkeys from aerial predators like hawks. Inside the run, provide shaded areas or shelter to protect birds from harsh sun or rain.
9. Plan for Easy Access and Maintenance
A well-designed coop facilitates daily chores such as feeding, watering, cleaning, and egg collection. Include large access doors or removable panels that allow easy reach into all coop areas. Use durable materials for feeders and waterers that can be cleaned and refilled without hassle.
A removable tray or linoleum flooring under the bedding can simplify cleaning. Position feeders and waterers off the ground to reduce contamination and spillage. Regular cleaning helps prevent diseases and keeps your turkeys healthy and happy.
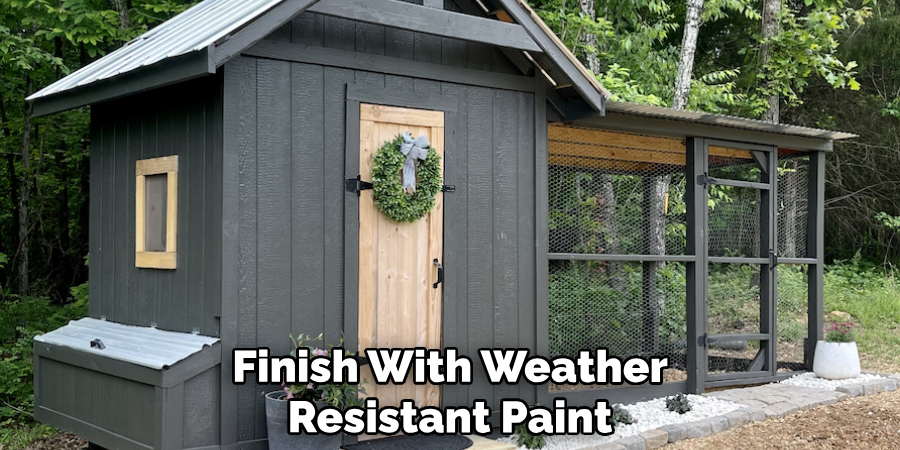
10. Finish with Weather-Resistant Paint or Sealant
To protect your coop from moisture, rot, and insect damage, finish it with a weather-resistant, non-toxic exterior paint or sealant. Use a paint designed for outdoor wood structures or an exterior-grade wood stain with UV protection. Apply at least two coats for maximum durability, allowing adequate drying time between coats.
Regularly inspect your coop for peeling paint or exposed wood and reapply sealant as needed. A well-maintained finish prolongs the life of your coop and ensures your turkeys have a safe and comfortable home year after year.
Conclusion
Building a turkey coop ideas might seem challenging, but by following these detailed methods and taking the time to plan and build carefully, you can create a secure and comfortable environment that keeps your turkeys healthy and happy. From planning and material selection to security and maintenance, each step plays a vital role in your coop’s success.
Your turkeys will thank you with better health and productivity, making the effort well worth it. Thanks for reading our blog post on how to build a turkey coop! We hope you found it helpful and informative.
About the Author
Adrian Green, a lifelong woodworking enthusiast, shares his passion for the craft through The Woodenify Blog. With a foundation built on years of hands-on experience in his father’s woodworking shop, Adrian is dedicated to helping others learn and grow in the world of DIY woodworking. His approach to woodworking combines creativity, practicality, and a deep appreciation for the art of building with your own hands. Through his blog, he inspires individuals of all skill levels to embark on their own woodworking journeys, creating beautiful, functional pieces of furniture and décor.
Professional Focus
- Specializes in DIY woodworking projects, from furniture to home décor.
- Provides step-by-step guides and practical tutorials for woodworkers of all skill levels.
- Dedicated to helping readers build confidence and skill through easy-to-follow instructions and tips.
- Passionate about fostering a community of makers who can share, learn, and grow together.
Education History
- University of Craft and Design – Bachelor of Fine Arts (BFA) in Woodworking and Furniture Design
- Woodworking Apprenticeships – Extensive hands-on training with skilled craftsmen to refine carpentry and furniture making techniques.
- Online Courses & Masterclasses – Continued education in advanced woodworking techniques, design principles, and specialized tools
Expertise:
- DIY woodworking, carpentry, furniture making, and home décor projects.
- Creating accessible tutorials and guides for beginner to advanced woodworkers.
- Sharing the joys and satisfaction of woodworking, from raw materials to finished products.