Are you tired of constantly opening and closing the door for your cat? Installing a cat door can be a simple solution to this problem.
How to cover a cat door may become necessary for various reasons, such as preventing unwanted animals from entering, maintaining better insulation in your home, or when the door is no longer in use. Addressing this issue requires a practical solution that ensures security and preserves the aesthetics of your living space. Additionally, it is important to consider the safety of your cat when covering the door.
Whether you’re looking for a temporary fix or a permanent solution, there are several effective methods to cover a cat door while keeping your home functional and visually appealing. Let’s get into the details.
What Are the Benefits of Covering a Cat Door?
Covering a cat door not only helps to maintain the security and aesthetics of your home, but it also provides several other benefits. These include:
- Prevention of Unwanted Visitors: A covered cat door can prevent unwanted animals or pests from entering your home through the opening. This is especially important if you live in an area with wild animals or have had past incidents with intruders.
- Temperature Control: A covered cat door can help regulate the temperature in your home by preventing drafts during colder months or keeping cool air inside during hotter months. This can result in energy savings and a more comfortable living environment for both humans and cats.
- Noise Reduction: If you live in a noisy neighborhood or have loud neighbors, a covered cat door can help reduce the amount of noise entering your home. This can result in a more peaceful and relaxing living space for you and your feline friend.
- Safety: A covered cat door ideas can provide an added layer of security for your home by preventing potential break-ins through the opening. It also prevents small children or other pets from accidentally wandering outside without supervision.
What Will You Need?
To install a covered cat door, you will need the following materials:
- A covered cat door kit
- A measuring tape
- A pencil
- A jigsaw or similar cutting tool
- Screws and a screwdriver
- Caulking gun and caulk (optional)
10 Easy Steps on How to Cover a Cat Door
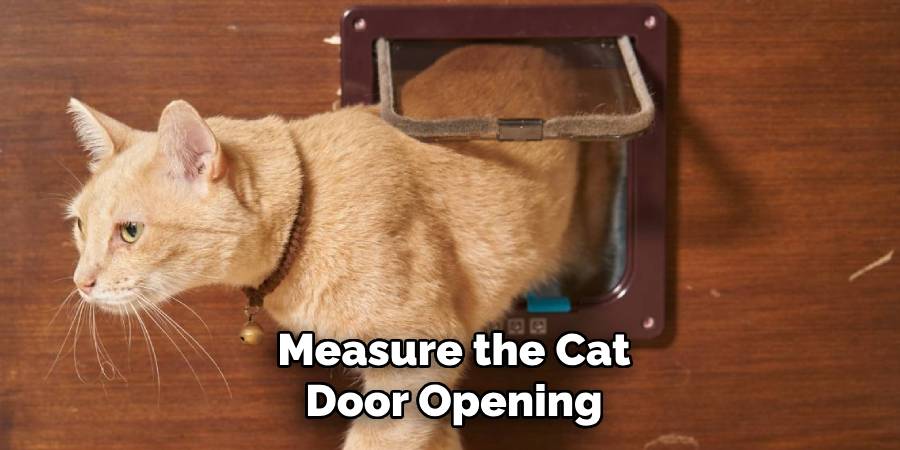
Step 1. Measure the Cat Door Opening
Use a measuring tape to accurately measure the dimensions of the cat door opening. Carefully record both the height and width of the opening to ensure you have the correct measurements. It’s important to be precise to avoid any mismatches with the covered cat door kit, as this could lead to improper installation or reduced effectiveness. If you’re working with an irregular or uniquely shaped opening, take note of any curves or angles that might need special attention.
Step 2. Select a Suitable Cover
Consider the material, size, and durability when selecting a suitable cover for your cat door. The cover should be made of sturdy materials, such as metal or heavy-duty plastic, to withstand wear and tear while providing adequate protection. Ensure the dimensions of the cover match the measurements of your cat door opening for a secure fit. Additionally, look for a design that is easy to install and remove, as well as one that complements the aesthetics of your home. If noise control or insulation is a priority, opt for a cover designed to minimize drafts and outside sounds.
Step 3. Mark the Covering Material
Using a measuring tape, carefully measure the dimensions of your cat door opening, including its height and width. Transfer these measurements onto your chosen covering material using a pencil or marker to ensure accuracy. It’s helpful to use a straightedge or ruler to create clean and precise lines. Double-check your markings before proceeding to the next step to avoid any errors in cutting or fitting the cover. This step is crucial for achieving a snug and secure fit for the finished product.
Step 4. Cut the Material
Using a sharp utility knife, scissors, or a saw—depending on the material you’ve chosen—carefully cut along the lines you marked. Ensure you maintain steady, even pressure while cutting to avoid jagged edges or uneven shapes. If your material is particularly thick or tough, consider using a tool designed specifically for that type of material, such as a jigsaw for wood or heavy-duty shears for metal. Take your time and prioritize safety by wearing protective gloves and working on a stable surface. Once the piece is cut, inspect the edges and sand or smooth them as needed to remove any rough spots. This will help ensure a proper fit and safe handling during installation.

Step 5. Test the Fit
Carefully place the cut piece into its designated position to test the fit. Ensure that it aligns properly with the surrounding components and that there are no gaps, overhangs, or crooked edges. If the piece does not fit perfectly, make minor adjustments by trimming or sanding as needed. Take note of any areas where the material may need to be reshaped for a better fit. Testing the fit before final installation ensures that the finished project will be secure, functional, and visually appealing.
Step 6. Secure the Cover
To secure the cover, begin by aligning it carefully in its final position. Use clamps or temporary fasteners to hold the cover in place to prevent it from shifting during the securing process. Depending on the material and design, use screws, nails, adhesive, or another fastening method recommended for the project. Make sure to evenly distribute fasteners for a firm and stable connection. Check that the cover remains aligned as you work, and make any necessary adjustments to ensure a professional and precise finish.
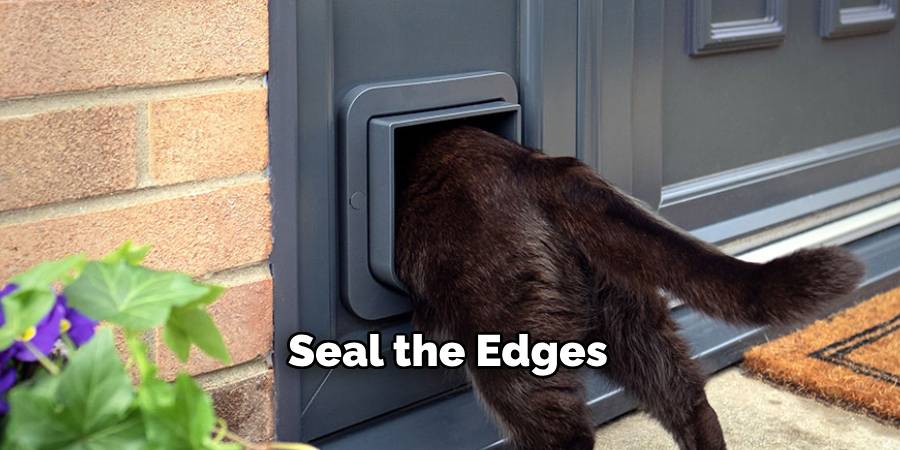
Step 7. Seal the Edges
To ensure a durable and weatherproof result, carefully seal the edges of the cover. Choose a sealant appropriate for the material, such as silicone, acrylic, or polyurethane. Apply the sealant evenly along all the edges using a caulking gun or applicator, ensuring there are no gaps or weak spots. Smooth out the sealant with a tool or your finger, if needed, to create a clean and consistent finish. Allow the sealant to fully cure according to the manufacturer’s instructions before proceeding.
Step 8. Test the Installation
After the sealant has fully cured, carefully inspect the edges to ensure they are securely sealed with no visible gaps. Next, test the installation by gradually applying pressure or stress in the intended use scenario. For examples such as coverings or enclosures, check for proper alignment, stability, and effectiveness of the seal. If applicable, introduce water, air, or another relevant element to ensure that the seal is watertight, airtight, or sufficient for its purpose. Address any detected issues immediately to prevent long-term damage.
Step 9. Clean Up
After completing the installation and testing, ensure that the work area is thoroughly cleaned and organized. Remove any leftover materials, tools, or debris from the site to maintain a tidy and safe environment. Properly dispose of waste according to local regulations, especially if hazardous materials were used during the process. Inspect the area one final time to confirm that no tools or components have been left behind. A clean and orderly workspace not only reflects professionalism but also prevents potential hazards or damage in the future.
Step 10. Inspect Regularly
Regular inspections are essential to maintaining the quality and safety of the completed work. Establish a routine schedule to assess the area or project, ensuring that everything remains in optimal condition. Look for signs of wear, damage, or any changes that may require attention or maintenance. Address issues promptly to prevent them from escalating into larger problems. Keeping a detailed record of inspections can help track progress and identify recurring issues.
By following a regular inspection schedule, you can ensure that your work remains in top shape and meets all necessary standards and regulations.

5 Things You Should Avoid
- Using Unstable Materials
Avoid using flimsy or unstable materials to cover the cat door. Items that are too lightweight or poorly secured can easily be pushed aside by your cat or fall off, defeating the purpose of covering the door.
- Blocking Ventilation Completely
Ensure that covering the cat door doesn’t obstruct necessary airflow. Completely sealing off the door without proper air circulation can create ventilation issues, especially in small spaces.
- Using Harmful Substances
Do not use toxic or harmful adhesives, paints, or sealants near the cat door. Cats are naturally curious and may accidentally ingest these substances, which could be dangerous to their health.
- Damaging the Doorframe
Avoid using screws, nails, or overly strong adhesives that could permanently damage the doorframe. This could make future repairs or removal more challenging and potentially costly.
- Neglecting Aesthetic Appeal
Avoid making the cover look out of place or untidy. Opt for a solution that blends well with the rest of the door or surrounding decor to ensure it doesn’t diminish the overall appearance of your home.
Conclusion
How to cover a cat door effectively requires a balance of functionality, aesthetics, and practicality.
By considering important factors such as the material used, the method of installation, and the visual integration with the surrounding space, you can create a solution that meets your needs without causing damage or appearing unkempt.
Whether you opt for a temporary covering or a more permanent fix, taking the time to plan and execute correctly will ensure both durability and satisfaction.
About the Author
Adrian Green, a lifelong woodworking enthusiast, shares his passion for the craft through The Woodenify Blog. With a foundation built on years of hands-on experience in his father’s woodworking shop, Adrian is dedicated to helping others learn and grow in the world of DIY woodworking. His approach to woodworking combines creativity, practicality, and a deep appreciation for the art of building with your own hands. Through his blog, he inspires individuals of all skill levels to embark on their own woodworking journeys, creating beautiful, functional pieces of furniture and décor.
Professional Focus
- Specializes in DIY woodworking projects, from furniture to home décor.
- Provides step-by-step guides and practical tutorials for woodworkers of all skill levels.
- Dedicated to helping readers build confidence and skill through easy-to-follow instructions and tips.
- Passionate about fostering a community of makers who can share, learn, and grow together.
Education History
- University of Craft and Design – Bachelor of Fine Arts (BFA) in Woodworking and Furniture Design
- Woodworking Apprenticeships – Extensive hands-on training with skilled craftsmen to refine carpentry and furniture making techniques.
- Online Courses & Masterclasses – Continued education in advanced woodworking techniques, design principles, and specialized tools
Expertise:
- DIY woodworking, carpentry, furniture making, and home décor projects.
- Creating accessible tutorials and guides for beginner to advanced woodworkers.
- Sharing the joys and satisfaction of woodworking, from raw materials to finished products.