Are you tired of your crash bar door swinging open in the wind or being easily accessible to intruders? Locking a crash bar door may seem like a complicated task, but with the right tools and techniques, it can be done effectively.

Crash bar doors, also known as panic bars or push bars, are commonly used in commercial buildings, schools, and public spaces to ensure safety and quick egress during an emergency. While these doors are primarily designed to facilitate easy exit, there are situations where securing them is necessary, such as after business hours or during restricted access periods. Properly locking a crash bar door ensures the space remains secure without compromising its functionality.
This guide on how to lock a crash bar door will walk you through the essential steps and considerations for safely locking a crash bar door.
What Are the Benefits of Locking a Crash Bar Door?
Locking a crash bar door provides several benefits, including:
- Enhanced Security: Locking the door prevents unauthorized access and helps deter potential intruders.
- Improved Safety: In addition to its primary function as an emergency exit, locking the crash bar door can prevent accidental openings that could lead to injuries or property damage.
- Compliance with Regulations: Some buildings are required by law to have secured emergency exits during non-business hours. Failing to comply with these regulations could result in fines and penalties.
What Will You Need?
To ensure that your crash bar door is properly locked and secured, you will need the following items:
- Crash Bar Door: This is the main component of the emergency exit. It consists of a metal bar that spans across the width of the door and allows for easy push operation during emergencies.
- Door Lock: This is used to secure the crash bar door design from unauthorized access. There are various types of locks available, such as key locks, keypad locks, and electronic card reader locks.
- Keys or Access Codes: Depending on the type of lock installed, you will need either physical keys or access codes to open and close the crash bar door.
- Maintenance Tools: To ensure the proper functioning of a crash bar door, regular maintenance is required. Tools such as lubricants, screwdrivers, and wrenches may be needed for maintenance and repairs.
- Emergency Signage: In case of an emergency, it is important to have clear and visible signs indicating the location of crash bar doors. This can greatly help in evacuating people quickly and safely.
10 Easy Steps on How to Lock a Crash Bar Door
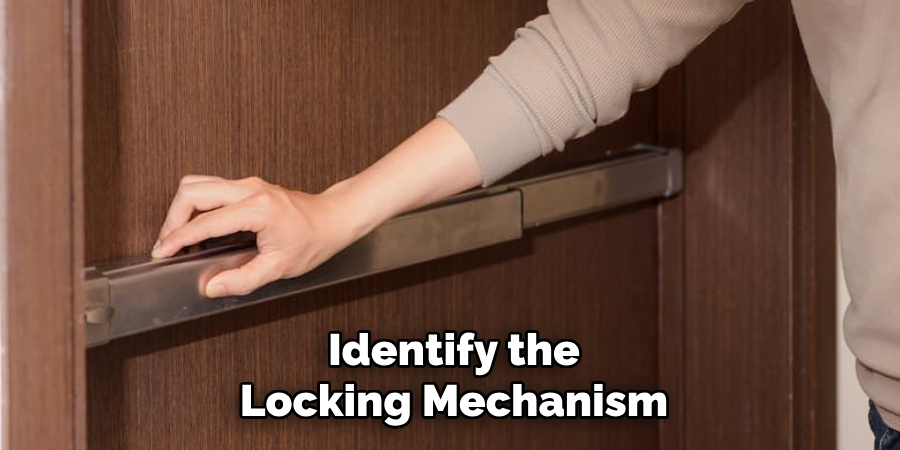
Step 1. Identify the Locking Mechanism:
The first step to locking a crash bar door is to identify the type of locking mechanism it uses. Crash bars are often equipped with different locking systems, such as keyed cylinders, electronic locks, or manual locking pins. Carefully examine the crash bar to determine if it requires a key or another specific tool to engage the lock. If you are unsure about the mechanism, consult the user manual provided by the manufacturer or check for labels or markings near the crash bar that provide guidance. Understanding the type of lock is essential to ensure proper and secure operation.
Step 2. Locate the Key or Tool:
If the crash bar requires a key or specific tool, begin by identifying its storage location. Keys are often stored in designated key boxes, with management or security staff, or attached to a labeled keychain. For tools, check maintenance kits or storage areas where such equipment is typically kept. Ensure you have the correct key or tool by cross-referencing it with the user manual or any provided identification labels. Having the proper item ready will save time and ensure smooth operation during the locking or unlocking process.
Step 3. Engage the Crash Bar:
Locate the crash bar on the door, which is typically positioned horizontally across the width of the door. Ensure the door is properly aligned within its frame before engaging the bar. Firmly press the crash bar with consistent pressure until you hear or feel the locking mechanism disengage. This action allows the door to open smoothly. If resistance is encountered, double-check for any obstructions or ensure the door hardware is functioning correctly. Always release the crash bar after use to return it to its resting position.
Step 4. Activate the Locking System:
To activate the locking system, first ensure the door is fully closed and properly aligned within its frame. Locate the key or locking mechanism designated for the door. Insert the key into the lock cylinder or engage the locking mechanism as required. Turn the key or operate the locking system firmly but gently until you hear or feel the lock engage. Verify that the door is securely locked by testing the handle or crash bar to ensure it does not open. Always double-check the locking system to confirm proper activation for security.
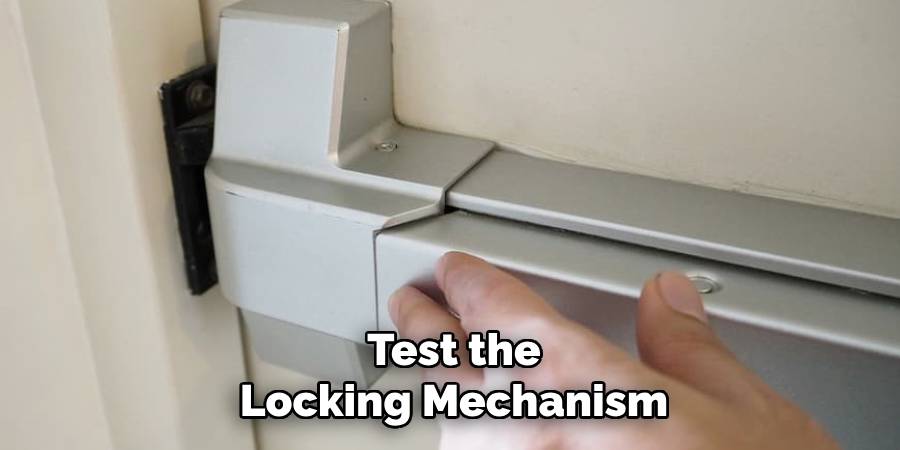
Step 5. Test the Locking Mechanism:
After activating the locking mechanism, it is crucial to test its functionality to ensure the door is securely locked. Gently push or pull on the door to confirm it remains closed and does not move. If the door opens or feels loose, inspect the lock for proper engagement and repeat the locking process if necessary. Additionally, if the lock has a visual indicator or requires a key, verify any visual cues or remove the key to complete the test. A properly tested locking mechanism assures security and peace of mind.
Step 6. Check for Proper Closure:
Ensure the door is fully closed by observing its alignment with the frame. Inspect for any gaps or irregularities that might indicate an incomplete closure. Test the closure by gently pushing against the door without unlocking it; if it feels firmly secured and does not budge, the closure is proper. If the door does not align correctly or does not close firmly, adjust any necessary components, such as hinges or the latch, to achieve proper closure. A securely closed door not only enhances safety but also prevents drafts and potential damage.
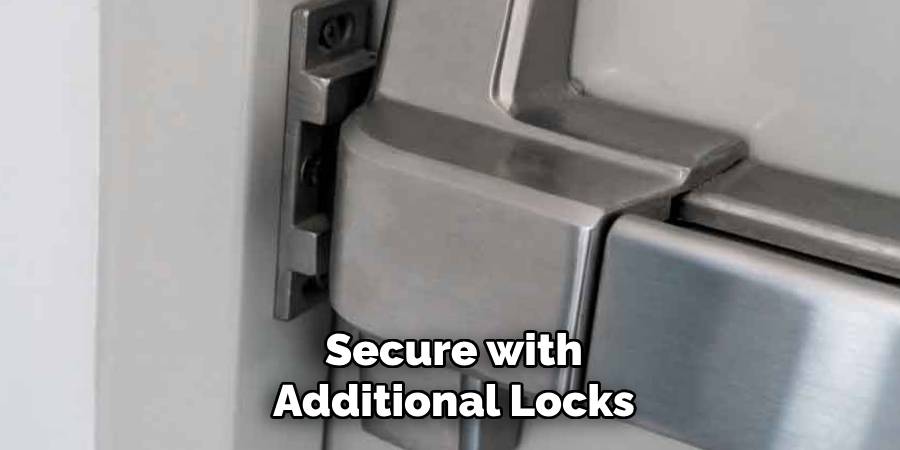
Step 7. Secure with Additional Locks:
For added security, consider installing additional locks such as deadbolts, chain locks, or sliding bolts. These secondary locks provide an extra layer of protection, making it more difficult for unauthorized access. Begin by evaluating the type of door and its material to determine which additional lock is most suitable. Carefully follow the manufacturer’s installation instructions to ensure proper alignment and functionality. Test the lock thoroughly by operating it multiple times to confirm it is secure and easy to use. Adding extra locks not only reinforces your door’s security but also provides enhanced peace of mind.
Step 8. Inspect Emergency Signage:
Emergency signage plays a critical role in guiding individuals to safety during urgent situations. Begin by ensuring all emergency signs are visible and unobstructed. Check that the signs are properly illuminated, especially in low-light conditions, and verify that any battery-powered backup lighting is functional. Inspect the signs for any damage, fading, or wear that could compromise their clarity and replace them as needed. Additionally, confirm that the signage complies with local safety regulations and standards to ensure maximum effectiveness in an emergency.
Step 9. Regular Maintenance:
Regular maintenance is essential to ensure the longevity and reliability of safety equipment and systems. Develop a maintenance schedule that includes routine inspections, testing, and servicing of all emergency equipment, such as fire extinguishers, alarms, and emergency lighting. Keep detailed records of maintenance activities to track compliance and identify potential issues before they escalate. Additionally, train staff on proper maintenance procedures and stay up-to-date with any changes in safety regulations. Proactive maintenance can help prevent equipment failures and ensure a safe environment for everyone.
Step 10. Document the Locking Procedure:
Establishing a clear and detailed locking procedure is essential to security and safety. Begin by outlining the specific steps required to secure all entry points, including doors, windows, and gates. Specify the order of locking, the individuals responsible for carrying out the procedure, and the tools or keys required. Record the times when locks should be secured and any exceptions to the process. Regularly review and update the procedure to account for new equipment, changes in access needs, or updated security policies.

By following these steps, you can ensure a crash bar door is securely locked while maintaining its functionality for emergencies.
5 Things You Should Avoid
- Using Improvised Tools: Avoid using tools or items not specifically designed for locking a crash bar door. Improvised methods can damage the locking mechanism or compromise the door’s integrity.
- Neglecting Regular Maintenance: Failing to maintain the crash bar mechanism can lead to malfunctions, making it difficult to properly lock the door or ensure its emergency functionality.
- Blocking the Crash Bar: Do not obstruct the crash bar with objects or modifications that could prevent it from functioning during an emergency.
- Ignoring Security Guidelines: Skipping steps in the lock procedure or ignoring established security policies can lead to unauthorized access or create safety risks.
- Overtightening Locking Mechanisms: Avoid overtightening any parts of the locking system, as this can damage components or impair the door’s ability to open easily during emergencies.
Conclusion
Learning how to lock a crash bar door is essential for maintaining both security and safety.
By following the correct procedure, adhering to all security guidelines, and avoiding common mistakes such as overtightening or skipping steps, you can ensure that the door functions effectively in its dual role. Regular inspection and maintenance of the locking system are also critical to prevent accidental failures.
When done correctly, locking a crash bar door provides peace of mind, knowing that the environment remains secure without compromising accessibility during emergencies.
About the Author
Adrian Green, a lifelong woodworking enthusiast, shares his passion for the craft through The Woodenify Blog. With a foundation built on years of hands-on experience in his father’s woodworking shop, Adrian is dedicated to helping others learn and grow in the world of DIY woodworking. His approach to woodworking combines creativity, practicality, and a deep appreciation for the art of building with your own hands. Through his blog, he inspires individuals of all skill levels to embark on their own woodworking journeys, creating beautiful, functional pieces of furniture and décor.
Professional Focus
- Specializes in DIY woodworking projects, from furniture to home décor.
- Provides step-by-step guides and practical tutorials for woodworkers of all skill levels.
- Dedicated to helping readers build confidence and skill through easy-to-follow instructions and tips.
- Passionate about fostering a community of makers who can share, learn, and grow together.
Education History
- University of Craft and Design – Bachelor of Fine Arts (BFA) in Woodworking and Furniture Design
- Woodworking Apprenticeships – Extensive hands-on training with skilled craftsmen to refine carpentry and furniture making techniques.
- Online Courses & Masterclasses – Continued education in advanced woodworking techniques, design principles, and specialized tools
Expertise:
- DIY woodworking, carpentry, furniture making, and home décor projects.
- Creating accessible tutorials and guides for beginner to advanced woodworkers.
- Sharing the joys and satisfaction of woodworking, from raw materials to finished products.