Finishing shiplap edges is a crucial step in any shiplap installation project, ensuring a seamless and professional-looking result. Shiplap, with its distinctive overlapping design, offers a timeless and versatile aesthetic that adds character to any space. However, achieving a polished finish along the edges can be challenging without the right techniques. Whether you’re installing shiplap as wall paneling, ceiling cladding, or exterior siding, properly finishing the edges enhances the overall appearance and durability of the installation.
From filling gaps and sanding rough edges to applying trim or caulk, there are various methods to consider. Attention to detail and precision are key to achieving clean and crisp edges that complement the shiplap’s rustic charm. In this guide, we’ll explore effective strategies and expert tips how to finish shiplap edges, empowering DIY enthusiasts and professionals alike to achieve flawless results in their projects.
What is Shiplap?
Shiplap is a type of wooden board typically used in the construction of homes, barns, sheds, and other outdoor structures. Traditionally, it’s known for its rabbet or notch cut into the top and bottom of each board, allowing the pieces to fit together snugly, creating a tight seal. This unique joining method gives shiplap its characteristic appearance, with each board slightly overlapping the one below it, resulting in a distinctive, horizontal pattern that adds both aesthetic appeal and structural integrity to walls and ceilings.
Shiplap’s popularity has surged in recent years, thanks in part to its rustic charm and versatility in both traditional and contemporary designs. It offers a practical and visually appealing solution for interior and exterior finishes and can be painted, stained, or left natural to suit various design preferences.
Understanding Shiplap Edges
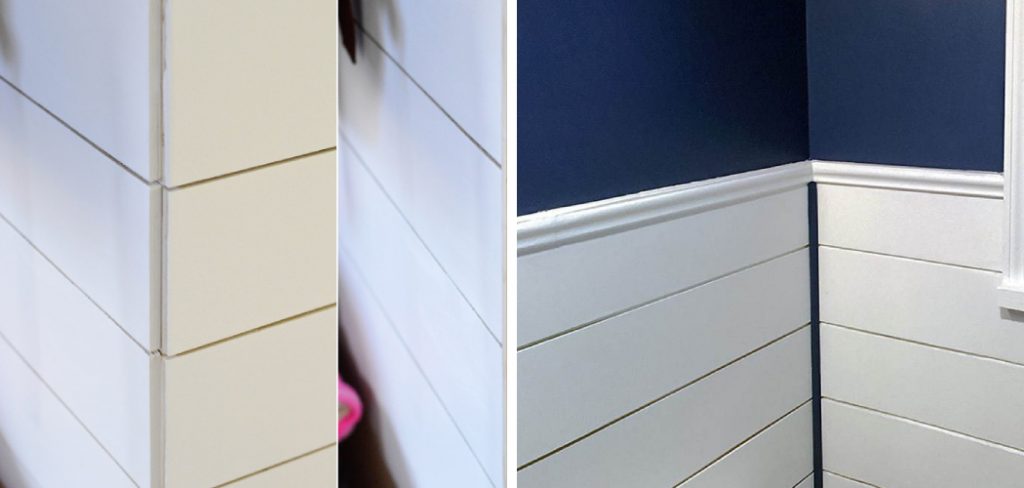
The edges of shiplap play a crucial role in both its installation and overall aesthetic appeal. Typically, the edges can either be rough-sawn or smooth, depending on the finishing preference and the intended style of the space. Shiplap with rough-sawn edges tends to offer a more rustic and textured look, ideal for traditional or farmhouse design schemes. On the other hand, shiplap with smooth edges provides a cleaner, more refined appearance, suitable for modern or minimalistic interiors.
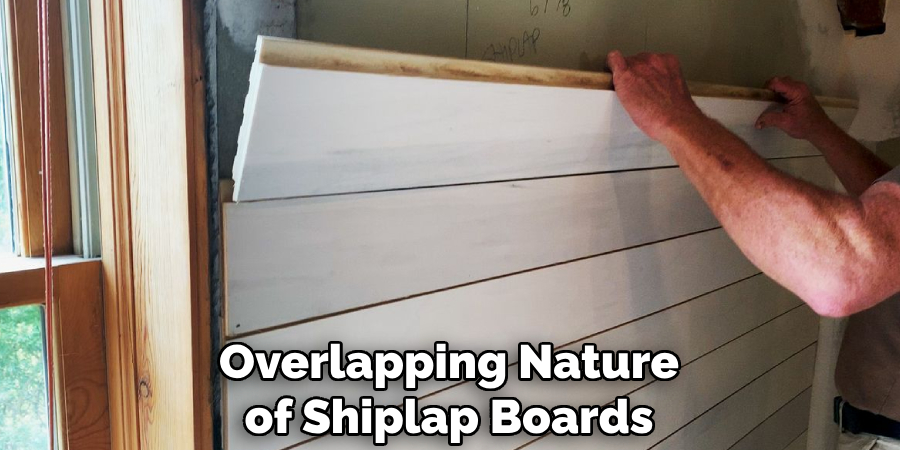
When installing shiplap, understanding the types of edges is essential for achieving the desired fit and finish. The overlapping nature of shiplap boards creates what is known as a “shadow line” between each board, a defining characteristic of the shiplap look. This shadow line can vary in depth and width based on the cut of the edges and how tightly the boards are fitted together.
For exterior installations, the way shiplap edges are treated also impacts the structure’s ability to repel water and withstand environmental elements. Properly finishing and sealing the edges can enhance the durability and longevity of the shiplap, protecting it from moisture and decay. Hence, whether aiming for a specific aesthetic or ensuring the structural integrity of the installation, a comprehensive understanding of shiplap edges is indispensable.
Different Types of Shiplap Edges
When selecting shiplap for a project, the type of edge finishing plays a significant role in the overall style and functional outcome of the install. There are several common types of shiplap edges that cater to different aesthetics and practical considerations:
- Square Edge: Square-edged shiplap boards fit together flush, creating a smooth and uniform surface. This style is perfect for a clean, contemporary look where minimal shadow lines are desired.
- Rabbeted Edge: A rabbeted edge features a cut-out notch along the top and bottom of each board. This design allows for a tight overlap, reducing the visibility of gaps and creating a pronounced shadow line that adds depth and character to the wall.
- Nickel Gap: Often considered a modern take on traditional shiplap, nickel gap boards are milled with a small, consistent space between them, resembling the thickness of a nickel. This gap ensures a uniform shadow line regardless of the natural expansion and contraction of the wood.
- Beveled Edge: Beveled edges are cut at an angle to create a more pronounced overlap effect. This type of edge adds a subtle dimension to the surface, offering a dynamic shadow line that enhances the rustic appeal.
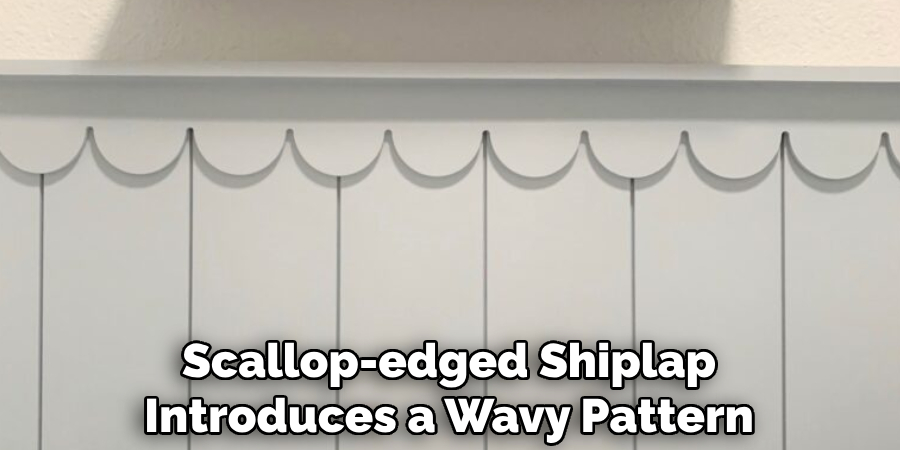
- Scallop Edge: For a more decorative approach, scallop-edged shiplap introduces a wavy pattern along the top and bottom, creating a unique and visually interesting texture that stands out in artistic or whimsical spaces.
Each type of shiplap edge brings its own aesthetic and installation considerations. Understanding the differences can help in making an informed decision that aligns with the desired style and functionality of the space.
The Challenges Associated with Finishing Shiplap Edges
Finishing the edges of shiplap can present several challenges, even for seasoned DIY enthusiasts or professionals. One primary concern is achieving a smooth transition between shiplap ends and the surrounding surfaces, such as corners, door frames, and ceilings. Without meticulous cutting and fitting, the edges may not align properly, leading to gaps or uneven lines that detract from the overall aesthetic.
In addition, different types of shiplap edges require distinct approaches and techniques. For instance, handling rabbeted or beveled edges demands more precision in cutting and alignment compared to square or nickel gap edges, where the focus might be more on the uniformity of spacing.
Another significant challenge is the finishing treatment of the edges themselves. Selecting the right type of sealant or paint that complements the chosen shiplap material and maintains the intended look over time is crucial. Balancing aesthetic considerations with the need for moisture resistance, especially in exterior installations, adds another layer of complexity.
Furthermore, the natural expansion and contraction of wood, a material commonly used for shiplap, pose a challenge in maintaining tight seals and consistent shadow lines around the edges. Seasonal variations in humidity and temperature can lead to gaps expanding or shrinking, affecting both the structural integrity and visual appeal of the shiplap installation.
10 Methods How to Finish Shiplap Edges
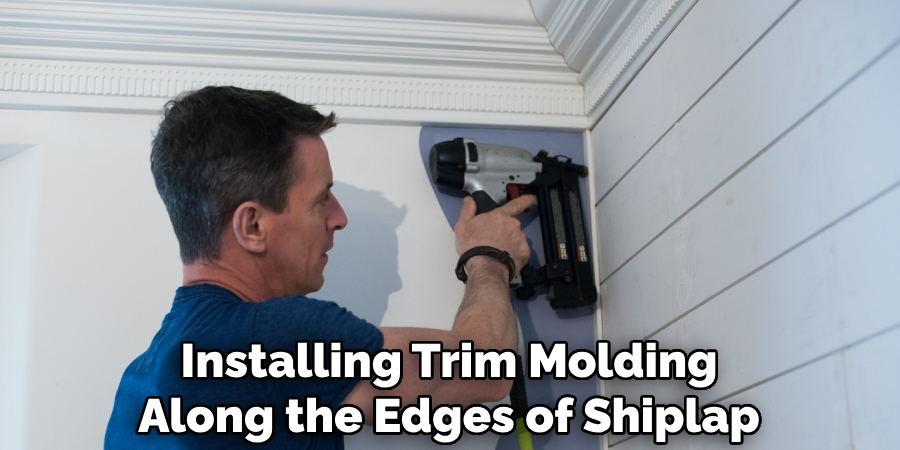
1. Trim Molding:
Installing trim molding along the edges of shiplap panels is a popular method for achieving clean and polished edges. Trim molding, such as quarter round or cove molding, is installed along the perimeter of the shiplap to cover the exposed edges and create a seamless transition between panels. To install trim molding, measure and cut the molding to fit each edge of the shiplap panel, ensuring tight miters at corners. Secure the molding in place with finishing nails or adhesive, making sure it sits flush with the surface of the shiplap. Once installed, caulk any gaps or seams between the molding and the shiplap to create a smooth finish.
2. Routed Edge:
Rounding or beveling the edges of shiplap panels using a router is another method for finishing shiplap edges. This technique creates a decorative profile along the edges of the shiplap, adding visual interest and softening the appearance of the panels. To route the edges of shiplap, use a router fitted with a round-over or chamfer bit to remove the sharp edges. Carefully guide the router along the edges of the shiplap, applying consistent pressure to achieve a uniform profile. Once routed, sand the edges smooth to remove any roughness or imperfections. This method is ideal for achieving a custom look and can be combined with other finishing techniques for added versatility.
3. Beaded Edge:
Creating a beaded edge along the edges of shiplap panels is another decorative finishing option. This technique involves adding a small bead or groove along the edges of the shiplap, giving the panels a subtle detail that enhances their visual appeal. To create a beaded edge, use a router fitted with a beading bit to cut a shallow groove along the edges of the shiplap. Carefully guide the router along the edges, applying consistent pressure to achieve a uniform bead. Once the bead is cut, sand the edges smooth to remove any roughness or imperfections. This method adds texture and dimension to the shiplap panels, making them stand out as a focal point in any space.
4. Wood Filler:
Using wood filler to fill gaps and imperfections along the edges of shiplap panels is a simple and effective method for achieving a smooth and seamless finish. Wood filler is a putty-like substance that can be applied to cracks, knots, and other blemishes in the wood surface. To use wood filler, apply it generously to the edges of the shiplap using a putty knife or spatula, ensuring that it fills any gaps or voids completely.
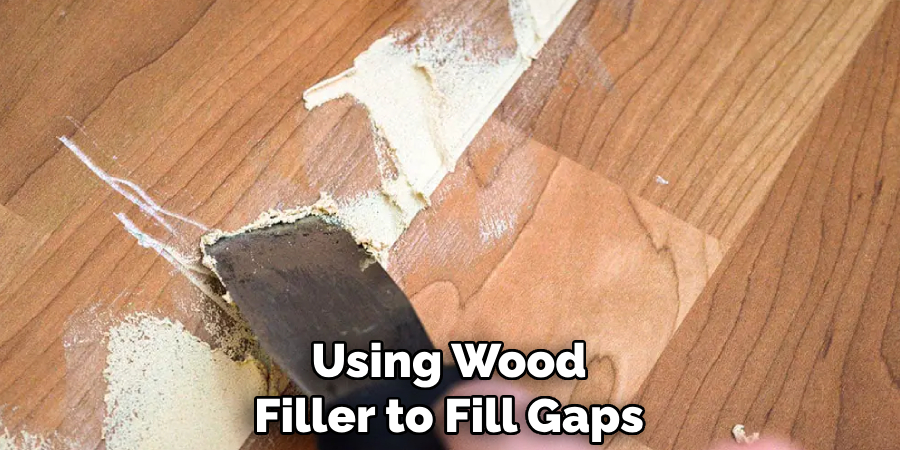
Once applied, smooth the filler with the putty knife or a damp cloth to create a flush surface. Allow the filler to dry completely, then sand the edges smooth to blend them with the surrounding shiplap. This method is ideal for achieving a uniform finish and concealing imperfections in the wood surface.
5. Caulk:
Applying caulk along the edges of shiplap panels is an effective method for sealing gaps and preventing moisture infiltration. Caulk is a flexible sealant that adheres to a variety of surfaces, making it ideal for filling small cracks and seams in shiplap installations. To use caulk, apply a bead of caulk along the edges of the shiplap, ensuring that it fills any gaps or voids completely.
Use a caulking gun to apply the caulk smoothly and evenly, then use a damp cloth or finger to smooth the bead and remove any excess. Once applied, allow the caulk to dry completely before painting or staining the shiplap. Caulk provides a durable and waterproof seal that helps protect the edges of the shiplap from moisture damage and prolongs the life of the installation.
6. End Matching:
End matching is a technique used to create interlocking joints along the edges of shiplap panels, creating a seamless and secure connection between panels. This method involves cutting a tongue and groove profile along the edges of the shiplap, allowing the panels to lock together tightly without the need for additional fasteners. To end match shiplap panels, use a table saw or router equipped with a tongue and groove bit to cut matching profiles along the edges of the panels.
Carefully align the tongue and groove profiles on adjacent panels, then press them together firmly to create a tight joint. End matching provides a strong and durable connection between shiplap panels, ensuring a professional-looking finish that resists movement and separation over time.
7. Sanding:
Sanding the edges of shiplap panels is a simple yet effective method for achieving a smooth and uniform finish. This technique involves using sandpaper or a sanding block to remove any roughness or imperfections along the edges of the panels, creating a clean and polished surface. To sand the edges of shiplap, use fine-grit sandpaper or a sanding block to gently sand the edges in a back-and-forth motion, following the grain of the wood.
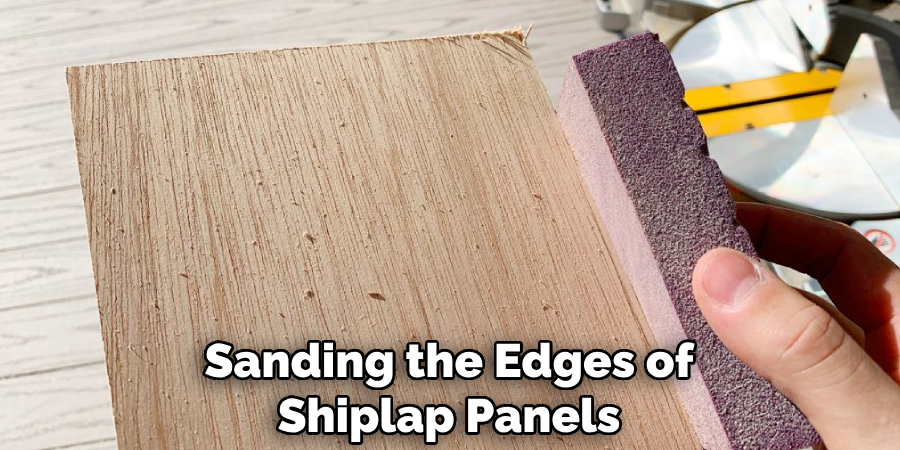
Be careful not to sand too aggressively, as this can remove too much material and create uneven surfaces. Once sanded, wipe the edges clean with a damp cloth to remove any dust or debris. Sanding provides a quick and easy way to achieve a professional-looking finish on shiplap panels.
8. Staining:
Staining the edges of shiplap panels is a finishing technique that enhances the natural beauty of the wood while also providing protection against moisture and wear. To stain the edges of shiplap, apply a wood stain of your choice using a brush or cloth, ensuring even coverage along the edges of the panels.
Allow the stain to penetrate the wood for the recommended amount of time, then wipe away any excess with a clean cloth. Once stained, allow the panels to dry completely before applying a clear topcoat or sealer to protect the finish. Staining adds depth and richness to the edges of shiplap panels, highlighting the grain and character of the wood for a timeless and elegant look.
9. Painting:
Painting the edges of shiplap panels is another finishing option that allows you to customize the appearance of the panels to suit your preferences and decor. To paint the edges of shiplap, apply a coat of primer to the edges using a brush or roller, ensuring even coverage. Once the primer has dried, apply a coat of paint in the color of your choice, again using a brush or roller to achieve smooth and even coverage.
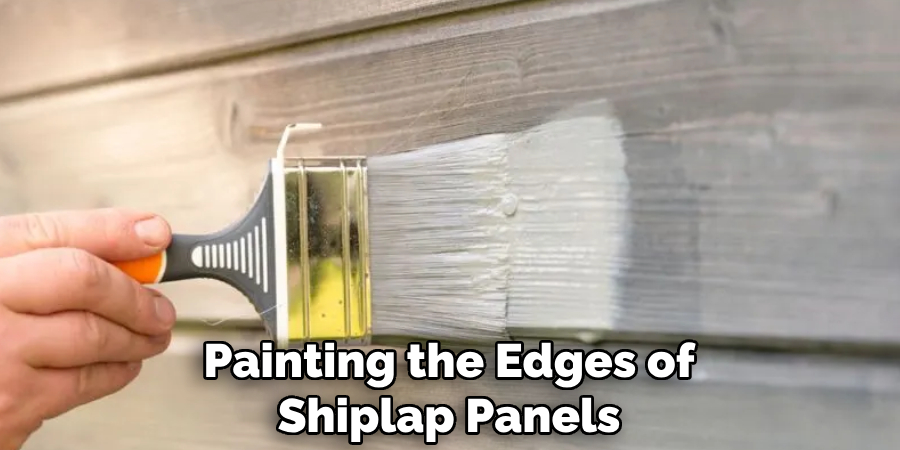
Allow the paint to dry completely between coats, then apply additional coats as needed to achieve the desired level of coverage and finish. Painting provides a durable and customizable finish that can complement any design style or color scheme.
10. Applying Edge Banding:
Edge banding is a thin strip of material, such as wood veneer or PVC, that is applied to the edges of shiplap panels to conceal the exposed edges and create a clean and finished appearance. To apply edge banding, cut the banding to the desired length and apply adhesive to the back side. Carefully align the edge banding with the edges of the shiplap panels, ensuring that it covers the exposed edges completely.
Use a roller or block to press the edge banding firmly in place, then trim any excess banding with a utility knife. Once applied, sand the edges smooth to create a seamless transition between the edge banding and the shiplap panels. Edge banding provides a durable and decorative finish that enhances the appearance of shiplap installations.
Maintenance Tips
To ensure the longevity and enduring appeal of your shiplap installation, regular maintenance is essential. Here are some practical tips to keep your shiplap looking its best:
- Dusting and Cleaning: Regularly dust and clean your shiplap walls to prevent the accumulation of dirt and debris. Use a soft, dry cloth or a lightly dampened one for painted or sealed shiplap to avoid damaging the finish. Avoid using harsh chemical cleaners that could strip the paint or protective coatings.
- Inspect for Damage: Periodically inspect your shiplap for any signs of damage, such as cracks, chips, or moisture penetration. Early detection of these issues can prevent more significant problems down the line.
- Touch-Up Paint or Stain: For painted or stained shiplap, keep some extra paint or stain on hand for touch-ups. Minor scratches or nicks can be quickly corrected with a small brush to maintain the appearance of your walls.
- Sealing Gaps: If you notice any gaps forming between shiplap panels due to house settling or moisture changes, reapply caulk or filler as needed. Ensure the area is clean and dry before applying.
- Climate Control: Try to maintain a stable indoor environment with controlled humidity levels. Extreme fluctuations in temperature and humidity can cause wood to expand and contract, leading to gaps or misalignment in your shiplap panels.

By following these maintenance tips, you can preserve the beauty and integrity of your shiplap walls for years to come.
Conclusion
In conclusion, mastering the art of finishing shiplap edges adds a final touch of polish and character to any interior space. By diligently preparing the edges, selecting the appropriate finishing method, and applying the finish with care, individuals can achieve stunning results that enhance both the appearance and durability of their shiplap walls or ceilings.
Whether opting for paint, stain, clear sealant, or a whitewash or limewash effect, each finishing method offers unique aesthetic possibilities to complement any design style. Additionally, maintaining the finished shiplap edges through regular cleaning and touch-ups ensures their long-lasting beauty and protection against wear and tear. Thanks for reading, and we hope this has given you some inspiration on how to finish shiplap edges!
About the Author
Adrian Green, a lifelong woodworking enthusiast, shares his passion for the craft through The Woodenify Blog. With a foundation built on years of hands-on experience in his father’s woodworking shop, Adrian is dedicated to helping others learn and grow in the world of DIY woodworking. His approach to woodworking combines creativity, practicality, and a deep appreciation for the art of building with your own hands. Through his blog, he inspires individuals of all skill levels to embark on their own woodworking journeys, creating beautiful, functional pieces of furniture and décor.
Professional Focus
- Specializes in DIY woodworking projects, from furniture to home décor.
- Provides step-by-step guides and practical tutorials for woodworkers of all skill levels.
- Dedicated to helping readers build confidence and skill through easy-to-follow instructions and tips.
- Passionate about fostering a community of makers who can share, learn, and grow together.
Education History
- University of Craft and Design – Bachelor of Fine Arts (BFA) in Woodworking and Furniture Design
- Woodworking Apprenticeships – Extensive hands-on training with skilled craftsmen to refine carpentry and furniture making techniques.
- Online Courses & Masterclasses – Continued education in advanced woodworking techniques, design principles, and specialized tools
Expertise:
- DIY woodworking, carpentry, furniture making, and home décor projects.
- Creating accessible tutorials and guides for beginner to advanced woodworkers.
- Sharing the joys and satisfaction of woodworking, from raw materials to finished products.