Building a blessing box is a heartwarming project that brings communities together to support those in need. A blessing box is a small, weatherproof structure filled with non-perishable food items, toiletries, and other essentials that are freely accessible to anyone who may be experiencing hardship.
Whether installed in a neighborhood, church, or community center, these boxes serve as a beacon of hope and compassion, offering assistance to individuals and families facing food insecurity or financial struggles.
In this article, we’ll explore the step-by-step process of how to build a blessing box, from selecting materials and design to stocking it with items and maintaining its contents. By embarking on this meaningful endeavor, you can make a tangible difference in your community by fostering kindness, empathy, and solidarity among neighbors.
What Is a Blessing Box?
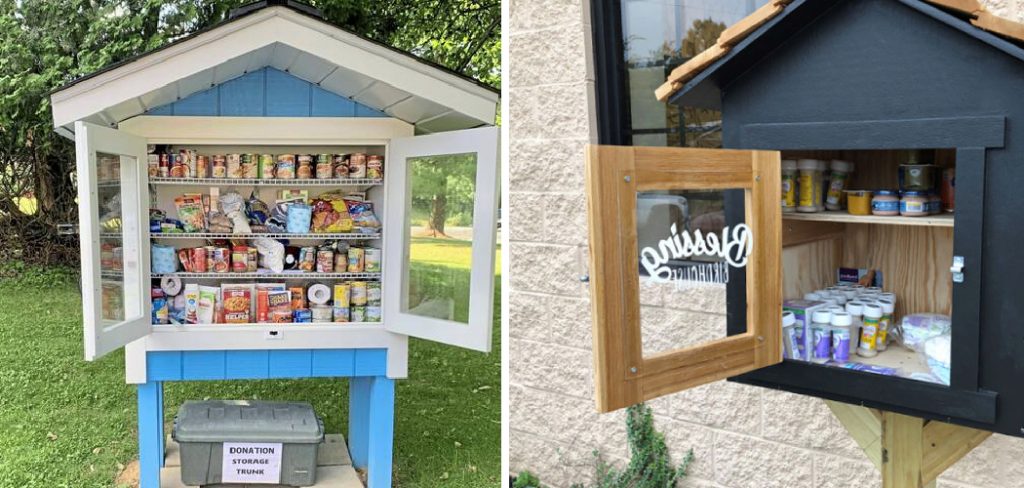
A Blessing Box, also known as a community pantry or little free pantry, is a small, outdoor cabinet that serves as a free resource for individuals and families in need. It operates on a simple yet profound principle: “Take what you need, leave what you can.
” Typically placed in accessible locations within a community, a Blessing Box is stocked with a variety of items, including non-perishable foods, personal care products, and sometimes even books or small toys. The goal is to provide immediate and anonymous access to essentials, reducing the stigma associated with seeking help.
These boxes are not just about the physical nourishment they provide; they are symbols of hope and generosity, encouraging a culture of sharing and caring within communities. By contributing to or using a Blessing Box, members of a community partake in a shared understanding that compassion and mutual support are invaluable.
Benefits of Building a Blessing Box
Building a Blessing Box in your community offers a multitude of benefits, impacting both the donors and the recipients positively. Firstly, it directly addresses the issue of food insecurity and provides immediate relief to individuals and families in need, offering them access to essentials without any barriers.
Furthermore, it fosters a strong sense of community and connectedness. By encouraging residents to ‘take what they need and leave what they can,’ a Blessing Box becomes a physical representation of the community’s collective empathy and kindness.
Additionally, it promotes social responsibility and volunteerism. Involving local organizations, schools, and businesses in the upkeep and stocking of the box can lead to increased awareness about the challenges some community members face, and inspire a collaborative effort towards addressing broader societal issues.
For those who contribute, it serves as an empowering opportunity to give back and make a tangible difference in someone’s life.
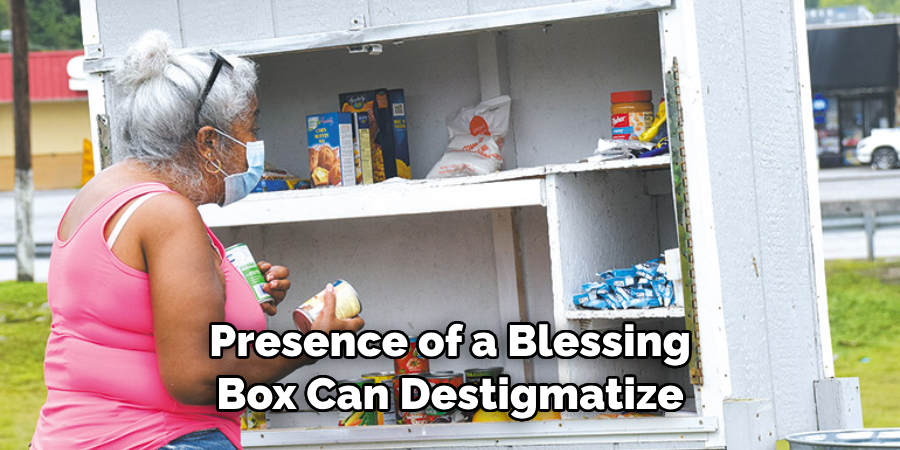
Lastly, the presence of a Blessing Box can destigmatize seeking help. It provides a discreet and judgment-free way for people to access the items they need, at any time, thus preserving their dignity and offering a bit of relief during tough times. In essence, Blessing Boxes help to weave a fabric of generosity and compassion into the community, making it stronger and more resilient in the face of adversity.
Importance of Community Support and Compassion
The importance of community support and compassion cannot be overstated, especially in the context of Blessing Boxes. These initiatives thrive on the premise of communal solidarity, where every member plays a crucial role in sustaining the well-being of one another.
Compassion, at its core, involves empathetic action towards easing the burdens of others, and community support serves as the vehicle for this compassion to come to life. In challenging times, the collective effort to fill and maintain these boxes can be a beacon of hope, demonstrating that no one has to face hardship alone.
Community-driven projects like Blessing Boxes not only address immediate needs but also contribute to building a more empathetic society. They remind us of our shared humanity and the power of small acts of kindness.
Through the simple act of contributing to or benefiting from a Blessing Box, individuals engage in a silent dialogue of support and understanding that transcends socio-economic boundaries. This cycle of giving and receiving fosters a sense of belonging and mutual respect among community members, reinforcing the foundation of a caring and inclusive society.
Choosing a Location for the Blessing Box
Selecting the right location for your Blessing Box is crucial for its success and accessibility. Ideally, the location should be easily accessible to those who might benefit from it the most, while also being visible and accessible to community members willing to donate. Here are some factors to consider when choosing a location:
- Visibility: Choose a spot that is visible to the public to encourage donations and usage. High foot traffic areas such as community centers, parks, or near local businesses can be ideal.

- Accessibility: The location should be accessible 24/7, allowing people to take or leave items according to their own schedule without restrictions. Consider ease of access for individuals with disabilities as well.
- Safety: Ensure the area is well-lit and safe, particularly during the night. This not only protects the donors and recipients but also deters potential vandalism or misuse of the Blessing Box.
- Permission: If you plan to install the Blessing Box on private property, including businesses or church grounds, secure permission from the property owners. For public spaces, you may need to check with local authorities for any regulations or permits required.
- Weather Considerations: Choose a location that offers some protection against the elements, or plan to weatherproof your Blessing Box accordingly. This helps to keep the contents in good condition.
- Community Need: Research and consider the areas in your community that are most in need. Placing the Blessing Box in a location where food insecurity is a known issue can maximize its impact.
By carefully selecting a location that meets these criteria, you ensure that the Blessing Box serves its purpose effectively, reaching those in need while fostering a spirit of generosity within the community.
Obtaining Necessary Materials and Tools
To build a Blessing Box, gathering the right materials and tools is the first step in bringing your community project to life. You will need durable materials that can withstand weather conditions and secure construction to ensure the box remains intact and usable for years to come. Here is a list of suggested materials and tools you might need:
Materials:
- Wood: Choose weather-resistant wood like cedar or treated lumber to construct the body of the box. This will help prevent decay and keep the contents dry.
- Plexiglass: For the door panel, plexiglass is a durable and transparent option, allowing the contents to be visible while protecting them from the elements.
- Hinges and Latch: High-quality hinges and a secure latch are crucial for the door to function properly and to keep the box secure.
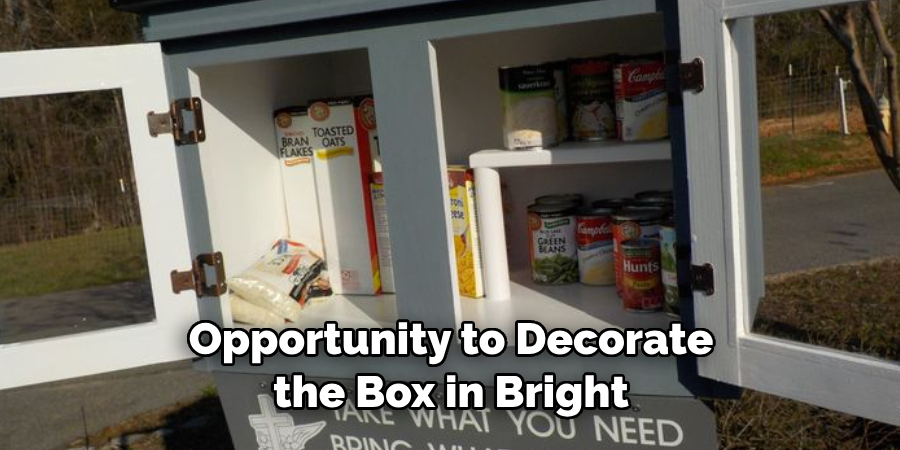
- Paint or Sealant: To protect the wood from weathering, use an outdoor paint or a clear sealant. This will also give you the opportunity to decorate the box in bright, welcoming colors.
- Roofing Material: Consider using shingles or a metal sheet for the roof to ensure the box remains watertight.
- Screws and Nails: Galvanized or stainless steel screws and nails are recommended for assembling the box to prevent rusting.
Tools:
- Saw: A circular saw or handsaw will be needed to cut the wood to the right dimensions.
- Drill: An electric drill is necessary for drilling holes and screwing the pieces together securely.
- Measuring Tape: Precision is key, so a measuring tape is essential for ensuring all parts fit together well.
- Level: Use a level to ensure your Blessing Box is straight and stable.
- Paintbrushes: For applying paint or sealant, have various sizes of brushes for larger surfaces and finer details.
- Safety Gear: Don’t forget protective gear such as gloves, goggles, and a dust mask for your safety during construction.
Gathering these materials and tools before starting will streamline the building process, making it more efficient and enjoyable. Remember, the goal is not just to create a physical structure but to build a beacon of hope and generosity in your community.
10 Methods How to Build a Blessing Box
1. Selecting a Location:
Begin by choosing a suitable location for your blessing box. Ideally, it should be easily accessible to those in need, such as a neighborhood park, community center, or church courtyard. Ensure that the chosen location has enough space to accommodate the box and that it is visible and well-lit to encourage use and donations. You may also want to consider obtaining permission from the property owner or local authorities before installing the box.
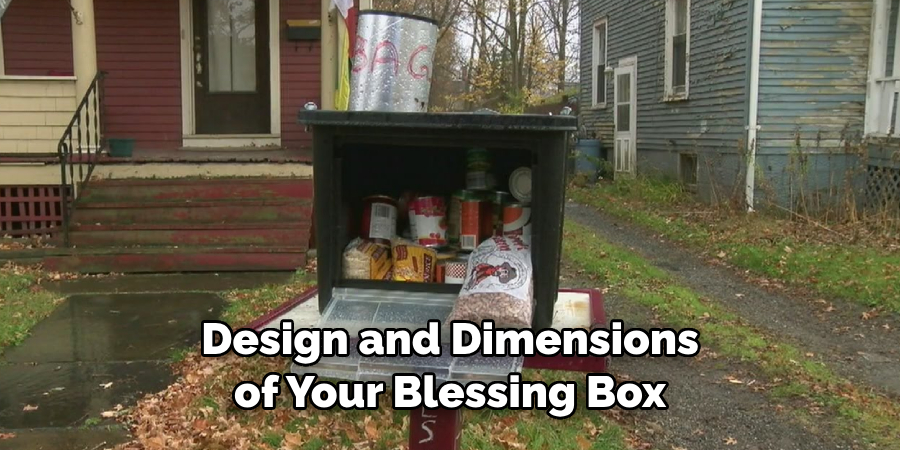
2. Designing the Box:
Decide on the design and dimensions of your blessing box based on available space and community needs. You can opt for a simple wooden box with a hinged door or get creative with custom designs that reflect the character of your community. Consider adding shelves, hooks, or compartments to organize donations. You may also want to incorporate a lock or other security features to protect the items inside.
3. Gathering Materials:
Collect the necessary materials to build the blessing box, including weather-resistant wood or other suitable building materials, screws or nails, hinges, a latch or lock for the door, and any decorative elements or paint for customization. Consider using recycled or reclaimed materials to reduce costs and environmental impact.
You may also want to gather tools such as a hammer, saw, drill, and measuring tape. However, if you don’t have access to these tools, consider reaching out to friends or family members who may be able to lend them to you. Additionally, some hardware stores offer tool rental services for a small fee.
4. Constructing the Box:
Cut the wood or other building materials to the desired dimensions according to your chosen design. Assemble the box frame using screws or nails, ensuring it is sturdy and stable. Attach the sides, back, and top of the box, leaving the front open for the door. Install any additional features such as shelves or compartments.
Finally, sand down any rough edges and apply a coat of paint or stain to finish off the box. You now have a beautiful and functional box that can be used for storage, organization, or as a decorative piece.
5. Adding a Door:
Construct a door for the blessing box using the same materials as the rest of the structure. Attach hinges to one side of the door and the corresponding side of the box, allowing it to swing open and closed freely.
Install a latch or lock to secure the door when not in use, ensuring that it can be easily opened by those in need. Consider adding a small window to the door so that visitors can easily see what items are available inside.
To personalize your blessing box, you can also add a sign or decoration to the door. This could be a simple hand-painted welcome message or a beautiful design representing your community or cause.
A personalized touch like this can make the blessing box feel more inviting and welcoming to those who may need its contents. While adding a door may seem like a small detail, it can make a big difference in terms of functionality and appearance.
6. Weatherproofing the Box:
Apply weatherproofing sealant or paint to the exterior of the blessing box to protect it from the elements. Ensure that all seams, joints, and edges are sealed to prevent moisture from seeping inside. Consider adding a sloped roof or overhang to further protect the contents from rain and snow. If possible, elevate the box off the ground to prevent water from pooling underneath.

Regularly inspect and maintain the weatherproofing to ensure its effectiveness. While weatherproofing can help protect the box, it is still important to periodically check and replace any damaged or weathered items inside.
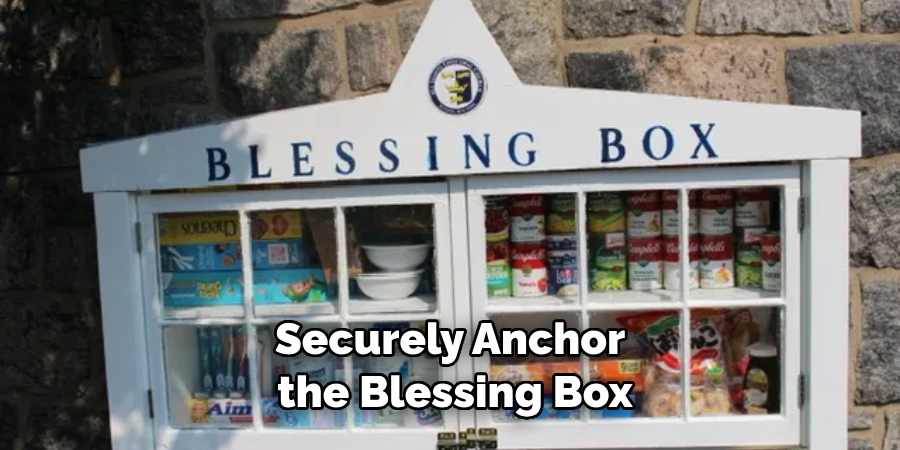
7. Installing the Box:
Securely anchor the blessing box to the ground or a sturdy surface using bolts, stakes, or concrete footings to prevent it from tipping over or being stolen. Place it in the chosen location, ensuring that it is level and stable.
Consider adding signage or decorations to attract attention and encourage use. Having the box in a visible and accessible location will increase its usage and success. Some suggestions for placement include near public transportation stops, in front of community centers or churches, or in areas with high foot traffic.
8. Stocking the Box:
Fill the blessing box with non-perishable food items, toiletries, hygiene products, and other essentials that may be needed by those in need. Encourage community members to donate items regularly and keep the box well-stocked.
Consider including a list of suggested donations or guidelines for use inside the box. Additionally, you can add a sign or note on the box to let people know what it is and who it is for.
Some ideas for items to stock in the blessing box include canned goods, rice, pasta, cereal, peanut butter, crackers, granola bars, toothbrushes, toothpaste, soap, shampoo, feminine hygiene products, and diapers.
You can also include items that cater to specific needs in your community, such as halal or kosher food options, or items for homeless individuals like socks, gloves, and hand warmers. It’s important to regularly check the expiration dates on donated items and replace them if needed.
9. Promoting Awareness:
Spread the word about your blessing box through social media, local newspapers, community bulletin boards, and word of mouth. Share photos and updates about the box’s impact on social media to inspire others to get involved. Consider organizing a grand opening event or ribbon-cutting ceremony to generate excitement and support.
Collaborate with local businesses or organizations to promote the box and its mission. Reach out to local schools or youth groups to involve young people in volunteering and donating to the box.
10. Maintaining the Box:
Regularly check and maintain the blessing box to ensure that it remains in good condition and well-stocked. Clean the box periodically, remove any expired or damaged items, and restock as needed. Engage volunteers from the community to help monitor and maintain the box, fostering a sense of ownership and responsibility.
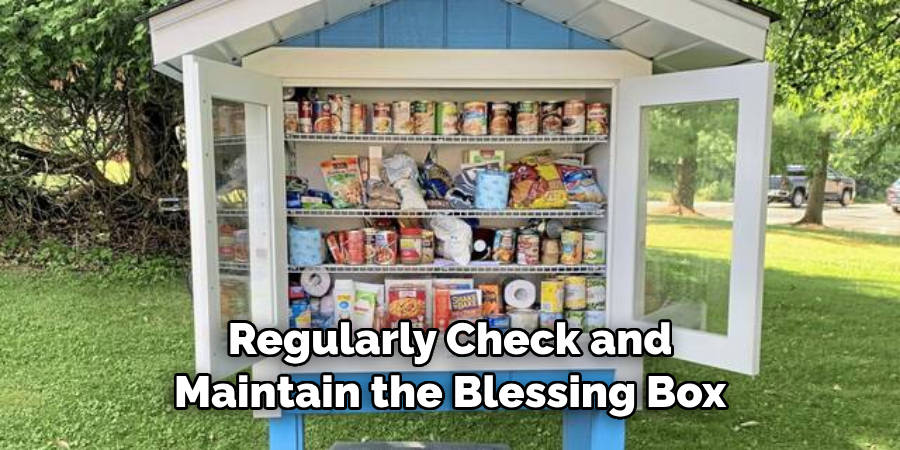
Keep track of the items being donated and distributed, and make sure to rotate them so that the same items are not always at the top. This will ensure that all donations are being utilized and not going to waste. Additionally, it is important to regularly check the box’s location for any potential hazards or obstructions that could hinder its accessibility.
Conclusion
In conclusion, building a blessing box is a tangible way to make a positive impact within your community. By following the steps outlined above, you can create a beacon of hope and support for those facing hardship. From careful planning and construction to thoughtful stocking and promotion, each aspect of building a blessing box contributes to fostering a sense of unity and compassion among neighbors.
As the box becomes a fixture in the community, it serves as a reminder of the power of collective kindness and generosity. Whether you’re providing essential items for those in need or simply spreading goodwill, the blessing box embodies the spirit of empathy and solidarity. Thanks for reading, and we hope this has given you some inspiration on how to build a blessing box!
About the Author
Adrian Green, a lifelong woodworking enthusiast, shares his passion for the craft through The Woodenify Blog. With a foundation built on years of hands-on experience in his father’s woodworking shop, Adrian is dedicated to helping others learn and grow in the world of DIY woodworking. His approach to woodworking combines creativity, practicality, and a deep appreciation for the art of building with your own hands. Through his blog, he inspires individuals of all skill levels to embark on their own woodworking journeys, creating beautiful, functional pieces of furniture and décor.
Professional Focus
- Specializes in DIY woodworking projects, from furniture to home décor.
- Provides step-by-step guides and practical tutorials for woodworkers of all skill levels.
- Dedicated to helping readers build confidence and skill through easy-to-follow instructions and tips.
- Passionate about fostering a community of makers who can share, learn, and grow together.
Education History
- University of Craft and Design – Bachelor of Fine Arts (BFA) in Woodworking and Furniture Design
- Woodworking Apprenticeships – Extensive hands-on training with skilled craftsmen to refine carpentry and furniture making techniques.
- Online Courses & Masterclasses – Continued education in advanced woodworking techniques, design principles, and specialized tools
Expertise:
- DIY woodworking, carpentry, furniture making, and home décor projects.
- Creating accessible tutorials and guides for beginner to advanced woodworkers.
- Sharing the joys and satisfaction of woodworking, from raw materials to finished products.