Are you looking for a fun and creative activity to do with your family? Painting wooden eggs is a great way to spend quality time together and unleash your creativity.
Painting wooden eggs is a delightful and creative activity for children and adults. Whether you’re preparing for a festive occasion like Easter or simply looking for a fun craft project, painting wooden eggs allows you to express your creativity and create beautiful, personalized decorations.
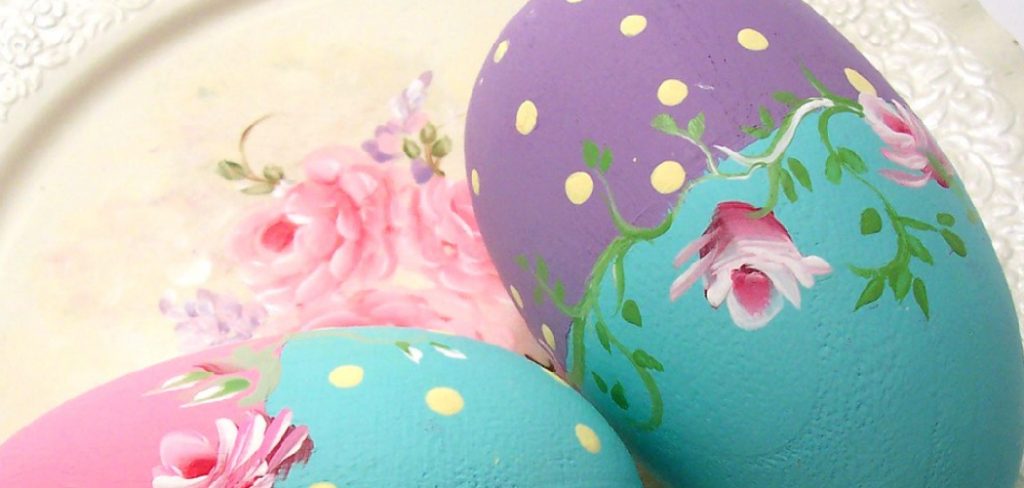
This guide will take you through the essential steps and tips for how to paint wooden eggs, ensuring that your finished pieces are vibrant and durable. From gathering the right materials to applying the final touches, we’ll cover everything you need to know to make your painted eggs a stunning addition to your home décor.
What are the Benefits of Painting Wooden Eggs?
There are several benefits to painting wooden eggs beyond just being a fun activity.
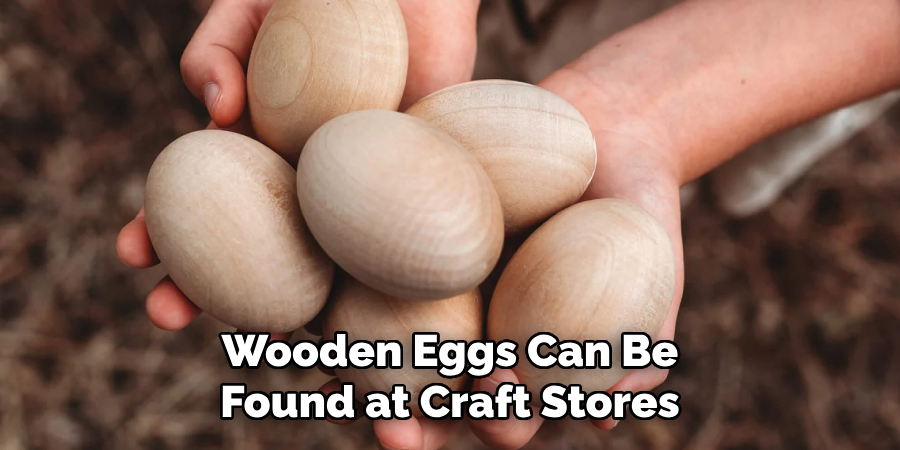
- Cost-effective: Painting wooden eggs is a budget-friendly way to add some festive decorations to your home. Wooden eggs can be found at craft stores and online for a fraction of the price of real eggs.
- Eco-friendly: Instead of wasting and discarding real eggs, painting wooden eggs allows you to reuse them year after year.
- Customizable: With wooden eggs, you have a blank canvas to unleash your creativity and create unique designs that reflect your personal style.
- Versatile: Painted wooden eggs can be used as decorations for various occasions, such as Easter, springtime, or even year-round home décor.
- Great for all Ages: Painting wooden eggs is an enjoyable activity for people of all ages, making it an excellent way to bond with your family and friends.
These benefits make painting wooden eggs a popular and enjoyable activity for many, so let’s start with how to do it!
What You Will Need
Before you begin painting, ensure you have all the necessary materials. Here’s a list of items you’ll need:
- Wooden Eggs: As mentioned before, wooden eggs can be found at craft stores or online. They come in different sizes and shapes, so choose the ones that appeal to you.
- Acrylic Paint: This type of paint is ideal for painting wooden eggs as it dries quickly and adheres well to wood surfaces. You can find acrylic paints in various colors at any craft store.
- Paintbrushes: Make sure you have a selection of different-sized paintbrushes on hand to create various designs and effects.
- Palette or Plate: Use a palette or plate to mix and blend your paint colors.
- Protective Covering: To avoid any mess, cover your work surface with newspaper or an old tablecloth.
- Optional Materials: To add some extra flair to your painted eggs, you can also use other decorative items like glitter, sequins, stickers, or ribbons.
Now that you have all your materials ready let’s dive into the step-by-step process of painting wooden eggs.
10 Easy Steps on How to Paint Wooden Eggs
Step 1. Prepare the Eggs:
Begin by making sure your wooden eggs are clean and smooth. If you notice any rough spots or splinters, gently sand them down with fine-grit sandpaper. This will ensure that the paint adheres evenly and smoothly to the surface. After sanding, wipe the eggs with a damp cloth to remove any dust or residue, and let them dry completely.
Step 2. Prime the Eggs:
Priming your wooden eggs is an important step that ensures the paint adheres well and the colors appear vibrant and true. Choose a white or light-colored acrylic paint or gesso to prime the eggs. Apply a thin, even coat of the primer to each egg using a medium-sized paintbrush.
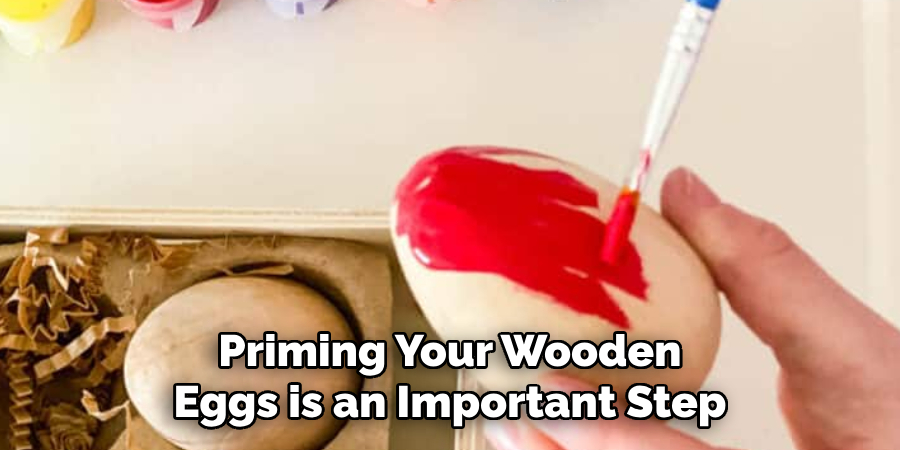
Hold the egg at the base with one hand and rotate it as you paint to cover the entire surface. Ensure to avoid drips or thick areas, as these can create uneven textures. Place the eggs on a drying rack or stand them up in an egg carton to dry thoroughly. Allow the primer to dry completely before proceeding to the next step. This usually takes about 30 minutes to an hour, but always refer to the manufacturer’s instructions on the drying time. If you notice any areas of the egg where the wood grain is still visible, you can apply a second coat of primer for better coverage. You can start painting your base colors once the eggs are fully primed and dry.
Step 3. Paint the Base Colors:
With your eggs primed and ready, it’s time to apply the base colors. Select the colors you want for your base and pour a small amount onto your palette or plate. Apply a thin, even layer of paint to each egg using a clean, medium-sized paintbrush. Like the priming process, hold the egg at the base and gently rotate it to cover the entire surface.
To achieve a smooth and consistent finish, avoid overloading your brush with paint and apply several thin coats rather than one thick coat. Allow each coat to dry completely before applying the next one. The drying time can vary based on the type of acrylic paint you are using, so follow the manufacturer’s instructions. Typically, each coat takes around 20-30 minutes to dry. Once the base color is fully dry and opaque, you can proceed to add designs and decorative elements to your eggs.
Step 4. Add Designs and Details:
Now that the base colors are dry, it’s time to get creative with your designs. Add patterns, shapes, and details to your eggs using smaller paintbrushes. You can experiment with various techniques like dots, stripes, flowers, or even intricate geometric patterns. If you are unsure about freehand painting, you can use stencils or lightly draw your design on the egg with a pencil before painting.

For fine details, consider using a fine-tipped brush or even a toothpick. Take your time and work slowly to ensure your designs are precise and neat. It can be helpful to sketch out your ideas on paper beforehand to get a clear vision of what you want to achieve. Allow each layer of paint to dry before adding more details to avoid smudging or blending colors unintentionally.
Remember, there’s no right or wrong way to design your eggs—let your creativity flow and have fun with the process!
Step 5. Add Embellishments:
Once you’re satisfied with the painted designs, it’s time to add any additional embellishments to make your wooden eggs truly unique. Consider using items like glitter, sequins, stickers, or ribbons to enhance the visual appeal of your eggs. To apply glitter, use a small brush to paint a thin layer of craft glue onto the areas where you want the glitter to adhere, then sprinkle the glitter over the glue.
Make sure to shake off any excess glitter once the glue is dry. For sequins or stickers, a small drop of glue can often do the trick, providing an extra touch of sparkle to your design. Ribbons can be tied around the eggs or glued on for a finishing touch. Allow all embellishments to dry thoroughly before moving on to the next step. This step is about adding that extra bit of flair, so feel free to be as subtle or extravagant as you wish.
Step 6. Seal the Eggs:
To protect your beautifully painted and embellished wooden eggs, it’s essential to seal them with a clear varnish or sealant. This will preserve the paint and decorations and give the eggs a polished, finished look. Choose a clear acrylic sealer, available in matte, satin, or glossy finishes, depending on your preference.
Apply a thin, even coat of the sealer using a clean brush. Hold the egg at the base and rotate it gently to cover the entire surface, avoiding drips or thick areas. Let the first coat dry completely, following the manufacturer’s instructions, which typically takes about 20-30 minutes. For added durability and a smoother finish, you can apply a second coat once the first one is dry. Allow the eggs to dry thoroughly after sealing before handling or displaying them.

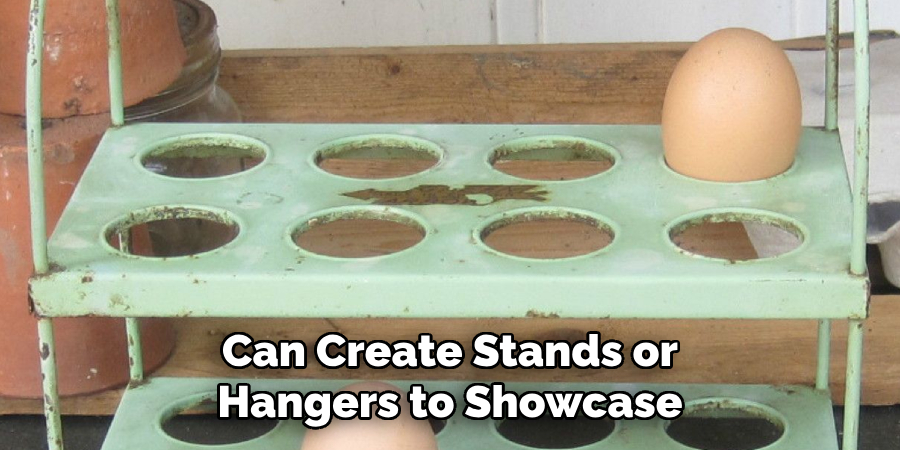
Step 7. Create Stands or Hangers:
Now that your eggs are beautifully decorated and sealed, it’s time to think about how you’ll display them. You can create stands or hangers to showcase your art. For stands, you can use small wooden spools, corks, or even fashion stands out of clay. Simply securely glue the egg’s base to the stand and allow it to dry completely.
If you prefer to hang your eggs, use a small screw eye hook, which can be twisted into the top of the egg. Be gentle to avoid cracking the wood. Once the hook is securely in place, thread a piece of ribbon or string through the hook and tie a loop. This allows you to hang your eggs from branches, hooks, or anywhere you desire. Whether on stands or as hanging ornaments, displaying your decorated eggs will allow you and others to enjoy your craftsmanship fully.
Step 8. Display and Enjoy:
With your stands or hangers in place, your beautifully crafted wooden eggs are now ready to be displayed. Arrange them as a centerpiece on your dining table, place them on shelves, or hang them in a sunny window to catch the light. These decorated eggs make fantastic seasonal decorations, gifts, or even family heirlooms.
Take time to admire your work and share the joy of your creative process with friends and family. Displaying your eggs in different settings can add a unique touch to various occasions, whether it’s a festive holiday, a special gathering, or simply a bright addition to your everyday decor. Enjoy the compliments and the satisfaction of creating something unique and personal.
Step 9. Maintenance and Storage:
Proper maintenance and storage of your decorated wooden eggs will ensure they remain beautiful for years to come. Dust them regularly with a soft, dry cloth to keep them pristine. Avoid exposing the eggs to direct sunlight for extended periods, which can cause colors to fade. If you need to clean the eggs, use a slightly damp cloth and gently wipe the surface, not disturbing any embellishments.
When storing your eggs, wrap each individually in tissue paper or bubble wrap to protect them from scratches and impacts. Place them in a sturdy box and store them in a cool, dry place away from moisture and heat sources.
Step 10. Create New Designs:
Once you’ve mastered the basic painting techniques and embellishing wooden eggs, consider experimenting with new designs and styles. You can try different themes for various holidays and occasions, such as Christmas or birthdays. Don’t hesitate to explore new materials as well, like metallic paints, fabric scraps, or natural elements such as dried flowers and leaves.

Try your hand at more advanced techniques, like decoupage or wood burning, to add intricate details and textures to your eggs. Keep pushing your creative boundaries and see what new and exciting designs you can create. The process of creating and innovating will keep the activity fresh and enjoyable for years to come.
By following these steps and adding your own personal touch, you can create stunning wooden eggs that will be cherished for years.
5 Additional Tips and Tricks
- Prime the Surface: Before applying paint, prime the wooden egg with a white or neutral primer. This helps the paint adhere better and makes your colors more vibrant.
- Use Fine Brushes for Details: Invest in a set of fine-tipped brushes to achieve intricate patterns and clean lines. They allow for precise application, which is especially important for small designs.
- Layer Your Paint: Apply multiple thin layers of paint rather than one thick layer. This prevents drips and ensures a smooth, even coat. Allow each layer to dry completely before applying the next.
- Seal Your Work: Once the paint is completely dry, protect your artwork with a clear acrylic sealer. This will make your painted eggs more durable and prevent the colors from fading.
- Experiment with Different Techniques: Don’t be afraid to mix things up! Try using sponges, stamps, or even marbling techniques to add unique textures and effects to your wooden eggs.
With these additional tips and tricks, you can take your wooden egg painting to the next level.
5 Things You Should Avoid
- Skipping the Primer: Failing to prime the surface can lead to uneven paint application and dull colors. Always start with a good primer to ensure your paint goes on smoothly.
- Overloading the Brush: Avoid loading your brush with too much paint. This can cause drips, streaks, and an uneven finish. Thin, even layers are the key to a professional look.
- Ignoring Drying Times: Patience is crucial when painting. Rushing through the drying process can result in smudging and inadvertent color blending. Allow each layer to dry fully before proceeding.
- Using the Wrong Brushes: Using the wrong type of brush can affect the quality of your design. Avoid using large or coarse brushes for detailed work and use fine-tipped brushes instead.
- Neglecting to Seal the Paint: Not applying a sealer can leave your artwork vulnerable to damage and fading over time. Always finish with a clear acrylic sealer to protect your hard work.
By avoiding these common pitfalls, you’ll be well on your way to mastering the art of painting wooden eggs.
5 Different Style Ideas to Try
- Traditional Designs: Take inspiration from traditional Easter egg designs and try your hand at creating intricate patterns and symbols.
- Modern Minimalism: For a modern twist on the classic wooden egg, keep it simple with bold, geometric designs or monochromatic color schemes.
- Nature-Inspired Themes: Use natural elements such as flowers, leaves, and birds to create whimsical and rustic designs.
- Abstract Art: Let your imagination run wild with abstract shapes, patterns, and colors for a unique, eye-catching design.
- Personalized Eggs: For a personalized touch, use stencils or freehand techniques to add names, initials, or special messages to your painted eggs.
There are endless possibilities when it comes to painting wooden eggs, so don’t be afraid to try out different styles and techniques to find your own unique approach.

How to Seal Painted Wooden Eggs?
To seal your painted wooden eggs, follow these simple steps:
- Allow the paint on your wooden eggs to dry completely before sealing.
- Choose a clear acrylic sealer specifically designed for use on wood surfaces.
- Shake the sealer well before use.
- Holding the can about 12 inches away from the egg, lightly spray an even coat of sealer over the entire surface.
- Allow the first coat to dry completely before applying a second coat for added protection.
- Let the final coat dry for at least 24 hours before handling or displaying your painted eggs.
Enjoy your beautifully sealed and protected wooden eggs!
Conclusion
How to paint wooden eggs is a delightful and creative activity that allows you to express your artistic flair in a myriad of ways.
By following the practical tips and tricks outlined above, such as priming the surface, using fine brushes, and experimenting with different techniques, you can create stunning designs that stand the test of time. Avoiding common pitfalls like skipping the primer or neglecting to seal your work ensures a high-quality finish that you can be proud of. With inspiration from traditional designs, modern minimalism, nature, abstract art, and personalized touches, the possibilities are endless.
So gather your materials, unleash your creativity, and enjoy the rewarding process of transforming simple wooden eggs into unique works of art. Happy painting!
About the Author
Adrian Green, a lifelong woodworking enthusiast, shares his passion for the craft through The Woodenify Blog. With a foundation built on years of hands-on experience in his father’s woodworking shop, Adrian is dedicated to helping others learn and grow in the world of DIY woodworking. His approach to woodworking combines creativity, practicality, and a deep appreciation for the art of building with your own hands. Through his blog, he inspires individuals of all skill levels to embark on their own woodworking journeys, creating beautiful, functional pieces of furniture and décor.
Professional Focus
- Specializes in DIY woodworking projects, from furniture to home décor.
- Provides step-by-step guides and practical tutorials for woodworkers of all skill levels.
- Dedicated to helping readers build confidence and skill through easy-to-follow instructions and tips.
- Passionate about fostering a community of makers who can share, learn, and grow together.
Education History
- University of Craft and Design – Bachelor of Fine Arts (BFA) in Woodworking and Furniture Design
- Woodworking Apprenticeships – Extensive hands-on training with skilled craftsmen to refine carpentry and furniture making techniques.
- Online Courses & Masterclasses – Continued education in advanced woodworking techniques, design principles, and specialized tools
Expertise:
- DIY woodworking, carpentry, furniture making, and home décor projects.
- Creating accessible tutorials and guides for beginner to advanced woodworkers.
- Sharing the joys and satisfaction of woodworking, from raw materials to finished products.