Are you tired of the plain, natural color of your wooden beads? Want to add some flair and personality to your jewelry or craft projects? Look no further! Dyeing wooden beads is an easy and fun way to transform them into vibrant, unique pieces that will make a statement.
Dying wooden beads is a creative way to customize jewelry, crafts, and decorative pieces. With various dyeing techniques and colors, you can transform plain wooden beads into vibrant components that match your style or project requirements. Whether you’re a seasoned crafter or a beginner looking to explore a new hobby, learning how to dye wooden beads opens the door to endless possibilities.
This guide will provide the essential steps and tips for achieving beautiful, long-lasting results with your dyed wooden beads.
What are the Benefits of Dyeing Wooden Beads?
Dyeing wooden beads is an affordable and versatile way to transform plain, natural-toned beads into colorful creations.
- Personalization: By dyeing your own wooden beads, you have complete control over the color and intensity of the dye. This allows you to create personalized jewelry or crafts that reflect your unique style and taste.
- Cost-effective: Wooden beads are relatively inexpensive, making them a budget-friendly option for crafting and DIY projects. Dyeing them yourself also saves money compared to buying pre-dyed beads.
- Versatility: There are endless possibilities when it comes to dyeing wooden beads. You can experiment with different colors, techniques, and patterns to create one-of-a-kind pieces that stand out.
- Eco-friendly: Most commercially available dyes contain harmful chemicals that can harm the environment. Using natural or eco-friendly dyes can minimize your carbon footprint and create a more sustainable product.
These are just a few of the many benefits of dyeing wooden beads. Let’s now explore the step-by-step process for achieving beautiful, dyed wooden beads.
What Do You Need to Dye Wooden Beads?
Before you begin the dyeing process, ensure you have all the necessary supplies. Here’s what you’ll need:
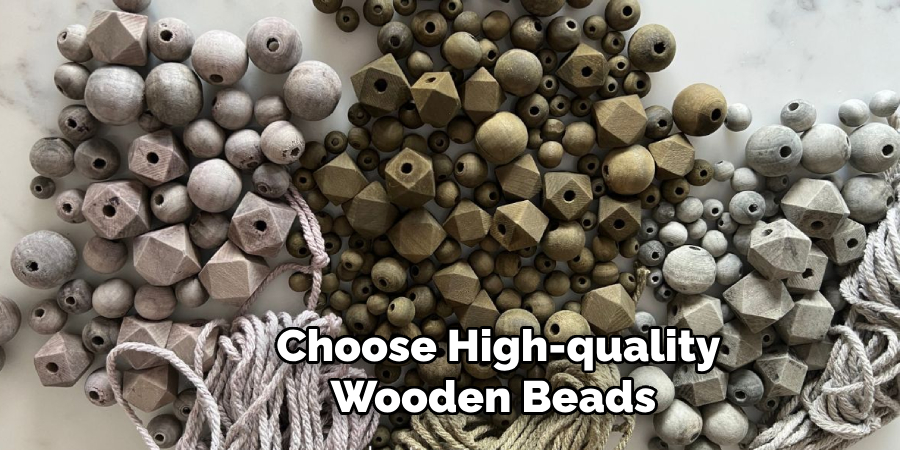
- Wooden Beads: Choose high-quality wooden beads that are smooth without cracks or imperfections. The type of wood used can also affect the outcome of the dye, so consider this when selecting your beads.
- Fabric Dye: Various types and brands of fabric dyes are available in the market. Procion MX, Rit Dye, and Jacquard Acid Dyes are the most commonly used ones for dyeing wooden beads.
- Hot Water: Hot water is essential for dissolving the dye and penetrating the wooden beads.
- Container or Pot: Use a heat-resistant container or pot that is large enough to hold your dye solution and beads. Non-reactive materials such as stainless steel or glass are recommended.
- Measuring Cups/Spoons: Accurate measurements are crucial for achieving consistent results with your dye.
- Stirring Utensil: Mix the dye and water evenly with a spoon or stick to stir the solution.
- Rubber Gloves: Protect your hands from getting stained by wearing rubber gloves throughout the dyeing process.
- Tongs or Slotted Spoon: Use these tools to handle the wooden beads while they are in the dye solution.
Once you have all your supplies ready, it’s time to start the dyeing process.
8 Easy Steps on How to Dye Wooden Beads:
Step 1: Prepare the Dye Solution
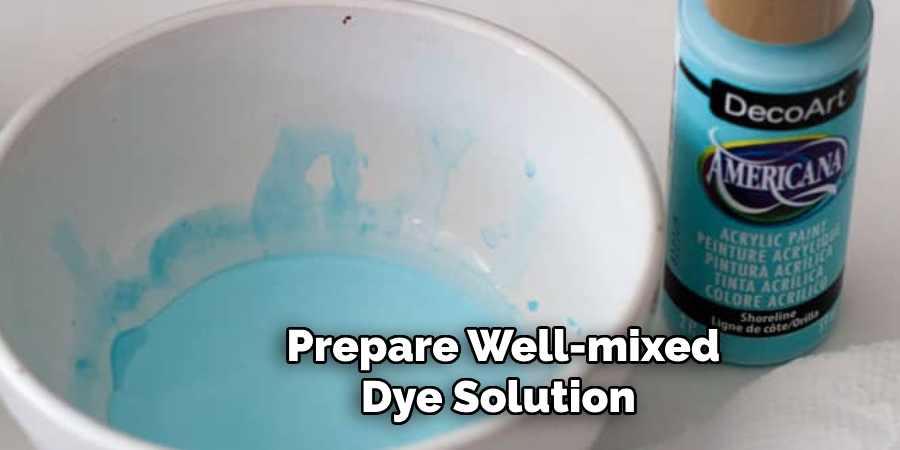
Before you begin, it’s crucial to prepare a well-mixed dye solution. Follow these steps to ensure your dye is ready for use:
- Read the Instructions on the Dye Package: Different dyes have different requirements and mixing ratios, so following the manufacturer’s guidelines is important. This will give you the best results and ensure consistent color.
- Measure the Dye and Water: Using your measuring cups or spoons, carefully measure the appropriate amount of dye and hot water as indicated on the dye package. Accurate measurements are essential for achieving the desired color intensity.
- Mix the Solution Thoroughly: Pour the measured dye into your heat-resistant container or pot, then add the hot water. Use the stirring utensil to mix the solution thoroughly. Make sure the dye is completely dissolved with no clumps or undissolved particles. This will help in providing an even color distribution on the beads.
- Check the Temperature: For best results, the water should be hot (around 140-160°F or 60-70°C, depending on the dye’s instructions). The heat helps the dye to penetrate the wood more effectively, resulting in vibrant and uniform colors.
- Test the Dye: Before immersing your wooden beads, it’s a good idea to test the dye solution on a scrap piece of wood or an extra bead. This allows you to see the color and make adjustments if necessary. You can add more dye for a deeper color or dilute with additional hot water for a lighter shade.
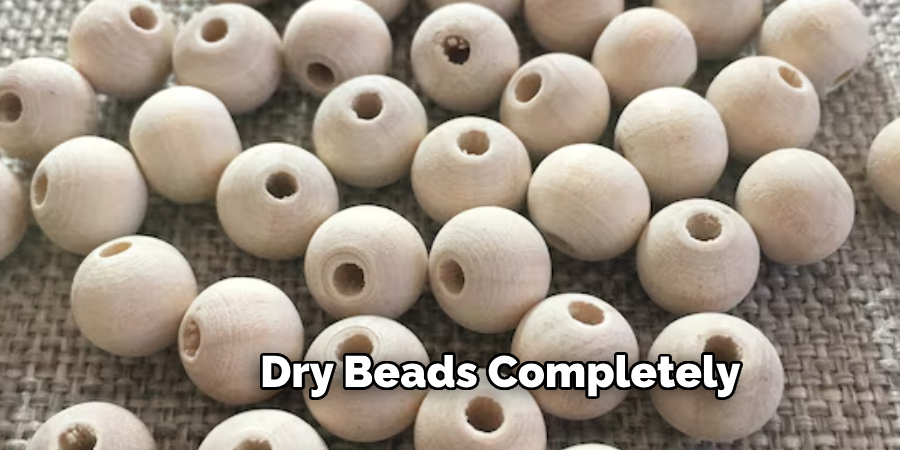
Step 2: Pre-wash the Wooden Beads
Pre-washing the beads helps remove any surface dust, oils, or residues that might interfere with the dyeing process:
- Rinse the Beads: Place the wooden beads in a colander and rinse them under warm running water. This will wash away loose particles.
- Soak in a Mild Cleaning Solution: Fill a small container with warm water and add a few drops of mild dish soap. Immerse the beads in this solution and let them soak for about 10 minutes. Swirl them around occasionally to ensure all surfaces are cleaned.
- Rinse Thoroughly: After soaking, rinse the beads thoroughly under warm water to remove all soap residues. Any leftover soap can affect the dye’s ability to adhere to the wood.
- Dry Completely: Lay the beads out on a clean towel and let them air dry completely. You can also lightly pat them dry, but ensure they are thoroughly dry before proceeding with the dyeing process. Wet beads can dilute the dye solution, impacting the color outcome.
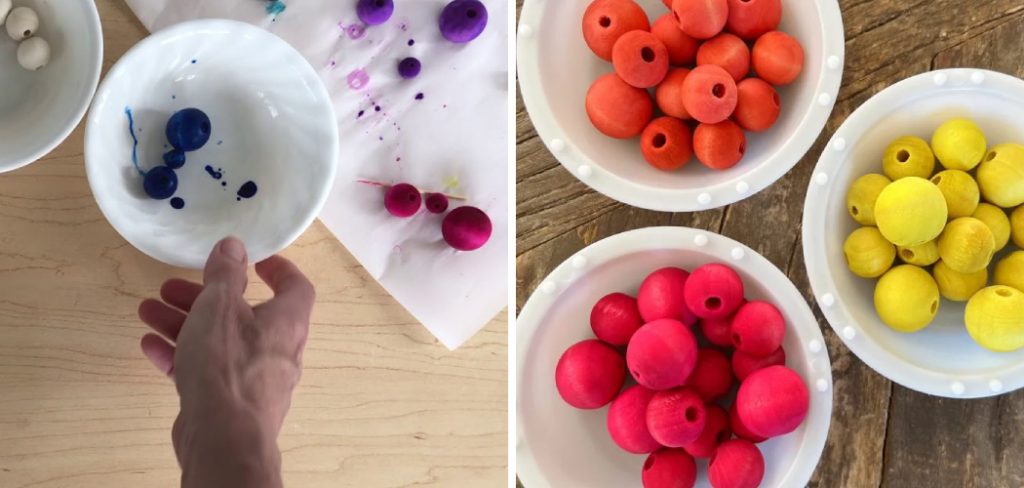
Step 3: Dye the Wooden Beads
Now that your dye solution is ready and your beads are prepped, you can start the dyeing process:
- Immerse the Beads: Gently place the wooden beads into the dye solution using tongs or a slotted spoon. Make sure they are fully submerged and not overcrowded in the container.
- Stir Occasionally: To get an even color, stir the beads occasionally while they are soaking in the dye solution.
- Keep an Eye on Timing: The longer you leave the beads in the dye solution, the deeper and more intense the color will be. Refer to the dye’s instructions for recommended soaking times.
- Check the Color: Remove one bead from the dye solution and rinse it under cold water to check if your beads have reached the desired color. The color may look darker when wet, so keep this in mind when checking.
- Add More Dye: If you want a deeper color, you can add more dye to the solution and continue soaking. Make sure to mix the dye thoroughly before adding it to ensure an even color.
- Rinse with Cold Water: Once your beads have reached the desired color, remove them from the dye solution and rinse them under cold water until they are clear. This will help remove any excess dye and stop the color from developing further.
- Dry Completely: Lay the beads out on a clean towel and let them air dry completely before handling. Once dry, you can continue to use or store your dyed wooden beads.
Step 4: Troubleshooting Tips
Here are some common issues that may arise during the dyeing process and how to troubleshoot them:
- Uneven Color: If you notice uneven color on your beads, it could be due to inadequate stirring or overcrowding in the container. Stir regularly and avoid overcrowding to ensure even dye distribution.
- Pale Color: A pale color can result from insufficient dye or not soaking the beads long enough. To achieve a deeper color, you can add more dye to the solution and soak the beads for a longer period.
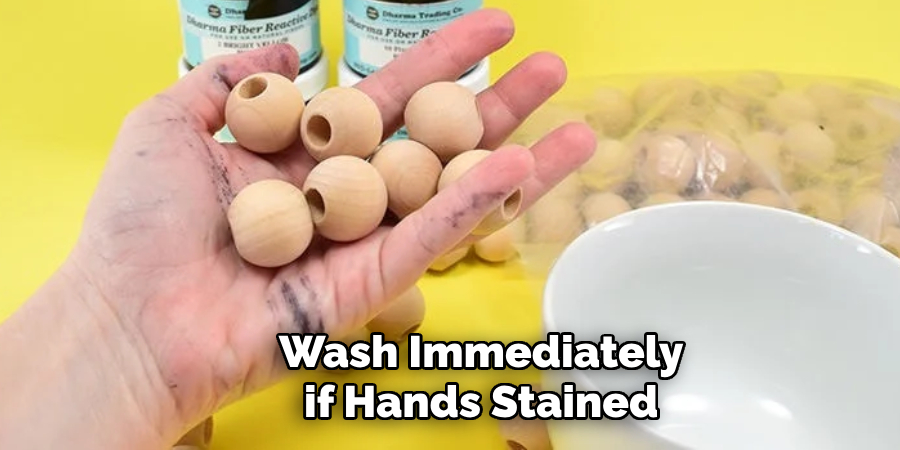
- Stained Hands or Tools: If you accidentally get dye on your hands or utensils, wash them immediately with soap and water. For tougher stains, you can use rubbing alcohol or bleach to remove them.
Step 5: Clean Up
Once you have finished dyeing your wooden beads, it’s important to clean up properly:
- Dispose of the Dye Solution Safely: Allow the dye solution to cool completely before disposing of it. If you are using a natural or food-based dye, you can pour it down the drain. Otherwise, follow the manufacturer’s guidelines for safe disposal.
- Clean Your Tools and Container: Thoroughly wash your mixing container, stirring utensils, and tongs or spoon with soap and water. Dry them completely before storing them.
- Store Remaining Dye Solution: If you have leftover dye solution, store it in a sealed container for future use. Label the container with the type of dye, color, and date.
Stored dye solutions may not be as effective, so it’s best to use them within a few months.
Step 6: Finishing and Sealing the Dyed Wooden Beads
To ensure that the vibrant colors of your dyed wooden beads last longer and to provide additional protection, follow these steps:
- Inspect the Beads: Inspect them for any uneven coloring or flaws once the beads are completely dry. Retouch any beads if necessary by repeating the dyeing process.
- Apply a Finish: Choose a suitable finish to seal the dye and protect the beads. Options include clear varnish, shellac, or a natural oil like linseed or jojoba. Test a small bead first to determine the finish’s effect on the dyed color.
- Seal the Beads: Lightly apply the chosen finish to each bead using a small brush or a soft cloth. Ensure even coverage and avoid applying too thickly, which can cause streaking or uneven coloration.
- Dry Thoroughly: Place the beads on a clean, dry surface and let them dry completely according to the finish’s instructions. Depending on the type of finish used, this can take several hours to overnight.
- Polish if Desired: Once dry, you can gently polish the beads using a soft cloth to enhance their shine and smoothness.
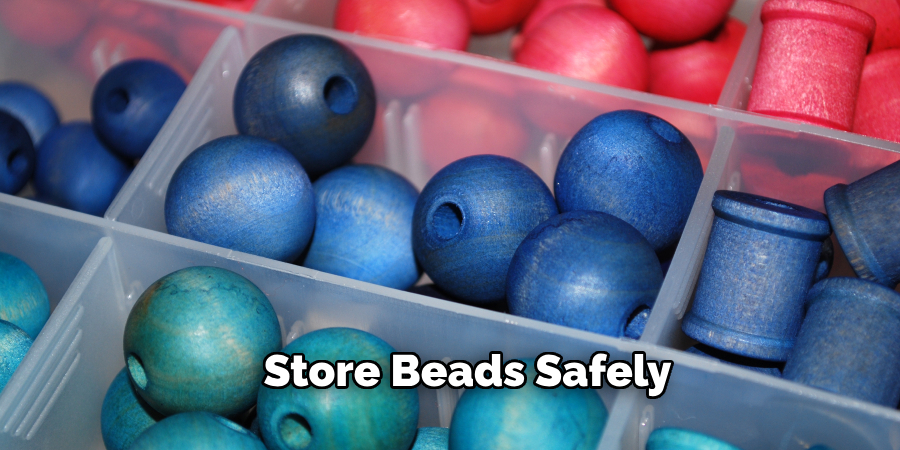
- Store Properly: Store the finished beads in a dry, cool place to prevent any potential damage from moisture or heat. You can place them in a sealed container or plastic bag to maintain their vibrant colors.
By following these finishing steps, your dyed wooden beads will not only be beautifully colored but also durable and ready for use in various craft projects.
Step 7: Incorporate Dyed Beads into Your Projects

Now that your wooden beads are beautifully dyed and sealed, it’s time to get creative and incorporate them into your craft projects:
- Choose Your Project: Decide how you would like to use the dyed beads. Some popular options include jewelry making (like necklaces, bracelets, and earrings), home décor items (such as garlands, beaded curtains, and ornaments), or keychains and bag charms.
- Prepare Your Materials: Gather all necessary materials for your chosen project. Depending on the project, you may need items like string or wire, jump rings, clasps, pliers, scissors, and glue.
- Design Your Layout: Before starting, plan the design and arrangement of your beads. Lay out your beads on a flat surface to visualize the final product. This step helps ensure that the colors and sizes are well-balanced and aesthetically pleasing.
- String the Beads: Begin stringing the beads according to your design plan. If creating jewelry, ensure that the string or wire used is sturdy enough to hold the beads securely. For home décor items, use materials that can withstand the weight and placement of the beads.
- Secure the Ends: After stringing the beads, securely fasten the ends of your project. For jewelry, this typically involves tying knots or adding clasps. You may need to tie off the ends or use glue to secure them for other craft items.
- Add Finishing Touches: Once your project is assembled, add any additional embellishments or finishing touches as desired. This could include adding charms, tassels, or other decorative elements to enhance the overall look.
- Display or Gift: Your crafted item is now ready to be displayed in your home or given as a thoughtful handmade gift. Enjoy the personal touch and vibrant colors that your dyed wooden beads bring to your creations.
Incorporating these dyed wooden beads into your projects allows you to create unique, personalized items that showcase your creativity and craftsmanship.
Step 8: Maintenance and Care for Dyed Wooden Beads
To ensure the longevity and beauty of your dyed wooden bead creations, it is essential to follow proper maintenance and care guidelines:
- Avoid Excessive Water Exposure: Although the beads are sealed, excessive moisture can still affect their color and texture. Remove any jewelry or items with wooden beads before swimming, bathing, or engaging in activities where they might get wet.
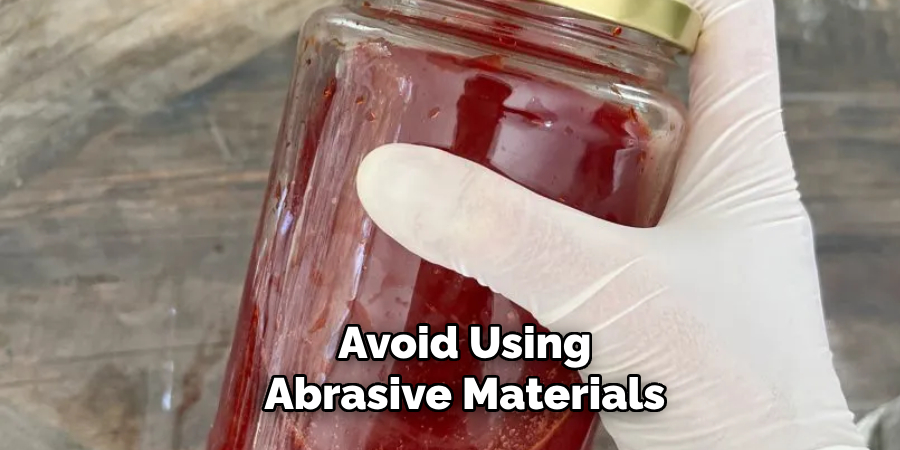
- Clean Gently: If your beads require cleaning, use a soft, damp cloth to wipe them gently. Avoid using harsh chemicals or soaking the beads, as this can damage the finish and discolor the dye.
- Store Safely: When not in use, store your beaded creations in a dry, cool place away from direct sunlight. Prolonged exposure to sunlight can fade the colors over time. Consider using a jewelry box, pouch, or sealed container to protect them from dust and humidity.
- Handle with Care: Wooden beads can be susceptible to scratching and chipping. Handle your bead creations with care, especially when storing or transporting them.
- Reapply Finish if Needed: Over time, the protective finish on your beads may wear down. If you notice a loss of sheen or protection, you can reapply a thin layer of the original finish, such as clear varnish or natural oil, to restore their look and durability.
By following these maintenance and care tips, your dyed wooden bead creations will continue to look vibrant and beautiful, allowing you to enjoy their unique charm for a long time.
With these steps and tips, you can now confidently dye wooden beads and incorporate them into your creative projects. Let your imagination run wild as you experiment with different colors, finishes, and designs to create one-of-a-kind pieces that showcase your personal style.
5 Things You Should Avoid
- Skipping the Sanding Process: One of the most crucial steps in dyeing wooden beads is to sand them properly before applying any dye. Failing to sand the beads can result in an uneven surface that will not absorb the dye uniformly, leading to blotchy and unattractive colors.
- Using Excessive Dye: Applying the dye in thin, even layers is important. Over-saturating the beads with dye can cause the colors to become too dark and less vibrant. It can also lead to longer drying times and a higher chance of the dye bleeding onto your hands or surfaces.
- Ignoring Safety Precautions: Always work in a well-ventilated area and use appropriate protective gear such as gloves and masks when handling dyes and finishes. Neglecting these precautions can expose you to harmful chemicals and fumes.
- Skipping the Sealing Step: After dyeing the beads, it’s essential to seal them to protect the color and add durability. Skipping this step can result in the dye bleeding or fading over time, compromising the appearance and longevity of your beads.
- Using Harsh Cleaning Methods: Avoid using abrasive materials or harsh chemicals to clean your dyed wooden beads. These can damage the finish and discolor the dye. Always opt for gentle cleaning methods to preserve the beads’ beauty and integrity.
By being mindful of these common mistakes, you can ensure a more successful and enjoyable bead-dyeing experience, resulting in beautiful, long-lasting creations.
Conclusion
How to dye wooden beads is an accessible and enjoyable way to add a personal touch to your creative projects.
By meticulously following each step—from sanding and applying dye to sealing and caring for your beads—you can achieve vibrant, long-lasting results that enhance the beauty and uniqueness of your handmade items. Avoiding common pitfalls such as skipping essential steps or using excessive dye ensures that your beads maintain their color and integrity over time. Whether you’re crafting jewelry, home décor, or other decorative pieces, dyed wooden beads offer endless possibilities for customization and creativity.
Embrace the process, experiment with different techniques, and let your imagination guide you to create one-of-a-kind masterpieces that reflect your personal style and artistic flair.
You can also check it out to Apply Varnish Without Brush Marks
About the Author
Adrian Green, a lifelong woodworking enthusiast, shares his passion for the craft through The Woodenify Blog. With a foundation built on years of hands-on experience in his father’s woodworking shop, Adrian is dedicated to helping others learn and grow in the world of DIY woodworking. His approach to woodworking combines creativity, practicality, and a deep appreciation for the art of building with your own hands. Through his blog, he inspires individuals of all skill levels to embark on their own woodworking journeys, creating beautiful, functional pieces of furniture and décor.
Professional Focus
- Specializes in DIY woodworking projects, from furniture to home décor.
- Provides step-by-step guides and practical tutorials for woodworkers of all skill levels.
- Dedicated to helping readers build confidence and skill through easy-to-follow instructions and tips.
- Passionate about fostering a community of makers who can share, learn, and grow together.
Education History
- University of Craft and Design – Bachelor of Fine Arts (BFA) in Woodworking and Furniture Design
- Woodworking Apprenticeships – Extensive hands-on training with skilled craftsmen to refine carpentry and furniture making techniques.
- Online Courses & Masterclasses – Continued education in advanced woodworking techniques, design principles, and specialized tools
Expertise:
- DIY woodworking, carpentry, furniture making, and home décor projects.
- Creating accessible tutorials and guides for beginner to advanced woodworkers.
- Sharing the joys and satisfaction of woodworking, from raw materials to finished products.