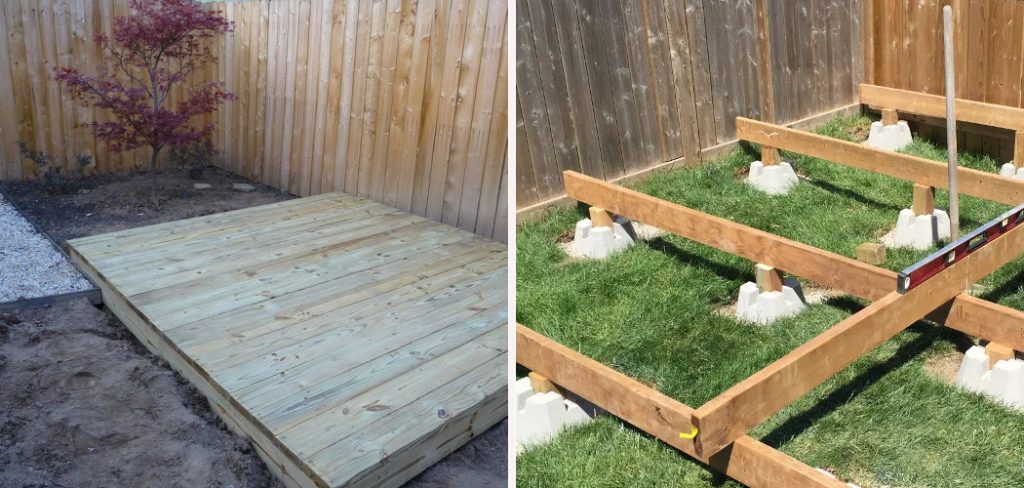
Deck blocks are a common choice for small decks that do not require traditional footings or for decks that will be built close to the ground. However, some homeowners may prefer to hide these deck blocks for aesthetic reasons. In this guide, we will discuss how to hide deck blocks and provide tips on achieving a more seamless look for your deck.
Why Hide Deck Blocks?
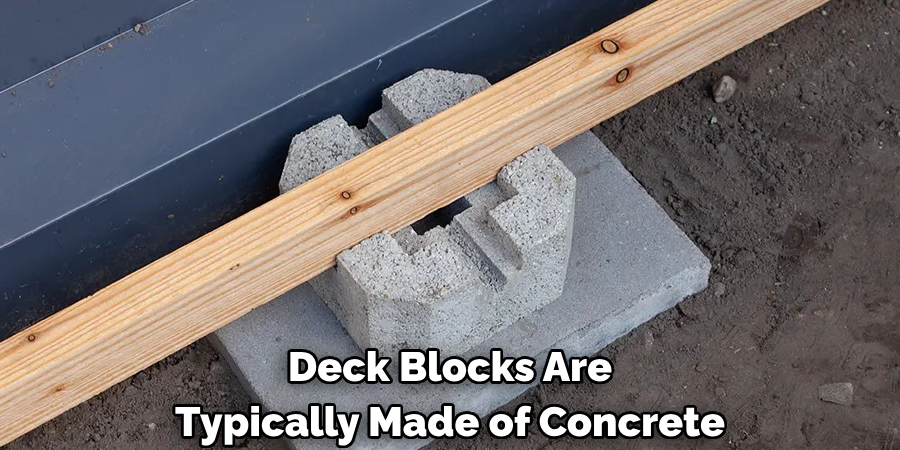
Deck blocks are typically made of concrete and can be an eyesore for some homeowners. In addition, they may not fit in with the overall aesthetic of your deck design. By hiding them, you can create a cleaner and more polished look for your deck.
Necessary Items
Before you begin, make sure you have the necessary items for this project. These may include:
- Lattice or wooden panels
- Pressure-treated wood boards
- Screws or nails
- Measuring tape
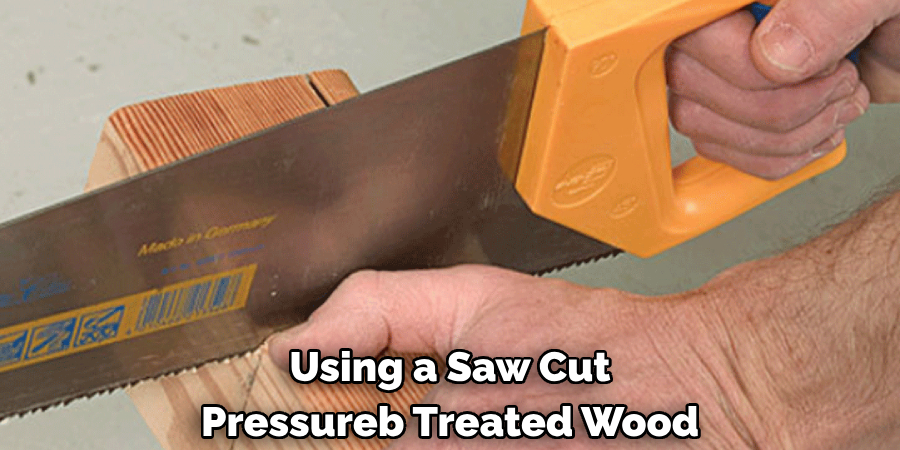
- Saw (circular saw or miter saw)
8 Things to Know Before You Start
1) Check Local Building Codes
Before you begin hiding your deck blocks, it is important to check with your local building codes. Some areas may have specific requirements for how decks should be constructed and may not allow for this method of hiding deck blocks.
2) Consider the Height of Your Deck
The height of your deck will also play a role in determining if this method is suitable for your deck. Typically, decks that are built higher off the ground may require traditional footings and may not be able to use this method.
3) Plan Your Lattice or Wooden Panels
Decide on the type of material you want to use to hide your deck blocks. Popular choices include lattice or wooden panels. Make sure to measure and plan accordingly for the amount of material you will need.
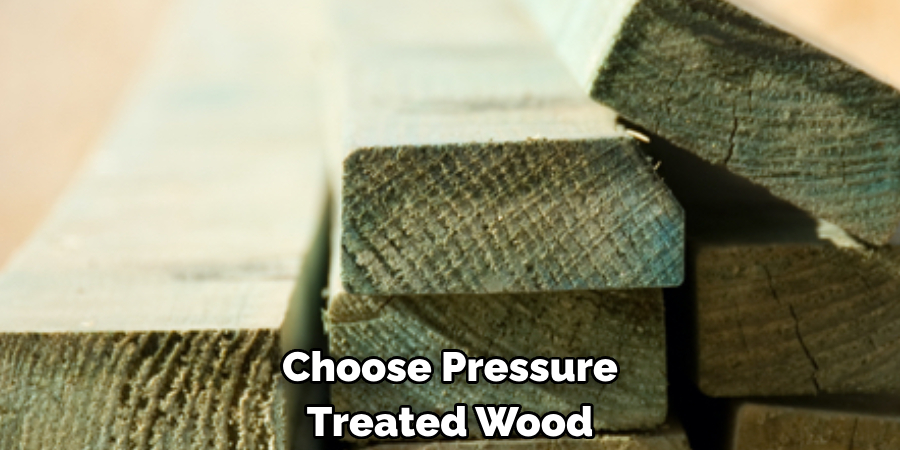
4) Choose Pressure-Treated Wood
When selecting wood for this project, make sure to choose pressure-treated wood. This type of wood is treated with a preservative that helps protect against rot, decay, and insects. And since this wood will be in contact with the ground, it is important for it to have this added protection.
5) Use Screws or Nails
For attaching the lattice or wooden panels to your deck, make sure to use screws or nails that are suitable for outdoor use. This will ensure that they do not rust or deteriorate over time. If you are unsure, ask a professional at your local hardware store for recommendations.
6) Cut the Lattice or Wooden Panels
Measure and cut your lattice or wooden panels to the appropriate size. A circular saw or miter saw can help make this process easier. Make sure to wear protective gear such as safety glasses and gloves when cutting wood.
7) Secure the Lattice or Wooden Panels
Attach the lattice or wooden panels to your deck using screws or nails. Make sure they are securely fastened and evenly spaced for a clean look. Even if you are planning to paint or stain your deck, it is recommended to do this step before securing the lattice or wooden panels.
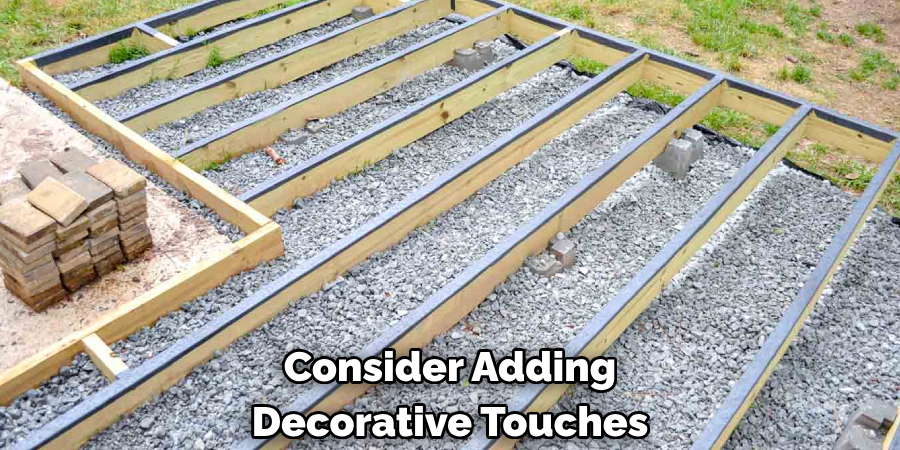
8) Consider Adding Decorative Touches
To further enhance the look of your concealed deck blocks, consider adding decorative touches such as plants, outdoor rugs, or built-in seating. This can help blend the deck blocks into the overall design and create a more inviting outdoor space.
Hiding deck blocks may require some extra planning and effort, but the end result can greatly improve the overall look of your deck. Consider using lattice or wooden panels to achieve a more polished and seamless appearance for your outdoor space. And remember to always check with local building codes before making any changes to your deck.
12 Steps on How to Hide Deck Blocks
Step 1: Measure and Plan
Measure the distance between each deck block and ensure that you have enough material to cover them all. Plan for any cuts you may need to make on your lattice or wooden panels. Also, consider any decorative touches you may want to add.
Step 2: Cut Pressure-Treated Wood Boards
Using a saw, cut pressure-treated wood boards into strips that will be used as frames for the lattice or wooden panels. Make sure they are long enough to cover the entire deck block but not too wide so that they will be visible after installation.
Step 3: Measure and Cut Lattice or Wooden Panels
Measure and cut your lattice or wooden panels to the appropriate size. Make sure they fit snugly into the frames you created in step 2. Soak the panels in water for an hour before cutting to prevent splintering.
Step 4: Paint or Stain
If desired, paint or stain your lattice or wooden panels before installation. This will ensure that all sides are coated and protected from the elements. But if you are planning to paint or stain your deck, it is recommended to do this step after installation.
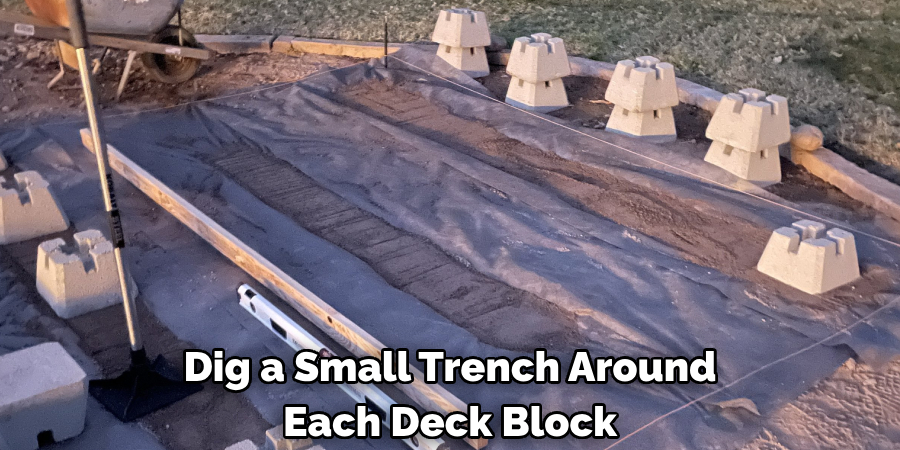
Step 5: Dig a Trench
Dig a small trench around each deck block. This will allow for the lattice or wooden panels to sit flush with the ground and create a seamless look. As an alternative, you can also remove the deck blocks and dig holes for traditional footings.
Step 6: Install Frames
Using screws or nails, attach the frames to the sides of each deck block. Make sure they are securely fastened and level with the ground. While you can use a level for this step, it may be easier to eyeball it since the frame will be covered.
Step 7: Add Lattice or Wooden Panels
Place the lattice or wooden panels into the frames and secure them with screws or nails. Make sure they are straight and evenly spaced for a clean appearance. If using multiple panels, make sure they line up seamlessly.
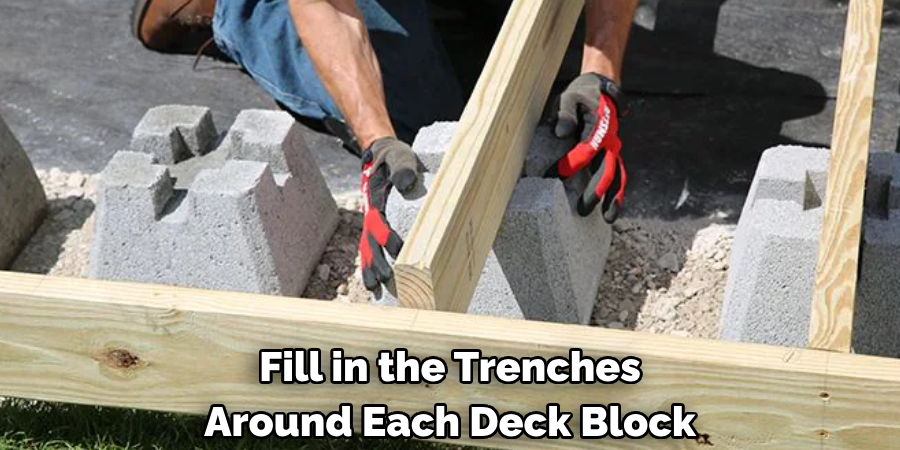
Step 8: Fill in Trenches
Fill in the trenches around each deck block with soil or gravel. This will help secure the lattice or wooden panels and prevent shifting over time. Make sure to compact the soil or gravel so that it is level with the surrounding ground.
Step 9: Add Decorative Touches
To further blend your deck blocks into the design of your outdoor space, consider adding decorative touches such as plants, outdoor rugs, or built-in seating. This can help create a more cohesive and inviting atmosphere.
Step 10: Seal Cracks
If there are any visible cracks between the lattice or wooden panels and the ground, use caulk or sealant to fill them in. This will prevent any debris or water from getting inside and potentially causing damage.
Step 11: Regular Maintenance
To ensure that your hidden deck blocks remain in good condition, it is important to regularly check for any signs of wear or damage. Make sure to also clean them periodically to remove any dirt or debris that may accumulate over time.
Step 12: Check Local Building Codes
Before making any changes to your deck, it is important to check with your local building codes and regulations. Some areas may have specific requirements for hidden deck blocks or may require a permit before installation. Make sure to follow all guidelines to avoid any potential issues in the future.
Overall, hiding deck blocks requires careful planning and attention to detail, but with these steps, you can achieve a seamless and polished look for your outdoor space. Remember to prioritize safety and check with professionals when needed, and enjoy your newly improved deck! So don’t hesitate to take on this project and improve the durability and aesthetics of your deck. With these steps on how to hide deck blocks, you’ll be on your way to a more visually pleasing outdoor space in no time.
8 Things to Avoid When Hiding Deck Blocks
When it comes to hiding deck blocks, there are a few things you should avoid in order to ensure a successful and long-lasting outcome. Here are eight things to keep in mind while working on your hidden deck block project:
1) Using Untreated Wood
It’s important to use pressure-treated or rot-resistant wood when constructing the frames for your lattice or wooden panels. This will help prevent the wood from deteriorating over time and potentially compromising the stability of your deck.
2) Cutting Lattice or Wooden Panels Too Short
Measure twice, cut once! It’s important to carefully measure and plan before cutting your lattice or wooden panels to ensure they fit properly into the frames. Cutting them too short can result in visible gaps or an uneven appearance.
3) Neglecting to Seal Cracks
As mentioned in step 10, it is important to seal any visible cracks between the lattice or wooden panels and the ground. This will help prevent any potential damage from water or debris entering these spaces.
4) Not Checking Local Building Codes
Before undertaking any construction project, it’s crucial to check with your local building codes and regulations. This will ensure that you are following all necessary guidelines and avoid any potential issues in the future.
5) Using Inadequate Tools
Having the right tools can make a significant difference in the success of your project. Make sure to use appropriate tools for cutting, measuring, and attaching materials to ensure a clean and professional finish.
6) Skipping Regular Maintenance
To keep your hidden deck blocks in good condition, it’s important to regularly check for any signs of wear or damage. Neglecting regular maintenance can lead to small issues becoming bigger and more costly problems over time.
7) Improperly Securing Frames
In step 6, we mentioned the importance of securely fastening the frames to the deck blocks. Failing to do so can result in unstable panels and potential hazards for anyone using the deck.
8) Rushing Through the Process
Hiding deck blocks may seem like a simple task, but it requires careful planning and attention to detail. Rushing through the process or cutting corners can result in an unsatisfactory outcome and potentially costly repairs in the future.
By avoiding these common mistakes, you can ensure a successful and visually pleasing hidden deck block installation that will enhance the overall look and functionality of your outdoor space. Happy building! So don’t hesitate to take on this project and improve the durability and aesthetics of your deck. With these steps, you’ll be on your way to a more visually pleasing outdoor space in no time.
8 Additional Tips for a Successful Hidden Deck Block Project
As with any DIY project, there are always additional tips and tricks that can help make the process smoother and more successful. Here are eight additional tips to keep in mind when hiding deck blocks:
1) Take Your Time
Don’t rush through the installation process. Carefully measure, plan, and execute each step to ensure a seamless and polished outcome. And remember, it’s better to take a bit longer and get it right than to have to fix mistakes in the future.
2) Use Leveling Tools
To ensure your deck blocks are level, use a laser or water level during installation. This will help avoid any unevenness or shifting over time. But don’t solely rely on these tools; regular checks and adjustments may still be necessary.
3) Consider Adding Lighting
Incorporating outdoor lighting into your deck design can not only enhance its appearance but also make it safer to use at night. Consider installing lights around the perimeter or directly onto the lattice or wooden panels for a subtle and elegant look.
4) Choose Durable Materials
When it comes to hiding deck blocks, it’s important to use materials that can withstand the elements and regular wear and tear. Opt for pressure-treated wood, weather-resistant lattice or panels, and rust-proof fasteners.
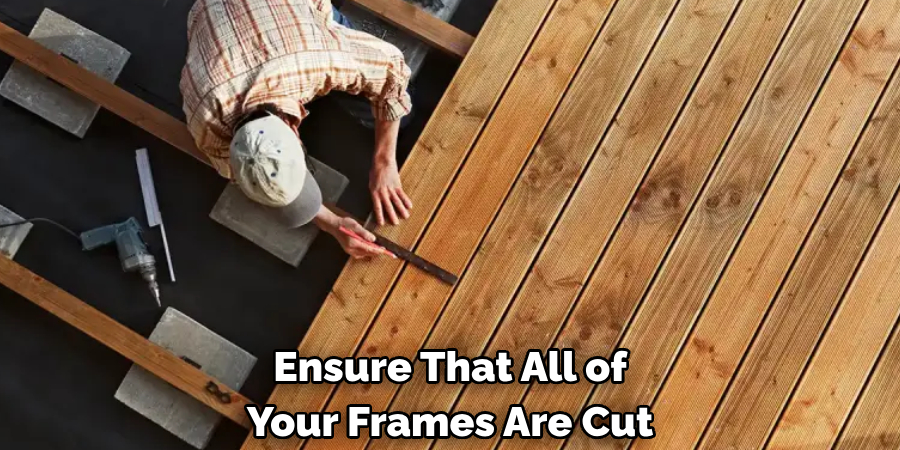
5) Use a Template
Creating a template can help ensure that all of your frames are cut to the same size and shape, resulting in a more uniform and professional look. It can also save time and reduce the risk of mistakes.
6) Seal All Exposed Wood
To protect your deck from moisture and rot, make sure to seal any exposed wood with a waterproofing sealant or paint. This will help prolong the lifespan of your deck and maintain its appearance.
7) Get Creative with the Design
Hiding deck blocks doesn’t have to be boring. Consider incorporating different designs or patterns into your lattice or panels for a unique and eye-catching look. Just make sure that they still provide proper ventilation for your deck.
8) Seek Professional Help When Needed
If you encounter any difficulties or feel unsure about certain steps in the process, feel free to seek professional help. It’s better to get expert advice and assistance than risk damaging your deck or compromising its stability.
By keeping these additional tips on how to hide deck blocks in mind, you can elevate your hidden deck block project and achieve a stunning and functional outdoor space that will last for years to come. Happy building! So don’t hesitate to take on this project and improve the durability and aesthetics of your deck. With these steps, you’ll be on your way to a more visually pleasing outdoor space in no time. Now that you have all the information and tips necessary, it’s time to get started on your hidden deck block project! Remember to take your time, follow all safety precautions, and don’t hesitate to seek help if needed.
Frequently Asked Questions
How Many Deck Blocks Do I Need for My Project?
The number of deck blocks needed will depend on the size and weight of your deck, as well as local building codes. It is recommended to consult a professional or use an online deck block calculator to determine the exact number needed for your specific project.
Can I Use Hidden Deck Blocks for All Types of Decks?
Hidden deck blocks are suitable for most types of decks, including ground-level and raised decks. However, it’s important to check with local building codes and regulations to ensure that you are using the appropriate materials and installation methods.
Do I Need a Permit for My Hidden Deck Block Project?
It’s always best to check with your local government or building department to determine if a permit is required for your specific project. In most cases, a permit will be necessary for any deck construction or renovation projects.
Can I Use Hidden Deck Blocks on Uneven Ground?
While it’s possible to use hidden deck blocks on uneven ground, it may require additional preparation and leveling techniques. It’s best to consult a professional for proper guidance and ensure the stability and safety of your deck.
How Can I Maintain My Hidden Deck Blocks?
Regular maintenance is key to prolonging the lifespan of your hidden deck blocks. This includes regularly checking for any damage or shifting, sealing exposed wood, and keeping the surrounding area clear of debris. It’s also important to check with or follow any maintenance guidelines from the manufacturer of your deck blocks. Overall, proper maintenance will ensure the long-term durability and attractiveness of your hidden deck block installation.
Conclusion
Hiding deck blocks is an effective and visually appealing way to enhance the look and functionality of your outdoor space. By following the steps on how to hide deck blocks outlined in this guide and keeping these additional tips in mind, you can successfully complete your hidden deck block project and enjoy a beautiful and sturdy deck for years to come. Remember, take your time, use quality materials, and don’t be afraid to seek professional help when needed.
About the Author
Adrian Green, a lifelong woodworking enthusiast, shares his passion for the craft through The Woodenify Blog. With a foundation built on years of hands-on experience in his father’s woodworking shop, Adrian is dedicated to helping others learn and grow in the world of DIY woodworking. His approach to woodworking combines creativity, practicality, and a deep appreciation for the art of building with your own hands. Through his blog, he inspires individuals of all skill levels to embark on their own woodworking journeys, creating beautiful, functional pieces of furniture and décor.
Professional Focus
- Specializes in DIY woodworking projects, from furniture to home décor.
- Provides step-by-step guides and practical tutorials for woodworkers of all skill levels.
- Dedicated to helping readers build confidence and skill through easy-to-follow instructions and tips.
- Passionate about fostering a community of makers who can share, learn, and grow together.
Education History
- University of Craft and Design – Bachelor of Fine Arts (BFA) in Woodworking and Furniture Design
- Woodworking Apprenticeships – Extensive hands-on training with skilled craftsmen to refine carpentry and furniture making techniques.
- Online Courses & Masterclasses – Continued education in advanced woodworking techniques, design principles, and specialized tools
Expertise:
- DIY woodworking, carpentry, furniture making, and home décor projects.
- Creating accessible tutorials and guides for beginner to advanced woodworkers.
- Sharing the joys and satisfaction of woodworking, from raw materials to finished products.