Are your cluttered spaces calling out for more storage? A storage bench could be the perfect solution. Not only does it provide a place to sit, but it also offers hidden storage to keep your home tidy and organized. In this comprehensive guide, we’ll walk you through the process of how to build storage benches. Whether you’re a seasoned DIY enthusiast or someone looking to add more organization to your home, this project is both rewarding and practical. Let’s get started!

Tired of clutter piling up in your living space? A storage bench might be the perfect solution for you. Not only does it provide a place to sit, but it also offers hidden storage to keep your home neat and organized. In this blog post, we’ll guide you through the process of building your very own storage bench, step-by-step. Whether you’re a DIY novice or a seasoned builder, this guide will offer efficient tips and practical advice tailored to your skill level and needs.
Why Choose a Storage Bench?
A storage bench is a versatile piece of furniture that can be used in various rooms, from the entryway to the bedroom. It combines functionality with style, making it a practical addition to any home. Imagine having a comfortable seat where you can put on your shoes while storing seasonal items or kids’ toys right beneath you. The possibilities are endless!
Tools and Materials You’ll Need
Before we jump into the building process, let’s gather all the necessary tools and materials. Here’s a handy checklist:
- Tape measure
- Pencil
- Circular saw or miter saw
- Power drill
- Wood screws
- Wood glue
- Sandpaper
- Paint or stain
- Hinges
- Plywood or solid wood boards
Ensure you have everything ready before you start to avoid interruptions during the project.
8 Steps for How to Build Storage Benches
1. Gather Your Materials and Tools
Before you start building, make sure you have all the necessary materials and tools. Here’s what you’ll need:
- Plywood or MDF boards
- Wood screws
- Wood glue
- Hinges (for the lid)
- Paint or varnish (optional)
- Measuring tape
- Saw (circular or jigsaw)
- Drill and drill bits
- Sandpaper
Having all your materials and tools ready will save you time and ensure a smoother building process. Consider visiting your local hardware store or ordering supplies online.

2. Design Your Bench
The first step in any DIY project is to create a design or plan. Measure the space where you intend to place your storage bench and decide on the dimensions. Make a sketch or use design software to visualize your project.
A well-thought-out design will ensure that your bench fits perfectly in your desired space and meets your storage needs. For inspiration, browse Pinterest or home improvement websites to see different styles and configurations.
3. Cut the Wood Pieces
Once you have your design, it’s time to cut the wood pieces according to your measurements. You will need:
- Two side panels
- Front and back panels
- Bottom panel
- Top panel (lid)
- Internal dividers (optional, for additional organization)
Make sure to measure twice and cut once to avoid any mistakes. Using a circular saw or jigsaw can make cutting easier and more precise.
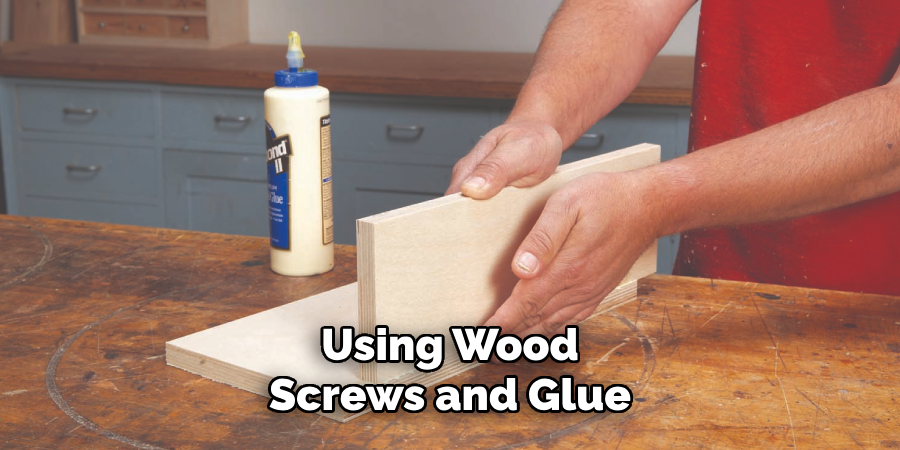
4. Assemble the Frame
Start by assembling the frame of your storage bench. Use wood screws and wood glue to attach the side panels to the front and back panels. Then, attach the bottom panel to the frame.
A sturdy frame is crucial for the durability of your bench. Make sure all joints are secure and square. You can use corner clamps to hold pieces in place while you screw them together.
5. Install Internal Dividers (Optional)
If you want to add internal dividers to your storage bench, now is the time to install them. Dividers can help keep your stored items organized and easily accessible.
Measure and cut the dividers to fit inside the frame, then attach them using wood screws and glue. Make sure they are evenly spaced and securely fastened.
6. Attach the Lid
The lid of your storage bench will be hinged for easy access. Attach the hinges to the back edge of the lid and then to the back panel of the frame.
Ensure that the lid opens smoothly and stays aligned with the frame. You may want to add a soft-close hinge or a lid support to prevent it from slamming shut.
7. Sand and Finish
To give your bench a polished look, sand all surfaces thoroughly. Start with coarse-grit sandpaper and gradually move to finer grits for a smooth finish.
Once sanded, you can choose to paint or varnish your bench. This step not only enhances the appearance but also protects the wood from wear and tear.
8. Enjoy Your New Storage Bench
With your storage bench complete, it’s time to put it to use. Place it in your desired location, and start filling it with items you need to store. Whether it’s shoes, blankets, or toys, your new bench will help keep your space organized and clutter-free.
Building a storage bench is a practical and satisfying DIY project that adds both functionality and style to your home. If you’re ready to tackle more projects and enhance your home even further, explore more DIY ideas and tips on our blog.
Maintenance Tips
To keep your storage bench looking and functioning its best, follow some simple maintenance tips. Regularly dust and clean the surface to prevent dirt buildup. Check the hinges and screws periodically to ensure they remain tight and secure. If the bench is painted, touch up any chips or scratches to maintain its appearance. Proper maintenance will extend the life of your storage bench.
Creative Customizations
If you’re feeling adventurous, consider customizing your storage bench further. Add features like built-in lighting, charging stations, or personalized engravings. Paint it in bold colors or patterns to make a statement piece. The possibilities are endless when it comes to DIY projects. Customizing your bench makes it uniquely yours and adds a personal touch to your home decor.

Budgeting and Cost-Saving Tips
Building a storage bench doesn’t have to break the bank. Here are some cost-saving tips:
- Use reclaimed wood or leftover materials.
- Compare prices for tools and materials online and in-store.
- Borrow or rent tools you don’t already own.
- Look for discounts or sales at local hardware stores.
Safety Precautions for Building Your Storage Bench
Safety should always be your top priority when engaging in construction projects. Here are some essential safety precautions to follow while building your storage bench:
- Wear Protective Gear: Always use safety goggles to protect your eyes from wood chips and dust. A dust mask is also recommended to avoid inhaling particles, and work gloves will protect your hands from splinters and cuts.
- Work in a Well-Ventilated Area: Ensure that your workspace is well-ventilated, especially if you’re using wood glue or paint, as these can emit harmful fumes.
- Handle Tools Carefully: Familiarize yourself with the tools you will be using. Follow the manufacturer’s instructions and always be mindful of your surroundings while operating power tools.
- Keep Your Workspace Tidy: Maintain a clean workspace to prevent trips and falls. Store tools and materials properly when not in use.
- Use Stable Work Surfaces: Ensure that your work surface is stable and secure to avoid accidents while cutting or assembling the wood.
- Be Mindful of Electrical Safety: If using power tools, ensure that cords are not frayed and that you are using tools rated for their intended purpose. Always unplug tools when not in use.
Common Mistakes to Avoid
Building a storage bench can be an enjoyable experience, but there are several common pitfalls to steer clear of to ensure a successful project.
- Skipping Measurements: Failing to measure properly can lead to incorrect cuts and dimensions, resulting in a bench that doesn’t fit your intended space. Always measure twice before cutting.
- Neglecting Material Quality: Using low-quality materials may save money upfront but could result in a lack of durability and a subpar finished product. Invest in quality wood and supplies for long-lasting results.
- Inadequate Planning: Jumping into the build without a clear plan or design can lead to confusion and errors. Take time to sketch out your project and gather all necessary materials in advance.
- Over-tightening Screws: While it’s important to ensure that everything is securely fastened, over-tightening screws can strip the wood, weakening the joints. Use a steady hand and don’t force screws beyond a snug fit.
- Ignoring Weight Limitations: Not accounting for how much weight the bench must support can lead to structural failure. Consider the items you will store and ensure that your design is sturdy enough to hold them.

Conclusion
Building a storage bench is a rewarding project that combines functionality with creativity. By following these steps, you’ll create a beautiful and practical addition to your home. Whether you need extra storage, seating, or both, a storage bench is a versatile solution that enhances any space. Hopefully, this article gave you some helpful tips about how to build storage benches successfully, so now that you have the proper knowledge on how to get the job done, why not give it a try today?
About the Author
Adrian Green, a lifelong woodworking enthusiast, shares his passion for the craft through The Woodenify Blog. With a foundation built on years of hands-on experience in his father’s woodworking shop, Adrian is dedicated to helping others learn and grow in the world of DIY woodworking. His approach to woodworking combines creativity, practicality, and a deep appreciation for the art of building with your own hands. Through his blog, he inspires individuals of all skill levels to embark on their own woodworking journeys, creating beautiful, functional pieces of furniture and décor.
Professional Focus
- Specializes in DIY woodworking projects, from furniture to home décor.
- Provides step-by-step guides and practical tutorials for woodworkers of all skill levels.
- Dedicated to helping readers build confidence and skill through easy-to-follow instructions and tips.
- Passionate about fostering a community of makers who can share, learn, and grow together.
Education History
- University of Craft and Design – Bachelor of Fine Arts (BFA) in Woodworking and Furniture Design
- Woodworking Apprenticeships – Extensive hands-on training with skilled craftsmen to refine carpentry and furniture making techniques.
- Online Courses & Masterclasses – Continued education in advanced woodworking techniques, design principles, and specialized tools
Expertise:
- DIY woodworking, carpentry, furniture making, and home décor projects.
- Creating accessible tutorials and guides for beginner to advanced woodworkers.
- Sharing the joys and satisfaction of woodworking, from raw materials to finished products.