Installing hardwood flooring is a rewarding project that can transform the look and feel of any space. With its durability, natural beauty, and timeless appeal, hardwood flooring is a popular choice for homeowners. Whether you’re renovating a single room or upgrading an entire home, understanding the key steps and tools required for proper installation is essential. This guide will walk you through the process of how to hardwood floor installation.
Preparing for Hardwood Floor Installation
Proper preparation is crucial for a successful hardwood floor installation. Begin by assessing the space where the flooring will be installed. Ensure the subfloor is clean, dry, and level, as any imperfections can affect the stability and appearance of the hardwood. Remove any existing flooring, such as carpet or old tile, and thoroughly sweep or vacuum the area to eliminate debris. Next, measure the room’s dimensions to determine the amount of hardwood needed, accounting for extra material to cover mistakes or future repairs.
Acclimate the hardwood planks to the room’s temperature and humidity by placing the boxes in the space for at least 48 to 72 hours before installation. This step helps prevent warping or bowing after the flooring is installed. Finally, gather all necessary tools and materials, such as a saw, tape measure, spacers, and adhesive, to ensure the process runs smoothly. Preparing thoroughly will help streamline installation and achieve a professional result.
Types of Hardwood Floor Installation Methods
When installing hardwood floors, there are several methods to choose from, depending on the type of hardwood, subfloor, and personal preference. The most common installation methods include:
- Nail-Down Method
This method is popular for solid hardwood floors and requires securing the planks to a wooden subfloor using nails or cleats. It’s a durable and stable option, often used for traditional hardwood installations, but it requires specialized tools like a flooring nailer.
- Glue-Down Method
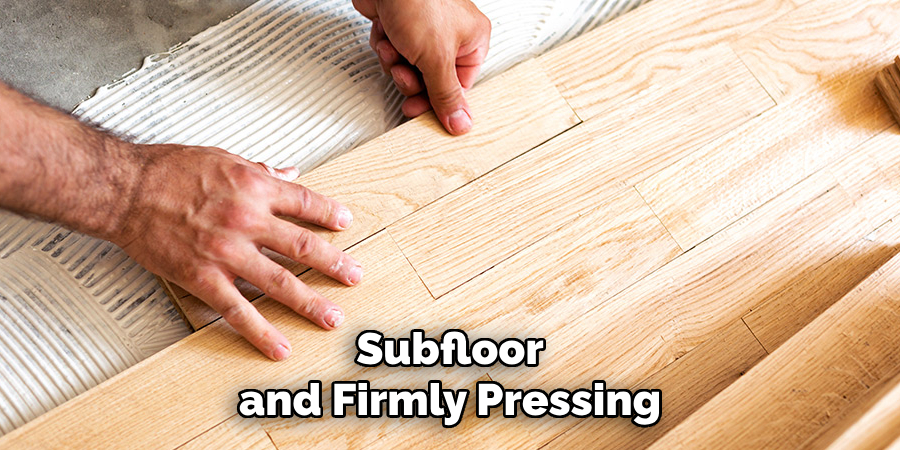
The glue-down method involves applying an adhesive to the subfloor and firmly pressing the hardwood planks into place. This technique is frequently used for engineered hardwood or in spaces with concrete subfloors. It provides strong adherence and helps reduce noise.
- Floating Floor Method
A floating floor installation does not require nails or glue. Instead, the hardwood planks are designed to interlock and “float” above the subfloor. This method is ideal for DIY installations as it is quicker and easier to install. It’s commonly used with engineered hardwood and laminate flooring.
- Staple-Down Method
Similar to the nail-down method, this approach involves using staples to secure the planks to the subfloor. It is less labor-intensive than nailing and works well for engineered hardwood flooring.
Selecting the right installation method depends on the specific requirements of the space and the type of flooring being installed. Proper preparation and understanding of the techniques will ensure a long-lasting and beautiful hardwood floor.
10 Methods How to Hardwood Floor Installation
1. Prepare the Subfloor for Installation
Before installing hardwood flooring, it’s crucial to prepare the subfloor to ensure durability and a smooth finish. Start by thoroughly cleaning the subfloor to remove any dust, dirt, or debris. Next, inspect the subfloor for any uneven areas, cracks, or squeaks. Sand down high spots and fill any low areas with leveling compound to achieve a flat surface. If the subfloor is wooden, secure any loose boards with screws to eliminate creaking.
Concrete subfloors should be checked for moisture using a moisture meter—if the reading exceeds acceptable levels, use a moisture barrier or sealant. Proper subfloor preparation is essential for preventing future issues like buckling or uneven wear, and it forms the foundation for a successful hardwood installation.
2. Acclimate Your Hardwood Flooring
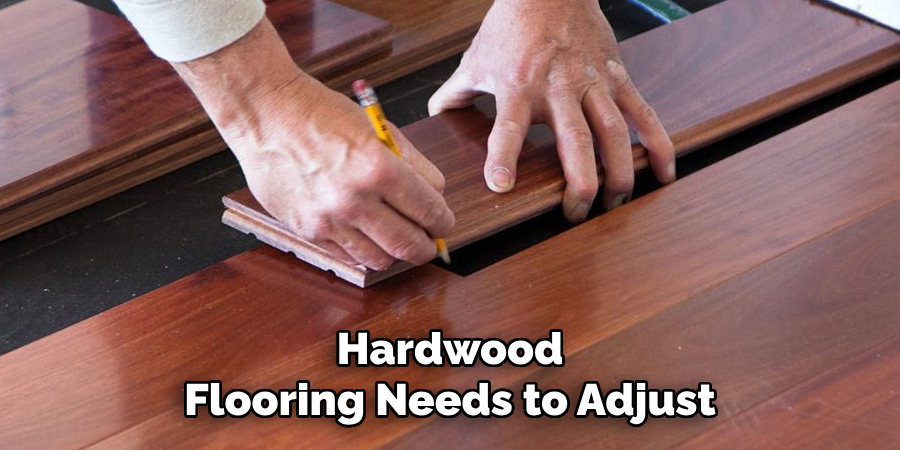
Hardwood flooring needs to adjust to the room’s humidity and temperature before installation. Bring the wood planks into the installation space and leave them for 48 to 72 hours, stacked with spacers for airflow. This process allows the wood to expand or contract to the room’s conditions, minimizing the risk of warping once installed. Failure to acclimate the wood can lead to gaps or cupping as the boards naturally expand and contract. Proper acclimation is a critical step, particularly in areas with significant temperature or humidity fluctuations.
3. Gather Essential Tools and Materials
Having the right tools and materials at hand makes the installation process efficient and stress-free. Essential tools include a flooring nailer, miter saw, tape measure, chalk line, rubber mallet, pry bar, and moisture barrier. You’ll also need flooring adhesive, nails, underlayment, spacers, and wood filler. Safety gear such as knee pads, gloves, and eye protection is important to avoid injuries during installation. By organizing your tools and materials beforehand, you’ll avoid delays and ensure a smoother installation process, from cutting the boards to securing them in place.
4. Install the Underlayment or Moisture Barrier
Laying down underlayment or a moisture barrier is essential to protect your hardwood from moisture and provide a cushioning effect. Roll out the underlayment across the subfloor, overlapping seams by a few inches, and tape them securely. For concrete subfloors, use a plastic moisture barrier to prevent moisture from seeping into the wood. Make sure the underlayment lies flat without wrinkles, as uneven layers can cause the hardwood to shift or creak. This step not only increases comfort underfoot but also prolongs the lifespan of your flooring by minimizing moisture damage.
5. Plan Your Layout and Mark Guidelines
Careful planning is crucial to achieving a visually appealing and structurally sound floor. Measure the room’s width and divide by the width of the boards to determine how many rows will fit. If the final row will be narrower than half a board, adjust the first row to maintain balance. Snap a chalk line along the starting wall to act as a guide, ensuring the first row is straight. Lay the boards parallel to the longest wall or the room’s main focal point to create a visually appealing flow. A well-planned layout prevents awkward cuts and maintains symmetry throughout the room.

6. Start the First Row with Precision
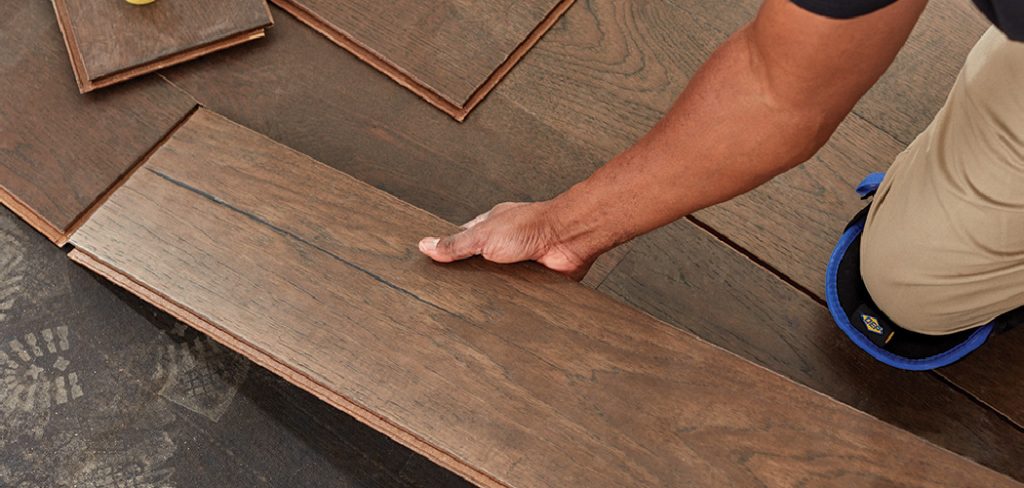
Begin installation by placing the first row of hardwood planks along the chalk line with the groove side facing the wall. Use spacers between the wall and the boards to maintain a 1/4-inch expansion gap, allowing for natural wood movement. Secure the first row by face-nailing through the top of each plank near the wall, where baseboards will later hide the nails. Use a flooring nailer to secure the tongue side of the plank to the subfloor. Getting the first row perfectly aligned is crucial, as it sets the foundation for the entire installation.
7. Stagger Seams for a Natural Look
Staggering the seams between rows creates a natural, visually appealing pattern and increases the floor’s stability. Start the second row with a plank cut at least 6 inches shorter than the previous row’s first plank. Continue alternating the lengths in each row to avoid forming patterns that look unnatural. This staggered layout mimics the random variation seen in natural wood flooring and reduces the risk of weak joints lining up, which could compromise the structural integrity of the floor. Proper staggering also makes the room appear more spacious and balanced.
8. Secure the Hardwood Planks Properly
For the first few rows, you may need to use a face-nailing technique, but once space allows, switch to blind nailing through the tongue of each plank. Use a flooring nailer to drive nails at a 45-degree angle through the tongue, which conceals the nails as the next board locks into place. Make sure each board is snug against the previous one before nailing to eliminate gaps. Use a rubber mallet to tap the boards gently into place, ensuring a tight fit. Proper nailing technique ensures a stable, gap-free floor that withstands daily use.
9. Trim the Final Rows and Install Them Carefully
When you reach the final rows, space becomes limited, requiring more precise cuts and careful fitting. Measure the gap between the last laid plank and the wall, subtracting the expansion gap, and rip cut the boards to fit. Use a pry bar to pull the boards tightly into place. Since there’s limited space for a nailer, you may need to glue and face-nail the last row. Filling any visible nail holes with wood filler of a matching color will complete the seamless look. Taking time with the final rows ensures the whole project looks professional and well-executed.
10. Finishing Touches: Sanding, Staining, and Sealing
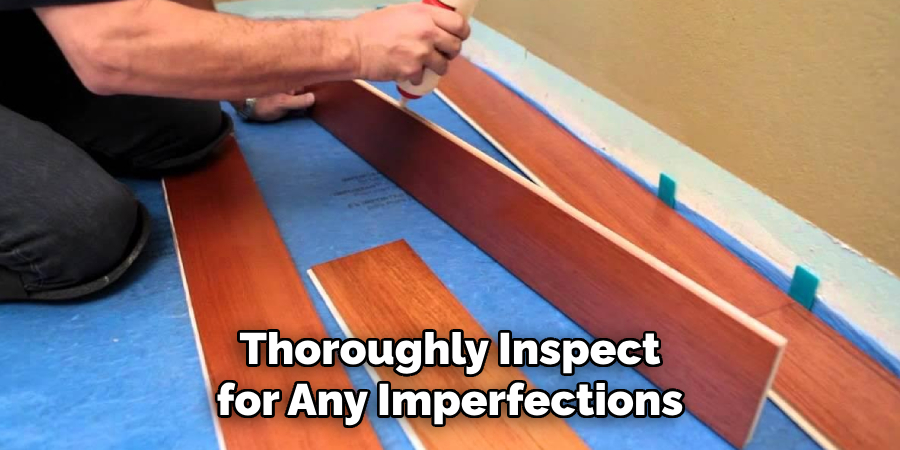
Once the floor is installed, thoroughly inspect for any imperfections or uneven boards. Sand the entire floor with a drum sander, starting with coarse grit and finishing with fine grit for a smooth surface. After vacuuming up dust, apply a stain if desired, followed by at least two coats of polyurethane sealant to protect the wood and enhance its natural beauty. Allow adequate drying time between coats and lightly sand between applications for a flawless finish. These finishing steps not only enhance the wood’s appearance but also add a protective layer against foot traffic, moisture, and daily wear.
Conclusion
Hardwood floor ideas can seem daunting, but by following these methods, you can achieve a stunning, professional-quality result. From meticulous subfloor preparation to careful nailing and finishing, each step contributes to the durability and beauty of your new flooring. Whether you choose solid hardwood or engineered planks, proper installation techniques ensure that your floors remain beautiful and resilient for decades. Thanks for reading, and we hope this has given you some inspiration on how to hardwood floor installation!
About the Author
Adrian Green, a lifelong woodworking enthusiast, shares his passion for the craft through The Woodenify Blog. With a foundation built on years of hands-on experience in his father’s woodworking shop, Adrian is dedicated to helping others learn and grow in the world of DIY woodworking. His approach to woodworking combines creativity, practicality, and a deep appreciation for the art of building with your own hands. Through his blog, he inspires individuals of all skill levels to embark on their own woodworking journeys, creating beautiful, functional pieces of furniture and décor.
Professional Focus
- Specializes in DIY woodworking projects, from furniture to home décor.
- Provides step-by-step guides and practical tutorials for woodworkers of all skill levels.
- Dedicated to helping readers build confidence and skill through easy-to-follow instructions and tips.
- Passionate about fostering a community of makers who can share, learn, and grow together.
Education History
- University of Craft and Design – Bachelor of Fine Arts (BFA) in Woodworking and Furniture Design
- Woodworking Apprenticeships – Extensive hands-on training with skilled craftsmen to refine carpentry and furniture making techniques.
- Online Courses & Masterclasses – Continued education in advanced woodworking techniques, design principles, and specialized tools
Expertise:
- DIY woodworking, carpentry, furniture making, and home décor projects.
- Creating accessible tutorials and guides for beginner to advanced woodworkers.
- Sharing the joys and satisfaction of woodworking, from raw materials to finished products.