Are you looking to add a touch of rustic charm to your home? Installing diy wood beams on ceiling is a great way to achieve that warm and inviting aesthetic. Not only do wooden beams add character and texture, but they can also help define a room’s space.
How to install wood beams on ceiling can significantly enhance the aesthetic appeal of any room, adding a sense of rustic charm or architectural elegance. Whether you are aiming to create the look of a vintage farmhouse, a modern industrial space, or a classic design, wood beams offer versatility and visual impact. While the process may seem daunting at first, with the right tools, materials, and careful planning, you can complete this project to transform your space.
This guide will walk you through the key steps to ensure a smooth and secure installation, from preparation to the final touches.
What Are the Benefits of Wood Beams?
Wood beams are not only aesthetically pleasing, but they also offer numerous benefits for your home. These include:
- Structural Support: Wood beams can provide structural support to your ceiling or roof, making it more stable and secure.
- Durability: With proper installation and maintenance, wood beams can last for decades.
- Insulation: Wood has natural insulation properties that can help regulate the temperature in your home, resulting in lower energy costs.
- Sound Absorption: The density of wood makes it an excellent material for absorbing sound, reducing noise levels within your space.
- Timeless Appeal: As mentioned earlier, wood beams possess a timeless and classic look that complements any home style.
What Will You Need?
To install wood beams in your home, you will need a few basic tools such as:
- Measuring tape
- Power drill
- Screws or nails
- Hammer (if using nails)
- Ladder or scaffolding, depending on the height of your ceiling
You may also need to purchase wood beams from a hardware store or lumberyard. It is important to measure and plan accordingly so that you buy the correct amount of wood for your project.

10 Easy Steps on How to Install Wood Beams on Ceiling
Step 1. Measure and Mark
Start by measuring the length and width of your ceiling where the wood beams will be installed. Use a measuring tape to ensure accurate dimensions. Once you have the measurements, use a pencil to mark the placement of each beam on the ceiling. It’s essential to space the beams to achieve a balanced and professional appearance. Double-check your measurements and markings to ensure accuracy before proceeding to the next step.
Step 2. Locate Ceiling Joists
To ensure a secure installation, you will need to locate the ceiling joists. Use a stud finder to identify the position of the joists along the ceiling. Move the stud finder slowly across the ceiling until it signals the presence of a joist. Mark the edges of each joist with a pencil to outline their placement. This step is crucial because the beams must be securely anchored into the joists to provide proper support. If the joists do not align with your planned beam placement, consider adjusting your design or using blocking to create a secure mounting framework.
Step 3. Cut the Beams to Size
Using a tape measure, carefully measure the length required for each beam to fit your design. Mark the measurements clearly on the beams with a pencil to ensure precision. Double-check all measurements before cutting to avoid errors. Use a circular saw or a miter saw to make clean, straight cuts along your marked lines.
Always wear appropriate safety gear, including goggles and gloves, while operating the saw. Once all beams are cut, sand any rough edges for a smooth finish. This step ensures the beams are ready for installation and fit perfectly into your ceiling design.
Step 4. Prepare the Ceiling Surface
Before installing the beams, ensure that the ceiling surface is clean, level, and adequately prepared. Begin by removing any dust, cobwebs, or debris using a broom or vacuum with a brush attachment. Inspect the ceiling for uneven areas or imperfections, and fill any cracks or holes with spackle or joint compound.
Allow the filler to dry completely and sand the area smooth for a seamless finish. If necessary, apply a fresh coat of paint or primer to the ceiling to create a uniform background that complements the beams. Finally, measure and mark the positions where the beams will be installed, using a chalk line or level to ensure accuracy. This careful preparation will help achieve a professional and polished final look.
Step 5. Pre-Drill Holes in the Beams
Using a power drill, carefully pre-drill holes in the beams at the marked positions. This step helps prevent the wood from splitting during installation and ensures easier alignment when securing the beams to the ceiling. Use a drill bit that matches the size of your screws or fasteners, and make sure the holes are evenly spaced for optimal support. Take your time to double-check the spacing and alignment of the holes to guarantee a sturdy and precise fit.

Step 6. Install Mounting Brackets
To begin installing the mounting brackets, align them with the pre-drilled holes on the beams. Hold the bracket firmly in place and secure it using screws or fasteners. Ensure that each bracket is securely fastened to prevent movement and maintain stability. Use a level to confirm that the brackets are properly aligned and adjust as necessary before fully tightening. Repeat this process for each bracket to create a reliable and evenly distributed support system. Double-check all brackets once installed to guarantee they are secure and aligned correctly.
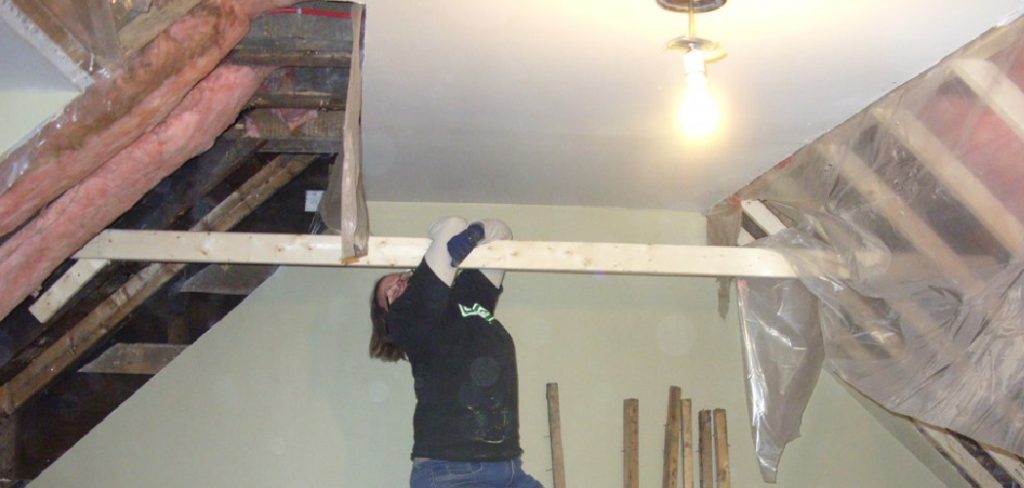
Step 7. Raise the Beam into Position
With the brackets securely installed, carefully lift the beam and position it onto the brackets. Ensure that the beam is centered and seated adequately in each bracket. It may be helpful to have multiple people assist with this step to distribute the weight and maintain control during the lift evenly. Once the beam is in place, check that it is level using a spirit level. Make any necessary adjustments to ensure proper alignment. When the beam is securely positioned and level, proceed to fasten it to the brackets using the appropriate screws or bolts to hold it firmly in place.
Step 8. Secure the Beam
Ensure that all screws or bolts are tightened firmly, but be cautious not to overtighten, as this could damage the beam or its brackets. Double-check that each fastener is secure and properly seated to prevent any movement or instability. For added safety and durability, consider using washers or lock nuts where applicable. Once all connections are secure, inspect the overall setup to confirm that the beam is stable and correctly aligned before moving on to the next step.
Step 9. Repeat for Additional Beams
If your project requires multiple beams, simply repeat the process above for each additional beam. Ensure that all beams are level and aligned adequately before proceeding to the next step. It may also be helpful to have someone assist you in holding the beams in place while you secure them.
Step 10. Final Inspection
After all beams have been installed, perform a thorough final inspection of the structure. Check that all connections are tight, all beams are properly aligned, and there are no visible signs of damage or instability. Verify that the framework is level and meets the intended design specifications. Taking the time to ensure everything is secure and in place will prevent potential issues later and provide a solid foundation for the project’s next phases.

By following these steps and guidelines, you can successfully install structural beams for any construction project.
5 Things You Should Avoid
- Skipping Proper Measurements
Failing to measure accurately can lead to misaligned beams and an uneven appearance. Always double-check your measurements before cutting or positioning the beams to ensure precision.
- Ignoring the Ceiling Structure Assessment
Installing wood beams without assessing the ceiling’s structural integrity can result in sagging or even damage over time. Ensure the ceiling can support the weight of the beams before commencing installation.
- Using the Wrong Type of Fasteners
Incorrect fasteners, such as nails or screws that aren’t designed for heavy loads, may not hold the beams securely. Always use fasteners appropriate for the material and weight of the beams.
- Neglecting Surface Preparation
Installing beams on a dirty or rough ceiling surface can result in poor adhesion and inadequate stability. Clean and smooth the surface thoroughly before installation.
- Skipping Finishing Touches
Forgetting to sand, stain, or seal the beams after installation can result in a subpar appearance and reduced longevity. Prioritize proper finishing to enhance the aesthetic and durability of the wood beams.

Conclusion
How to install wood beams on ceiling requires careful preparation, attention to detail, and proper execution to ensure a high-quality outcome.
From selecting the right materials and tools to preparing the surface, each step plays a critical role in achieving a stable and visually appealing installation. By avoiding common mistakes and focusing on finishing touches, you can ensure the beams not only enhance the aesthetics of the space but also maintain their durability over time.
With patience and precision, a successful wood beam installation can transform the look and feel of any room.
About the Author
Adrian Green, a lifelong woodworking enthusiast, shares his passion for the craft through The Woodenify Blog. With a foundation built on years of hands-on experience in his father’s woodworking shop, Adrian is dedicated to helping others learn and grow in the world of DIY woodworking. His approach to woodworking combines creativity, practicality, and a deep appreciation for the art of building with your own hands. Through his blog, he inspires individuals of all skill levels to embark on their own woodworking journeys, creating beautiful, functional pieces of furniture and décor.
Professional Focus
- Specializes in DIY woodworking projects, from furniture to home décor.
- Provides step-by-step guides and practical tutorials for woodworkers of all skill levels.
- Dedicated to helping readers build confidence and skill through easy-to-follow instructions and tips.
- Passionate about fostering a community of makers who can share, learn, and grow together.
Education History
- University of Craft and Design – Bachelor of Fine Arts (BFA) in Woodworking and Furniture Design
- Woodworking Apprenticeships – Extensive hands-on training with skilled craftsmen to refine carpentry and furniture making techniques.
- Online Courses & Masterclasses – Continued education in advanced woodworking techniques, design principles, and specialized tools
Expertise:
- DIY woodworking, carpentry, furniture making, and home décor projects.
- Creating accessible tutorials and guides for beginner to advanced woodworkers.
- Sharing the joys and satisfaction of woodworking, from raw materials to finished products.