Are you tired of working from your bed or couch? Do you often struggle to balance your laptop on your lap while trying to get work done? A lap desk may be the solution for you!
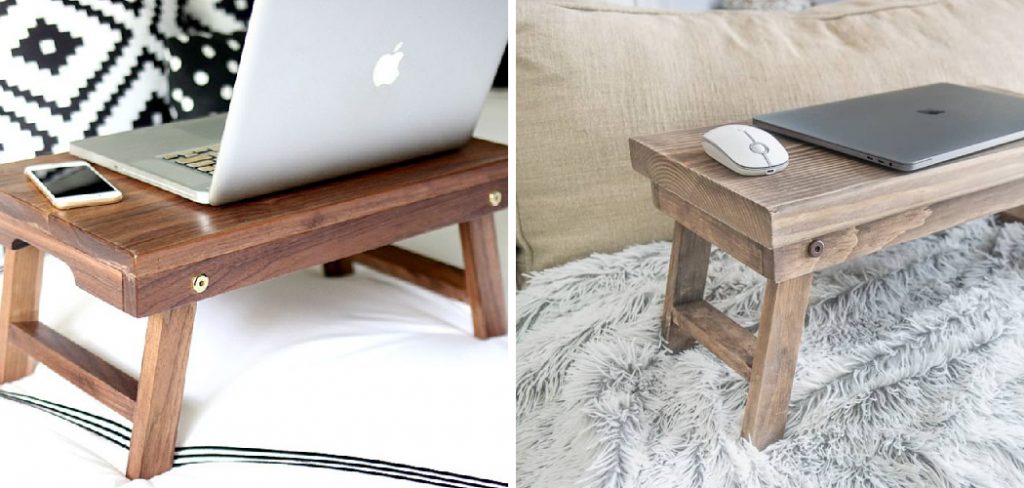
How to make a lap desk is a practical and creative project that can enhance your comfort and productivity while working or relaxing at home. With the increasing demand for flexible workspace solutions, a lap desk offers the perfect blend of portability and functionality.
Whether you’re a student needing a stable surface for studying, a professional working remotely, or simply someone who loves to enjoy a book or sketch while lounging on the couch, a lap desk can significantly improve your experience.
In this guide, we will walk you through the essential materials, tools, and steps required to make your own personalized lap desk, tailored to your unique needs and preferences.
What Will You Need?
Before you begin, gather the following materials and tools:
- A wooden board or plank (preferably lightweight)
- Sandpaper (medium-grade)
- Wood stain or paint
- Paintbrushes
- Clear coat finish (optional)
- Saw
- Drill
- Screws and nuts
- Screwdriver
Once you have all the necessary items, let’s start making your lap desk!
10 Easy Steps on How to Make a Lap Desk
Step 1: Measure and Cut Your Board
The first step is to decide on the size and shape of your lap desk. Consider your intended use for the desk, as well as any specific requirements such as space constraints or preferred dimensions. Once you have a rough idea, mark the desired length and width on your wooden board.
Next, using a saw, carefully cut along the marked lines to obtain a rectangular or square-shaped board.
Step 2: Sandpaper Your Board
After cutting your board to the desired dimensions, the next step is to smooth the edges and surface.
Use medium-grade sandpaper to gently sand down all sides of the board. This process helps to remove any splinters or rough patches that could snag on your clothing or skin, ensuring a comfortable working surface. Remember to pay close attention to the corners and edges, as these areas are often overlooked but can cause discomfort if left rough
.Once you have sanded the board thoroughly, you may want to follow up with finer sandpaper for a polished finish. This additional step will not only enhance the appearance of the wood but also prepare it for painting or staining, allowing for better adhesion and a more professional look.
After sanding, wipe the board with a clean, damp cloth to remove any dust particles before proceeding to the next step.
Step 3: Apply Stain or Paint
Once your board is sanded and free of dust, it’s time to add some colour or finish to your lap desk.

Choose a wood stain or paint that complements your style and preferences. If you opt for wood stain, apply it with a paintbrush in the direction of the grain to achieve an even finish. Allow the stain to sit for a few minutes before wiping away the excess with a clean cloth, ensuring a rich, natural look. If you prefer to use paint, gently apply it in thin layers, allowing each layer to dry before adding the next.
Be sure to cover the edges thoroughly. After your desired color is achieved, let the board dry completely according to the manufacturer’s instructions. This step adds aesthetic appeal and helps protect the wood surface for long-term use.
Step 4: Apply Clear Coat Finish (Optional)
After the stain or paint has dried completely, you may want to protect your lap desk further by applying a clear coat finish. This optional step will help seal the wood, providing added durability against scratches, spills, and wear over time. Using a clean paintbrush, apply a thin layer of clear coat in smooth, even strokes, ensuring you cover all surfaces of the board.
Allow the first coat to dry as per the manufacturer’s instructions, and consider applying a second coat for enhanced protection. This finish enhances the look of your lap desk by adding a subtle shine and elevates its longevity, making it a worthwhile investment for your workspace.
Step 5: Drill Holes for Screws
Once your lap desk is dry and finished to your liking, the next step is to add stability by securing the legs or base. If you use pre-purchased legs, position them appropriately on the underside of your board. Mark the spots where screws will go, ensuring they are evenly spaced and aligned for balance.
If you’re constructing your own supports, such as wooden blocks or a frame, mark those locations as well. Using a drill, create holes in the marked spots, ensuring they are slightly smaller in diameter than the screws you plan to use. This step is crucial for achieving a secure fit and preventing any splitting of the wood during assembly.
Step 6: Attach the Legs
Now it’s time to secure the legs or base to your lap desk. Position each leg in the drilled holes, ensuring they are aligned and that the desk sits evenly.
Using a screwdriver, insert the screws into the holes and tighten them firmly, but take care not to overtighten, as this may damage the wood. If you’re using wooden blocks or a custom frame as supports, repeat this process by attaching them at the designated spots.
Once all legs or supports are securely fastened, gently shake your lap desk to ensure stability. This step is vital to ensure that your lap desk can withstand daily use while providing a sturdy surface for your projects.
Step 7: Final Touches
With the legs securely attached, it’s time to add the final touches to your lap desk. Consider including features that enhance its usability, such as a cushion or padding on the underside for comfort when resting on your lap or decorative elements like stencils or decals for a personal flair.
If you wish to install a small drawer or compartment for storage, this is the stage to do so—measure and cut out the necessary pieces, ensuring they fit snugly.
Once additional features are in place, do a final inspection to ensure everything is secure and meets your expectations. This step is essential for making your lap desk functional and tailored to your specific needs.
Step 8: Test Your Lap Desk
Before fully committing to using your new lap desk, it’s essential to test its stability and functionality. Set it up on a flat surface and place some weight on it, mimicking how you intend to use it, whether for a laptop, books, or craft supplies. Pay attention to how it feels when resting on your lap—ensure that it is comfortable and that the height is appropriate for your needs.
Check for any wobbling or instability; if necessary, make adjustments to the legs or supports for a more secure foundation. This step will ensure that your lap desk is not only aesthetically pleasing but also practical and ready for daily use.
Step 9: Personalize Your Desk
Now that your lap desk is functional, consider ways to add your personal touch. You could customise it with your favourite colours or patterns, add stickers or decals, or even incorporate functional elements like cup holders or phone stands.
This step is all about making the desk uniquely yours, reflecting your style and enhancing your overall workspace experience. Personalization increases your enjoyment of the lap desk and provides an inspiring environment for productivity.
Step 10: Maintain Your Lap Desk
Regular maintenance is essential to ensure the longevity of your lap desk. Periodically check for any loose screws and tighten them as needed. Clean the surface with a gentle cleaner suitable for wood, avoiding abrasive materials that could scratch or damage the finish.

If the wood shows signs of wear, consider reapplying a clear coat or refreshing the stain or paint to maintain its look and durability. By investing a little time in upkeep, you can enjoy your handmade lap desk for years.
Following these ten simple steps, you can create a practical and personalized lap desk that fits your needs.
5 Things You Should Avoid
- Skipping the Measuring Process: Failing to measure your board or legs properly can lead to an unstable lap desk. Always double-check measurements for accuracy to ensure a balanced and functional design.
- Using Low-Quality Materials: Opting for inferior wood or hardware can compromise the durability of your lap desk. Invest in high-quality materials to ensure strength, longevity, and a better overall appearance.
- Neglecting Safety Precautions: Forgetting safety gear, such as goggles and gloves, can lead to injuries during construction. Always prioritise your safety by following appropriate precautions when using tools.
- Overlooking Finish Drying Times: Rushing the drying process for stains, paints, or clear coats can result in smeared finishes or compromised adhesion. Adhere to the manufacturer’s recommended drying times for optimal results.
- Ignoring Ergonomics: Failing to consider the height and design of your lapdesk can lead to discomfort during use. Ensure that the desk is at an appropriate height and angle to promote good working posture.
Conclusion
How to make a lap desk is a rewarding project that allows you to combine functionality with personal style.
By following the outlined steps, you can ensure that your desk is practical and tailored to your unique needs. From selecting the suitable materials and constructing a sturdy base to personalizing it with your favorite colors and decorative elements, each phase plays an essential role in achieving a high-quality end product.
Regular maintenance will help preserve the desk’s aesthetics and functionality over time, making it a reliable companion for work or leisure activities. Embrace the process and the satisfaction of building a lap desk that genuinely reflects you!
About the Author
Adrian Green, a lifelong woodworking enthusiast, shares his passion for the craft through The Woodenify Blog. With a foundation built on years of hands-on experience in his father’s woodworking shop, Adrian is dedicated to helping others learn and grow in the world of DIY woodworking. His approach to woodworking combines creativity, practicality, and a deep appreciation for the art of building with your own hands. Through his blog, he inspires individuals of all skill levels to embark on their own woodworking journeys, creating beautiful, functional pieces of furniture and décor.
Professional Focus
- Specializes in DIY woodworking projects, from furniture to home décor.
- Provides step-by-step guides and practical tutorials for woodworkers of all skill levels.
- Dedicated to helping readers build confidence and skill through easy-to-follow instructions and tips.
- Passionate about fostering a community of makers who can share, learn, and grow together.
Education History
- University of Craft and Design – Bachelor of Fine Arts (BFA) in Woodworking and Furniture Design
- Woodworking Apprenticeships – Extensive hands-on training with skilled craftsmen to refine carpentry and furniture making techniques.
- Online Courses & Masterclasses – Continued education in advanced woodworking techniques, design principles, and specialized tools
Expertise:
- DIY woodworking, carpentry, furniture making, and home décor projects.
- Creating accessible tutorials and guides for beginner to advanced woodworkers.
- Sharing the joys and satisfaction of woodworking, from raw materials to finished products.