Creating a window frame for glass can be a rewarding and practical DIY project. Whether you’re building a new frame or replacing an old one, the process requires careful planning, accurate measurements, and the right materials. A well-crafted window frame not only enhances the structural integrity of the window but also adds to the aesthetic appeal of your space. This guide will walk you through the steps of how to make a window frame for glass.
Importance of Making a Proper Frame for Glass
A properly constructed window frame is crucial for both functionality and durability. The frame provides essential support to the glass, ensuring that it remains securely in place and can withstand environmental factors like wind, rain, and temperature changes. An improper frame can lead to issues such as drafts, water leakage, and even structural instability over time.
Additionally, a well-made frame enhances the energy efficiency of your home by preventing heat loss, which can reduce energy costs. Beyond practicality, a well-designed frame can elevate the overall appearance of the window, contributing to the aesthetic harmony of the room or building. Taking the time to create a proper frame ensures longevity, safety, and visual appeal for your project.
Tools and Materials You’ll Need
To create a proper frame, having the right tools and materials is essential. Here’s a list to guide you:
- Measuring Tape: For accurate measurements of the dimensions required.
- Saw: A hand saw or power saw to cut framing materials to the correct size.
- Hammer and Nails or Screwdriver and Screws: To securely assemble the frame.
- Level: Ensures that your frame is properly aligned and straight.
- Wood or Metal for Framing: Depending on the type of frame you are constructing.
- Caulking Gun and Sealant: To fill gaps and ensure a tight seal, preventing drafts or leaks.
- Safety Gear: Such as gloves and safety goggles to protect yourself while working.
By gathering these items beforehand, you’ll set yourself up for a smoother and more efficient framing process.
10 Methods How to Make a Window Frame for Glass
1. Begin with Careful Measurement and Planning
Before cutting any wood or sourcing materials, it’s essential to begin the process with careful measurement of the opening where the window frame will be installed. Measure both the height and width at multiple points, as wall openings are not always perfectly square. Note the largest dimensions to ensure the glass will fit snugly within the frame.

Also consider the depth of the frame cavity, especially if the glass will be double-paned or if the window will include trim or weatherproofing. Draw a scaled sketch with labeled dimensions and cross-section details. Proper planning at this stage will help prevent costly miscuts and mismatches later.
2. Choose the Right Wood for Structural and Aesthetic Purposes
The choice of wood is critical in creating a strong, long-lasting window frame that complements your space. Hardwoods like oak, maple, or poplar are durable and hold screws and finishes well, while softwoods like pine or fir are more affordable and easier to work with.
If the window is to be exposed to moisture (as with exterior windows), consider rot-resistant wood like cedar or treated lumber. Inspect each piece for straightness, knots, and splits—flawed boards can warp or weaken the frame over time. Plan to cut four primary sections: two vertical side jambs, a top header, and a bottom sill or apron.
3. Cut Frame Components Using Precise Joinery Techniques
Once your wood has been selected and marked based on your measurements, it’s time to cut each piece with attention to accuracy. A miter saw is ideal for making clean 45-degree or square cuts, depending on your frame style. Dry-fit each piece together on a flat surface to ensure the corners meet flush without gaps.
For added strength and visual appeal, use mortise and tenon or lap joints rather than simple butt joints. Reinforce corners with wood glue and dowels or pocket screws, ensuring the structure is both rigid and square. Allow glue to dry fully before proceeding.
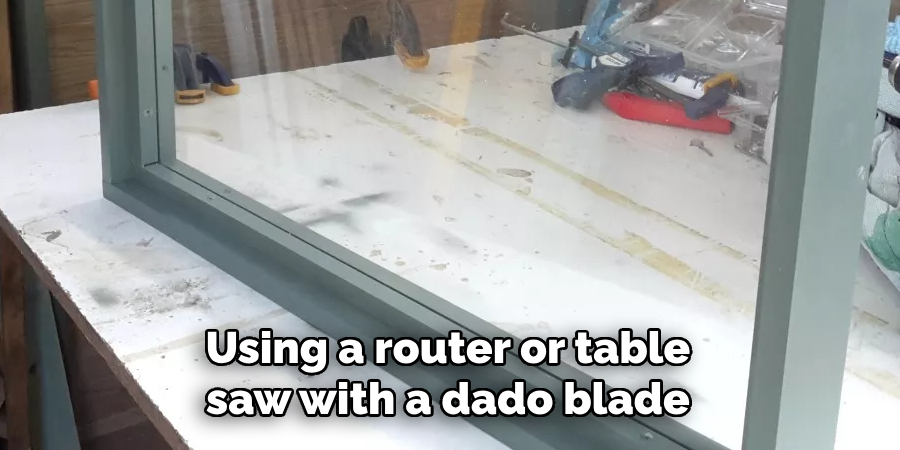
4. Construct a Rabbet Groove to Seat the Glass
To hold the glass securely in place, you’ll need to create a rabbet groove (a recessed channel) along the inner edge of the window frame. Using a router or table saw with a dado blade, cut a groove that’s approximately 3/8″ wide and deep enough to house the thickness of the glass plus a cushion of glazing compound or weather stripping. This groove should be clean and continuous around all four frame sides. Test the fit using a scrap piece of glass or a gauge to ensure a snug, even hold before final assembly.
5. Assemble the Window Frame and Ensure It’s Square
With the groove cut and all pieces pre-fitted, assemble the window frame on a large flat surface. Use corner clamps to hold the angles firmly at 90 degrees and check squareness by measuring diagonally from corner to corner—if the measurements are equal, the frame is square. Secure the joints with wood glue, clamps, and screws or nails, depending on your joinery. Allow the frame to cure for several hours, if not overnight, before moving it or proceeding to the next steps. A properly assembled frame is crucial for both aesthetics and functional stability.
6. Sand and Prepare the Surface for Finish or Paint
Once the glue is dry and the frame is fully assembled, sand the entire surface thoroughly using a sanding block or orbital sander. Start with medium-grit sandpaper (120 grit) and finish with a fine grit (220 grit) to achieve a smooth, touch-friendly surface. Pay special attention to the corners and rabbeted edges, removing any rough spots or excess glue. If you plan to paint the frame, consider applying a primer at this stage. For a natural look, apply a wood conditioner followed by stain and clear sealer to enhance the grain and protect against moisture.
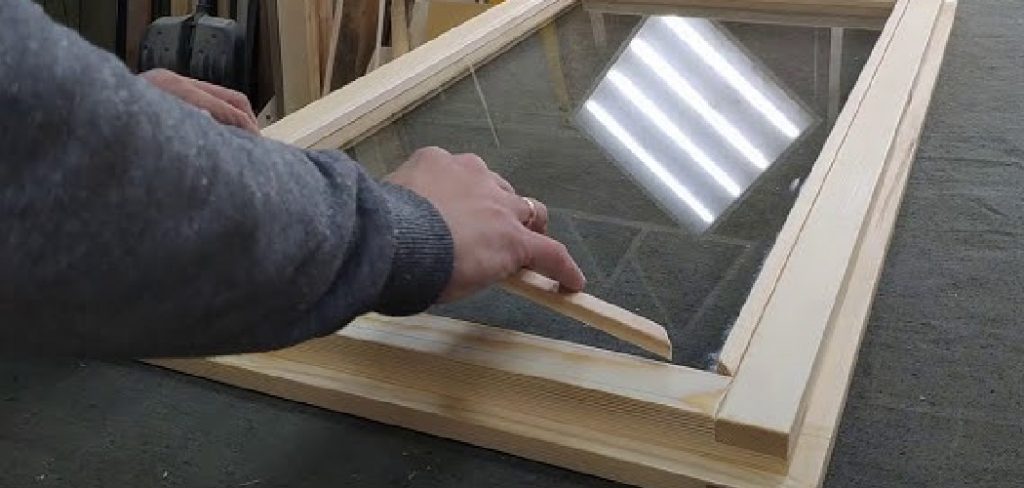
7. Install the Glass Panel with Safety and Care
With the frame finished, now comes the crucial step of installing the glass. Always wear gloves and eye protection when handling glass. Clean the rabbet groove thoroughly, then apply a bead of clear silicone or glazing compound. Gently lower the glass panel into the groove, making sure it lies flat and snug within the channel. Use glazier’s points or small brads to secure the glass in place without damaging it. For interior frames, silicone alone may suffice, while exterior applications will require additional waterproof sealing.
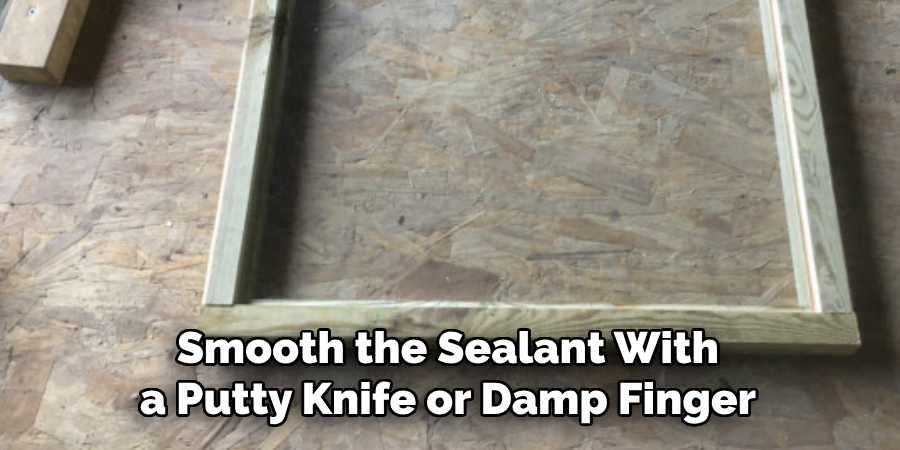
8. Seal the Edges and Add Trim for a Professional Finish
Once the glass is secured, apply a final bead of caulk or glazing compound along the inner edge where the glass meets the wood. Smooth the sealant with a putty knife or damp finger for a clean line. If desired, attach thin wood trim or glazing bead along the perimeter to conceal the rabbet and add decorative detail. Nail or glue this trim in place, then touch up with paint or finish to match the rest of the frame. This not only improves aesthetics but also provides an extra layer of glass security.
9. Add Weatherproofing if Used for Exterior Applications
If the window frame is for outdoor use, applying weatherproofing is essential. Use exterior-grade sealant along all seams and edges, particularly where the frame meets walls or siding. Install flashing tape around the opening before inserting the frame to protect against water infiltration. Additionally, you can attach weather stripping to the inside edge of the frame if the glass panel needs to be removable. A few coats of marine-grade polyurethane or spar varnish can provide UV resistance and water protection, extending the lifespan of the frame in harsh conditions.
10. Mount the Frame in Its Final Location Securely
The final step involves installing the completed window frame into its designated opening. Position the frame in the opening and check for plumb and level. Use shims as needed to ensure a snug, even fit on all sides. Drill pilot holes through the frame and into the structural opening, then secure it with long screws or nails. Fill any gaps between the frame and the wall with insulating foam or caulk. Inside, you can add trim molding to cover the transition and complete the look. Once installed, inspect the glass for cleanliness and test for air or water leaks.
Things to Consider When Installing a Window Frame
Measurement Accuracy
Before beginning, double-check all measurements to ensure the new frame fits accurately. Improper size can lead to leaks, drafts, or structural issues.
Quality of Materials
Choose high-quality materials for both the frame and the insulation. Durable materials will ensure longevity and better energy efficiency.
Weather Conditions
Avoid installing windows in bad weather, as moisture or chilly conditions can interfere with adhesives and sealants.
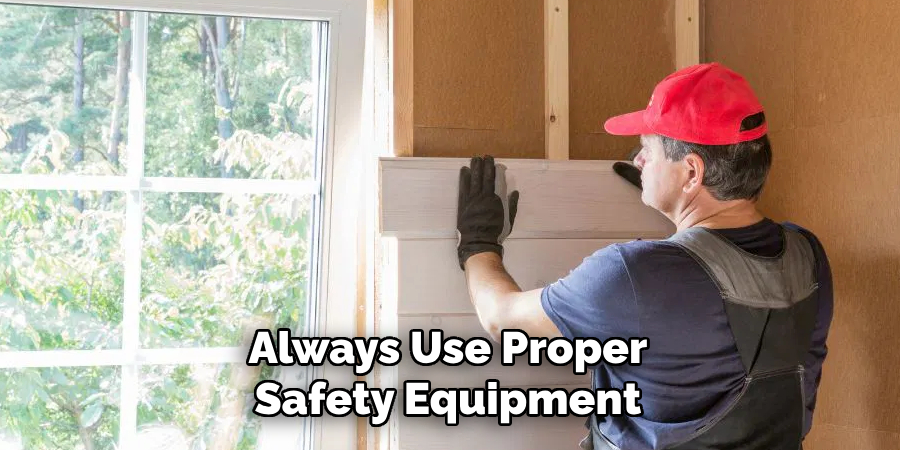
Safety Precautions
Always use proper safety equipment, such as gloves and safety glasses, to avoid injuries during installation.
Building Codes and Permits
Check local building codes and ensure you have any necessary permits or inspections required for the installation.
Energy Efficiency
Opt for energy-efficient windows and proper sealing techniques to improve insulation and reduce energy costs in the long term.
Conclusion
Building a wooden frame window for glass from scratch is a rewarding woodworking project that blends precision, craftsmanship, and function. Each step—from careful measuring and rabbet routing to glass installation and weatherproofing—demands attention to detail. With these ten elaborated methods, even a modest DIY enthusiast can craft a beautiful, durable frame that enhances any room or exterior. Thanks for reading our blog post on how to make a window frame for glass! We hope you found it helpful and informative.
About the Author
Adrian Green, a lifelong woodworking enthusiast, shares his passion for the craft through The Woodenify Blog. With a foundation built on years of hands-on experience in his father’s woodworking shop, Adrian is dedicated to helping others learn and grow in the world of DIY woodworking. His approach to woodworking combines creativity, practicality, and a deep appreciation for the art of building with your own hands. Through his blog, he inspires individuals of all skill levels to embark on their own woodworking journeys, creating beautiful, functional pieces of furniture and décor.
Professional Focus
- Specializes in DIY woodworking projects, from furniture to home décor.
- Provides step-by-step guides and practical tutorials for woodworkers of all skill levels.
- Dedicated to helping readers build confidence and skill through easy-to-follow instructions and tips.
- Passionate about fostering a community of makers who can share, learn, and grow together.
Education History
- University of Craft and Design – Bachelor of Fine Arts (BFA) in Woodworking and Furniture Design
- Woodworking Apprenticeships – Extensive hands-on training with skilled craftsmen to refine carpentry and furniture making techniques.
- Online Courses & Masterclasses – Continued education in advanced woodworking techniques, design principles, and specialized tools
Expertise:
- DIY woodworking, carpentry, furniture making, and home décor projects.
- Creating accessible tutorials and guides for beginner to advanced woodworkers.
- Sharing the joys and satisfaction of woodworking, from raw materials to finished products.