Are you interested in woodworking? Don’t worry if you have never tried it before. You can start with making a Windsor chair makeover, an iconic piece of furniture known for its durability and comfort.

Making a Windsor chair is a timeless craft that combines traditional woodworking techniques with artistry and functionality. Known for its sturdy design and elegant appearance, the Windsor chair has been a staple of furniture-making for centuries. This guide on how to make a Windsor chair will walk you through the essential steps and tools needed to create one of these classic chairs.
Whether you are a novice or an experienced woodworker, crafting a Windsor chair is a rewarding experience that allows you to develop your skills while preserving a cherished furniture-making tradition.
What Are the Benefits of Making a Windsor Chair?
There are several reasons why making a Windsor chair is an excellent project for woodworkers of all levels. Here are some benefits to consider:
- Skill Development: Making a Windsor chair requires precision and attention to detail, which can help you improve your woodworking skills and learn new techniques.
- Sense of Accomplishment: Crafting a functional piece of furniture with two hands is an incredibly satisfying experience that can boost your confidence and sense of achievement.
- Customization: By making your own Windsor chair, you can choose the materials, design, and finishing touches according to your preferences, creating a unique piece that reflects your style.
- Sustainability: Making a Windsor chair is a sustainable way to furnish your home. Using locally sourced materials and traditional woodworking techniques can reduce your carbon footprint and support local businesses.
- Connection to History: The Windsor chair has a long history dating back to the 18th century, allowing you to connect with this timeless craft and carry on the tradition of furniture-making.
What Will You Need?
Before you start your Windsor chair project, gathering all the necessary tools and materials is essential. Here is a list of items that you will need:
- Wood: The primary material for your Windsor chair will be wood, preferably hardwood such as oak, cherry, or ash. You can either purchase pre-cut pieces or cut them yourself from larger boards.
- Hand Tools: Traditional Windsor chairs use hand tools such as a drawknife, spokeshave, and hand saws. These tools may take some practice but give the chair a smooth finish.
- Power Tools: While not essential, power tools like a bandsaw and drill can help speed up the process and make specific tasks more manageable.
- Clamps: Clamps are necessary for holding pieces in place while you work on them. Various clamps, including bar clamps, C-clamps, and spring clamps, will come in handy during the construction of your chair.
- Finishing Materials: You’ll need sandpaper or a sander to smooth out any rough edges and a finish to protect the wood and give your chair a polished look.
8 Easy Steps on How to Make a Windsor Chair
Step 1: Select and Prepare Your Wood
Start by choosing the wood you want to use based on your preference and desired style for your Windsor chair. Standard options include oak, cherry, or ash due to their strength and workability. Once you’ve chosen your wood, cut it into the necessary pieces for the chair’s legs, seat, spindles, and back. Ensure each piece is appropriately sized and free from defects. If needed, plane and sand the wood to create smooth surfaces easier to work with during construction.
Step 2: Shape the Seat
Begin by shaping the chair seat, which serves as the central component. Use a jigsaw or bandsaw to cut the seat to the desired shape, typically an oval or D-shape. Once the general shape is achieved, carve out a shallow hollow in the seat using a scorp or an
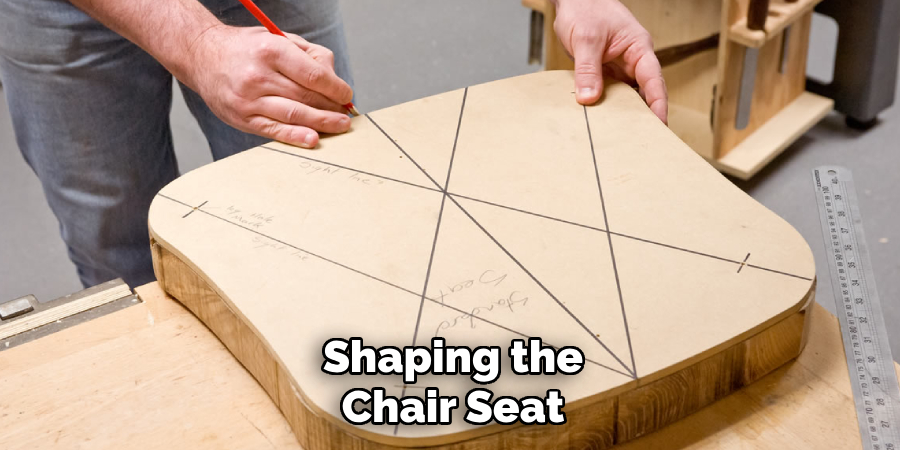
inshave to provide comfort. Smooth the surface with sandpaper, ensuring there are no rough patches. Mark and drill the holes for the legs and spindles, ensuring precise angles to maintain the chair’s stability and aesthetic balance.
Step 3: Turn the Legs and Spindles
To create the legs and spindles, use a lathe to shape the wood into the desired forms. Aim for a sturdy taper near the ends of the legs to ensure a secure fit into the seat and floor stability. The spindles should be thinner and more delicate, contributing to the chair’s refined appearance. Be consistent in the design to maintain a cohesive look. Once turned, sand the components smoothly and check for any imperfections affecting the assembly.
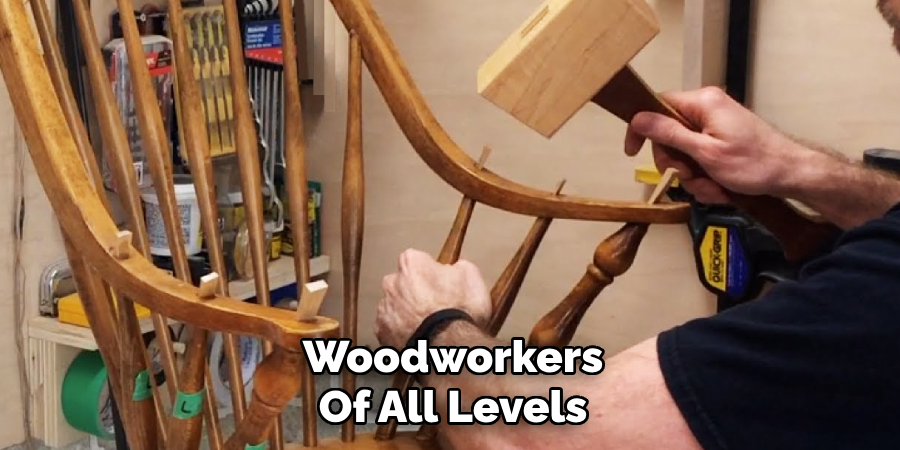
Step 4: Assemble the Chair
Begin the assembly by attaching the legs to the seat. Insert the legs into the pre-drilled holes, ensuring they are aligned at the correct angles for stability. Use wood glue or wedges to secure the legs tightly in place. Next, position the spindles into the designated holes on the seat and upper backrest, ensuring they are evenly spaced and straight. Carefully tap the spindles into place using a mallet, applying gentle pressure to avoid damage. Check the alignment of all components as you go, making adjustments if necessary. Allow the glue to dry thoroughly before proceeding to the final step.
Step 5: Finish the Chair
Once the assembly is complete and the glue has dried, it’s time to apply the finishing touches to the chair. Begin by sanding the entire surface of the chair with fine-grit sandpaper to remove any remaining rough spots and ensure a smooth finish. After sanding, clean the surface to remove any dust or debris. Apply your desired finish, such as wood stain or paint, to enhance the chair’s
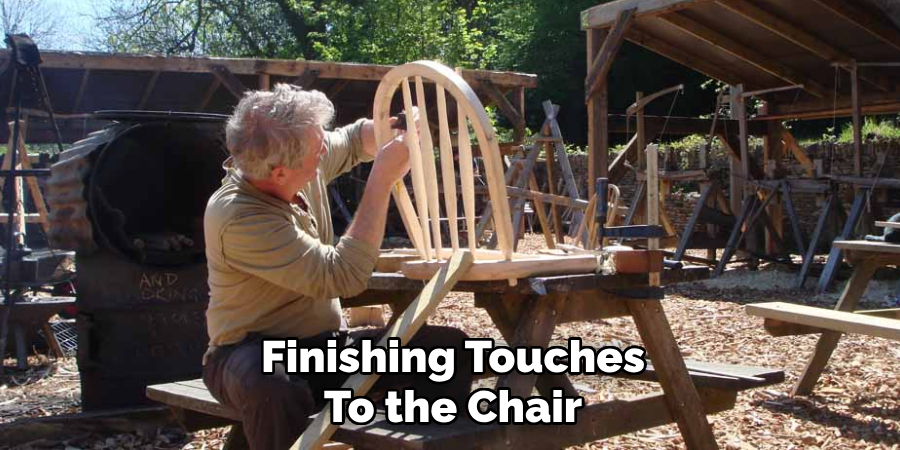
appearance and protect the wood from wear and tear. Allow the finish to dry completely before applying a sealant or topcoat for added durability. Inspect the chair one final time for any imperfections, and your handcrafted chair is ready for use!
Step 6: Maintain the Chair
Regular maintenance is essential to ensure the longevity and durability of your handcrafted chair. Periodically inspect the chair for any signs of wear, such as loose joints or scratches. Tighten any screws or joints as necessary to maintain stability. If the chair has a wood stain or paint finish, consider reapplying a fresh coat every few years to keep it looking its best and to provide continued protection. Clean the chair regularly with a damp cloth to remove dust and dirt, avoiding harsh chemicals that could damage the finish. Proper care will ensure that your chair remains a cherished piece for years to come.
Step 7: Enjoy Your Chair
Now that your handcrafted chair is complete and well-maintained, it’s time to enjoy the fruits of your labor. Place the chair in your desired location, whether at the dining table, on the patio, or as an accent piece in your living room. Appreciate the craftsmanship and effort you invested in creating a unique piece of furniture that reflects your style. If the chair was built for a specific purpose or person, take pride in the fact that it is both functional and meaningful. Share your project with friends and family, or use it as inspiration for future woodworking endeavors.
Step 8: Share Your Experience
Once your chair has found its place and purpose, consider sharing your woodworking experience with others. Document your process, challenges, and successes through photos, videos, or written notes. Sharing your story on social media or through a

woodworking community inspires others to take on similar projects. It allows you to connect with like-minded individuals who share your passion. Your insights and tips could be invaluable to someone starting their own woodworking journey. Encourage discussions, exchange ideas, and celebrate the art of craftsmanship together.
Following these 10 easy steps, you can create a beautiful and functional Windsor chair that will be cherished for years.
5 Things You Should Avoid
- Using Improper Tools: Crafting a Windsor chair requires specialized tools such as spokeshaves, drawknives, and travishers. Avoid using substitutes or the wrong tools, as this can compromise the precision and quality of the chair.
- Skipping Wood Selection: Do not overlook the importance of choosing the right type of wood. Each component of a Windsor chair may require specific types of wood, such as hardwood for the legs and softer wood for the seat for better carving.
- Neglecting Proper Mortise and Tenon Joinery: Failing to accurately cut and fit mortise and tenon joints can weaken the chair’s structure. Avoid rushing or being imprecise during this critical step.
- Applying Finish Too Soon: Avoid using any finish before ensuring the chair is fully assembled and sanded smooth. Premature finishing can hinder adjustments and compromise the final appearance.
- Ignoring Ergonomic Design: Do not disregard the importance of comfort and ergonomics. Overlooking these aspects might result in a beautiful chair that is impractical and uncomfortable to use.
Conclusion
How to make a Windsor chair requires a combination of skill, patience, and attention to detail
By carefully selecting high-quality materials, adhering to traditional joinery techniques, and prioritizing aesthetics and functionality, you can craft a durable, elegant, and comfortable chair. Avoiding common mistakes, such as improper wood selection or rushed finishing, ensures that the final product meets both practical and artistic standards.
With dedication and precision, making a Windsor chair becomes a rewarding endeavor and a testament to the timeless beauty of handcrafted furniture.
About the Author
Adrian Green, a lifelong woodworking enthusiast, shares his passion for the craft through The Woodenify Blog. With a foundation built on years of hands-on experience in his father’s woodworking shop, Adrian is dedicated to helping others learn and grow in the world of DIY woodworking. His approach to woodworking combines creativity, practicality, and a deep appreciation for the art of building with your own hands. Through his blog, he inspires individuals of all skill levels to embark on their own woodworking journeys, creating beautiful, functional pieces of furniture and décor.
Professional Focus
- Specializes in DIY woodworking projects, from furniture to home décor.
- Provides step-by-step guides and practical tutorials for woodworkers of all skill levels.
- Dedicated to helping readers build confidence and skill through easy-to-follow instructions and tips.
- Passionate about fostering a community of makers who can share, learn, and grow together.
Education History
- University of Craft and Design – Bachelor of Fine Arts (BFA) in Woodworking and Furniture Design
- Woodworking Apprenticeships – Extensive hands-on training with skilled craftsmen to refine carpentry and furniture making techniques.
- Online Courses & Masterclasses – Continued education in advanced woodworking techniques, design principles, and specialized tools
Expertise:
- DIY woodworking, carpentry, furniture making, and home décor projects.
- Creating accessible tutorials and guides for beginner to advanced woodworkers.
- Sharing the joys and satisfaction of woodworking, from raw materials to finished products.