A wood wreath is a beautiful, rustic decorative piece that adds charm and warmth to any space. Perfect for year-round or seasonal display, wood wreaths bring a natural, timeless appeal to home décor. One of their standout benefits is durability, as wood can withstand the elements, making these wreaths suitable for both indoor and outdoor use. Additionally, they are incredibly customizable, allowing you to personalize the design to match your style or a specific theme.

Whether you’re looking to create a stunning centerpiece for your front door, a thoughtful handmade gift, or festive seasonal decorations, crafting your own wood wreath is a rewarding and enjoyable project. This article will provide a step-by-step guide on how to make a wood wreath from scratch, offering tips and inspiration to help you create a unique decorative piece that reflects your creativity and flair.
Materials and Tools Needed
Creating a beautiful wood bead wreath diy requires just a few basic materials and tools, many of which you may already have at home or can easily find at a craft store.
Basic Materials
- Wooden Slices or Discs (store-bought or DIY from branches)
- Wreath base (wire, wood ring, or foam)
- Hot glue or Wood Glue
- Twine, Ribbon, or Floral Wire
- Decorative Items (pinecones, faux flowers, greenery, seasonal embellishments)
Tools Required
- Hot glue gun
- Saw (if cutting your own wood slices)
- Sandpaper (to smooth rough edges)
- Scissors or wire cutters
- Drill (optional, if hanging or wiring elements)
With this collection of materials and tools on hand, you’ll be equipped to craft a stunning wood wreath that showcases your creative vision and adds a touch of charm to any space.
Choosing Your Wood Style and Wreath Design
Types of Wood Options
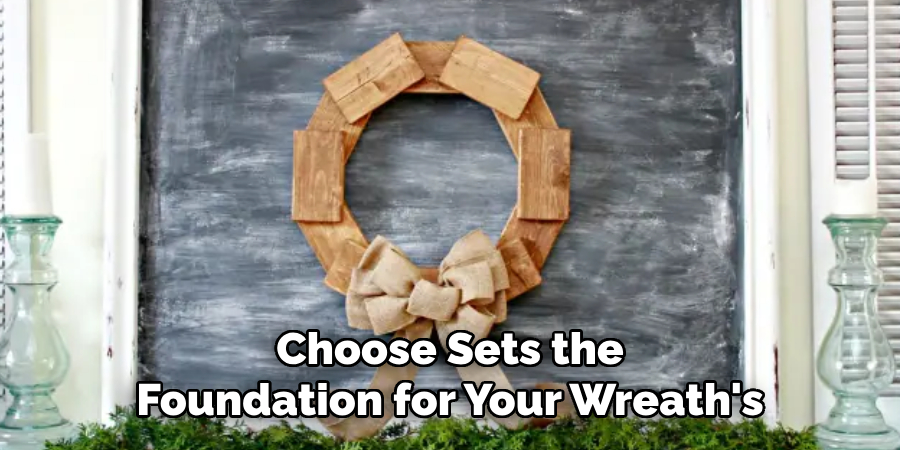
The type of wood you choose sets the foundation for your wreath’s aesthetic. Birch, cedar, and pine are excellent choices for those wanting a classic, rustic appearance. For a more coastal or vintage vibe, opt for driftwood or reclaimed wood, which offer a naturally weathered texture and unique character. Each wood type brings its own personality, so select one that aligns with your intended theme.
Design Styles
Once you’ve selected your wood, consider the overall design of your wreath. For a cohesive and bold look, cover the entire wreath base with overlapping wood slices. If you prefer a combination of textures, a mixed media approach that incorporates wood slices alongside floral elements or greenery can strike a beautiful balance. Those seeking something unique can explore themed wreaths, such as holiday-inspired designs, farmhouse motifs, or minimalist arrangements.
Color and Finish Choices
Decide whether to leave the wood slices in their natural state or add contrast with paint or wood stain. Natural finishes highlight the wood’s grain for a timeless feel, while painted or stained slices can suit specific color palettes. If you plan to display your wreath outdoors, a protective wood sealant is essential to preserve its beauty and durability against the elements.
Preparing the Wood Slices or Pieces
Sourcing and Cutting
Begin by sourcing logs or branches that are free of rot and imperfections. Once you have suitable wood, cut it into even slices, ideally about ¼”–½” thick, using a handsaw, miter saw, or similar tool. Precise cuts ensure uniformity, resulting in a polished final outcome. Allow the slices to dry thoroughly, as damp wood can lead to cracking or warping over time. Proper drying is crucial to maintaining the wreath’s longevity.
Sanding and Sealing

After the wood slices have dried, sand each piece to remove rough edges or splinters. Use fine-grit sandpaper to achieve a smooth finish that’s comfortable to handle and visually appealing. For an optional step, consider applying a clear wood sealer to each slice. This will help preserve the natural beauty and prevent damage from moisture, especially if the wreath will be displayed outdoors.
Arranging Before Gluing
Before attaching the slices to the wreath base, take some time to arrange them in your preferred layout. This step allows you to visualize the overall design and make adjustments before committing. Mixing different sizes and adjusting the direction of each slice creates a more dynamic and natural-looking composition. Once satisfied, you can begin gluing the pieces into place for a secure and beautiful finished product.
How to Make a Wood Wreath: Assembling the Wreath Base
Step 1: Attach Wood Slices
Start by choosing one section of the wreath as your focal point. Using hot glue or wood glue, attach each wood slice securely to the base. Work methodically, ensuring each piece aligns with your prearranged design. Press down gently on each slice to promote a firm bond and prevent shifting as the glue dries. Continue adding slices to create a seamless pattern, building outward from your selected starting point.
Step 2: Layering for Depth
To achieve a professional and polished look, focus on creating depth by layering the wood slices. Begin with larger slices as the foundation, arranging them evenly across the base. Next, add smaller slices on top to create dimension and texture. Overlapping the edges of the slices slightly will give the wreath a natural and dynamic appearance, avoiding a flat or uniform look.
Step 3: Covering the Entire Base or Partial Decoration
Decide whether you want to cover the entire wreath base with wood slices or keep part of it exposed for a more minimalist design. If you choose partial decoration, balance the exposed sections by incorporating complementary materials, such as greenery, floral elements, or ribbons. For a fully covered wreath, ensure the slices overlap consistently and the base is concealed. Adjust the positioning of the pieces as needed to maintain symmetry and visual appeal, resulting in a cohesive and stunning handmade wreath.
Decorating Your Wood Wreath
Adding Natural or Faux Elements
To give your wood wreath a unique and seasonal touch, consider adding natural or faux elements. Greenery, berries, or pinecones can instantly evoke a festive or seasonal atmosphere, from winter holidays to springtime vibes. Use floral wire or hot glue to secure these decorations in place, ensuring durability. Experiment with placement to achieve a balanced design, whether you want a symmetrical arrangement or a more freeform, natural look.

Painting or Personalizing
Personalizing your wreath is an excellent way to make it even more special. You can paint the wood slices with names, quotes, or initials to add a meaningful touch. For a precise result, try using stencils or carefully freehanding designs. If you prefer a rustic, artistic finish, a wood-burning tool can be used to create intricate patterns, text, or images on the slices. This personal touch will make your wreath truly one-of-a-kind.
Choosing a Theme
Selecting a consistent theme ties your wreath together beautifully. You might opt for a holiday-specific theme, such as Christmas with red and green accents, or a fall design featuring warm tones and autumnal elements. Alternatively, a farmhouse or modern rustic theme can create a timeless, versatile piece. Whatever theme you choose, ensure your details and colors harmonize for a cohesive, stunning decoration.
Attaching a Hanger or Display Option
Adding a Loop for Hanging
To easily hang your wreath, attach a loop of ribbon, wire, or twine to the back. Choose a material that complements your wreath’s theme or blends in subtly. Ensure the loop is centered and secured firmly using hot glue, strong adhesive tape, or staples to ensure it reliably holds the weight of the wreath.
Using a Wreath Hook
If you prefer not to add a loop, a simple solution is to use a metal wreath hook or an over-the-door wreath hanger. This method is efficient for doors and requires no additional modification to the wreath itself. Ensure the hook is sturdy enough to support the wreath’s weight.
Optional: Easel Display
For an alternative display option, consider placing your wreath on a small easel or a tabletop stand. This is an elegant way to showcase your creation indoors, whether as a centerpiece or an accent in your living space.
Maintenance and Storage Tips
Preserving the Wreath
To extend the lifespan of your wreath, it’s essential to protect it from harsh elements. If possible, keep the wreath indoors or display it in a covered outdoor area to avoid weather-related damage such as fading, moisture, or brittleness. For regular upkeep, gently dust the wreath or wipe it down with a dry, soft cloth to remove dirt and debris.
Seasonal Storage
When it’s time to store your wreath, proper care is necessary to preserve its shape and details. Wrap the wreath in bubble wrap or place it in a specially designed wreath storage box to protect it from dust and impacts. Store the wreath in a cool, dry place, away from direct sunlight or humidity. Avoid stacking heavy items on top of the wreath, as this may crush or damage delicate components, ensuring it remains in pristine condition for future use.

Conclusion
Creating a wood wreath is a rewarding process that allows for endless creativity and personalization. From selecting the right wood to designing, gluing, decorating, and finally hanging your creation, each step is an opportunity to craft something truly unique. Whether you choose a minimalist approach or a more elaborate design, the possibilities are endless. Wood wreaths offer a charming and durable option for any occasion or season. If you’ve been wondering “how to make a wood wreath,” now is the perfect time to try it. Unleash your creativity and enjoy the satisfaction of completing this delightful craft project!
About the Author
Adrian Green, a lifelong woodworking enthusiast, shares his passion for the craft through The Woodenify Blog. With a foundation built on years of hands-on experience in his father’s woodworking shop, Adrian is dedicated to helping others learn and grow in the world of DIY woodworking. His approach to woodworking combines creativity, practicality, and a deep appreciation for the art of building with your own hands. Through his blog, he inspires individuals of all skill levels to embark on their own woodworking journeys, creating beautiful, functional pieces of furniture and décor.
Professional Focus
- Specializes in DIY woodworking projects, from furniture to home décor.
- Provides step-by-step guides and practical tutorials for woodworkers of all skill levels.
- Dedicated to helping readers build confidence and skill through easy-to-follow instructions and tips.
- Passionate about fostering a community of makers who can share, learn, and grow together.
Education History
- University of Craft and Design – Bachelor of Fine Arts (BFA) in Woodworking and Furniture Design
- Woodworking Apprenticeships – Extensive hands-on training with skilled craftsmen to refine carpentry and furniture making techniques.
- Online Courses & Masterclasses – Continued education in advanced woodworking techniques, design principles, and specialized tools
Expertise:
- DIY woodworking, carpentry, furniture making, and home décor projects.
- Creating accessible tutorials and guides for beginner to advanced woodworkers.
- Sharing the joys and satisfaction of woodworking, from raw materials to finished products.