Creating a wooden sculpture is a rewarding craft that combines skill, creativity, and patience. Whether you are a beginner or an experienced artist, working with wood allows you to bring your artistic visions to life.
This guide on how to make wooden sculptures will walk you through the essential steps, tools, and techniques needed to craft your own wooden masterpiece. From selecting the right type of wood to refining the final details, the process is both challenging and deeply satisfying.
Why Choose Wood?
Wood has been used as a medium for art and sculpture for centuries, and for good reason. It is readily available, easy to work with, and can be shaped in countless ways. Different types of wood also offer unique qualities such as varying grain patterns and colors, allowing for endless creative possibilities.
In addition to its practicality, working with wood also offers a deeper connection to nature. As you carve and shape the wood, you are uncovering its natural beauty and creating something truly one-of-a-kind.
Selecting the Right Type of Wood
The first step in making a wooden sculpture is choosing the right type of wood. You want to select a piece that is strong enough to support the form and details of your sculpture but also soft enough to easily carve. Some popular types of wood for sculpting include basswood, pine, cedar, and mahogany.
It’s important to keep in mind that different woods have varying textures, hardness levels, and grain patterns. Experimenting with different types of wood can help you discover which ones work best for your particular style and technique.
Tools Needed
The tools needed for wooden sculpture are relatively simple and can be found at most craft or hardware stores. These may include:
- Chisels (Varying Sizes)
- Gouges
- Mallet
- Sandpaper (Various Grits)
- Wood Carving Knives
- Wood Files
- Vise or Clamp (Optional but Helpful for Securing the Wood)
8 Step-by-step Guidelines on How to Make Wooden Sculpture
Step 1: Sketch Your Design
Before you start carving, it is crucial to have a clear vision of your sculpture. Begin by sketching your design on paper, outlining the basic shape, features, and details you want to include. This sketch will serve as your roadmap throughout the sculpting process, ensuring that you stay focused on your intended form.
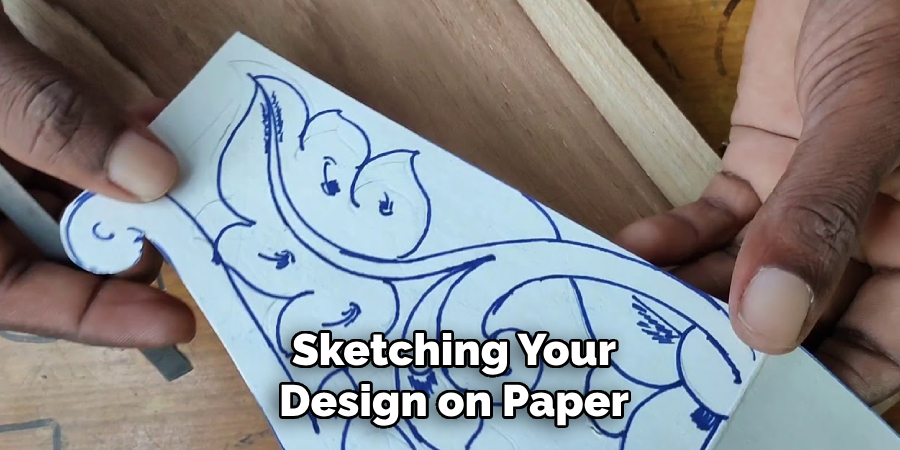
For added precision, you can also draw the design directly onto the surface of the wood with a pencil or chalk. Taking time to plan your sculpture at this stage will help minimize mistakes and make the carving process much smoother.
Step 2: Secure the Wood
Once you have your design ready, the next step is to secure your piece of wood in place. This ensures stability and allows you to carve safely and accurately. Use a sturdy vise or clamps to hold the wood firmly on your workbench or carving station. Make sure the wood is secured tightly but without causing any damage to it.
Properly securing your wood not only prevents movement but also reduces the risk of injury while using sharp tools. Taking this step seriously will give you the control needed to execute precise cuts and achieve the desired details in your sculpture.
Step 3: Rough Out the Form
With your wood secured and your design in hand, it’s time to start carving. Begin by using a mallet and chisel to rough out the basic shape of your sculpture. This step involves removing large chunks of wood to create an overall form that resembles your initial sketch. It is essential to work slowly and carefully at this stage, as any mistakes or large cuts cannot be reversed later on.
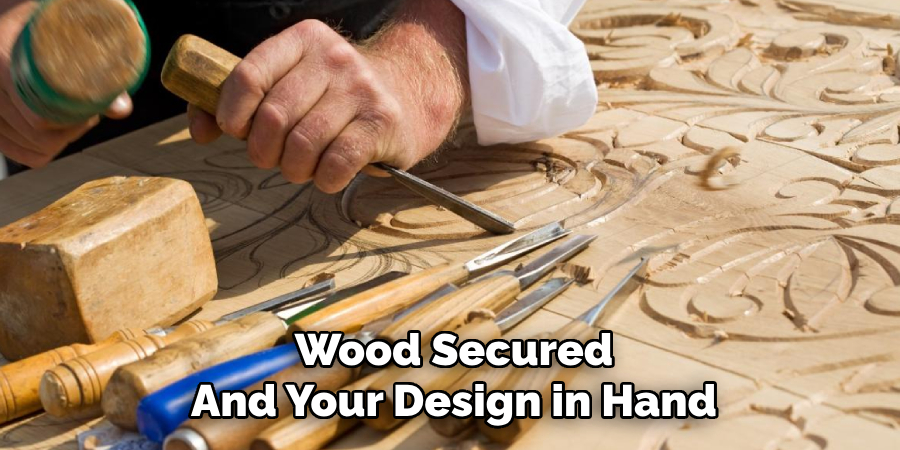
You can also use a wood carving knife to remove smaller pieces of wood and add finer details as needed. Remember to constantly refer back to your design sketch for guidance and make any necessary adjustments along the way.
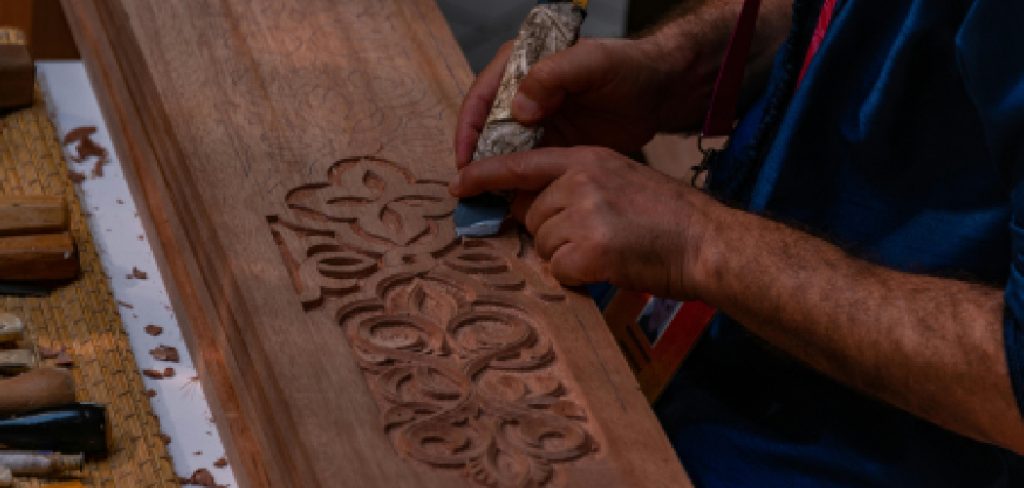
Step 4: Add Details
Once the rough outline of your sculpture is complete, it’s time to refine it by adding details. Use smaller chisels, gouges, and carving knives to carefully shape the finer elements of your design. Pay attention to intricate areas such as facial features, textures, or patterns that make the sculpture come to life.
Work slowly and deliberately, making small adjustments to avoid over-carving or damaging the piece. It’s helpful to step back frequently to evaluate your progress and ensure that the proportions and details align with your initial sketch. This stage requires patience and focus, as the details are what will define the character and uniqueness of your sculpture.
Step 5: Smooth Out the Surface
Once all the details are in place, use sandpaper of varying grits to smooth out the surface of your sculpture. This will help remove any rough edges or imperfections and give your piece a polished finish. Start with a coarse grit and gradually work your way to finer ones for a smoother surface. Wipe away any sawdust or debris as you go to get a better view of your progress.
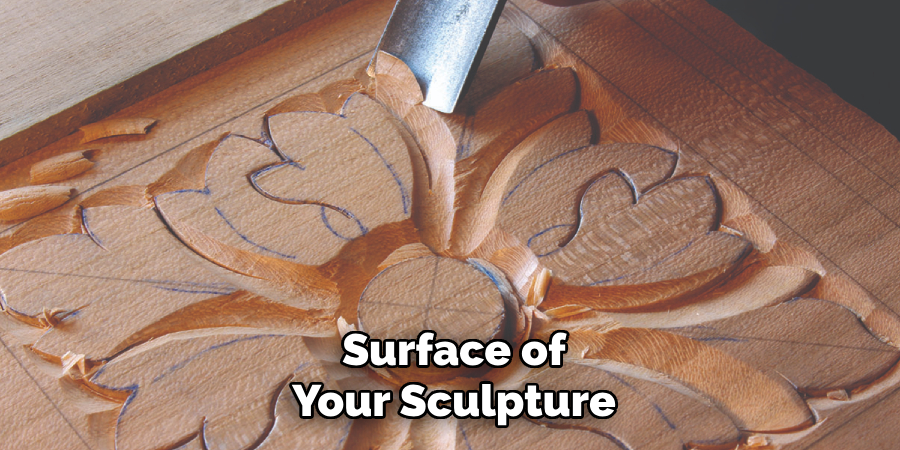
It’s essential to be gentle and avoid applying too much pressure while sanding, as this can damage the delicate details you have created. Take your time with this step and ensure that the surface is smooth and free of any blemishes before moving on to the next stage.
Step 6: Apply a Finish
Applying a finish is an optional but highly recommended step in wooden sculpture making. A finish not only protects the wood from damage but also enhances its natural beauty by adding color and shine. Some suitable finishes for wooden sculptures include varnish, wax, or oil-based products such as linseed or tung oil.
Before applying any finish, make sure to clean the surface of your sculpture thoroughly and let it dry completely. Then, follow the instructions on the product of your choice for application and drying times. It’s important to note that different finishes may produce varying results, so it is advisable to test a small area first before covering the entire piece.
Step 7: Final Touches
After applying a finish, take some time to evaluate your sculpture and make any final touches or adjustments as needed. You may need to smooth out any rough areas caused by the finish or add additional details that enhance its appearance. This stage is all about fine-tuning and perfecting your creation.
It can also be helpful to ask for feedback from others at this point, as they may notice something you may have missed or offer valuable suggestions for improvement.
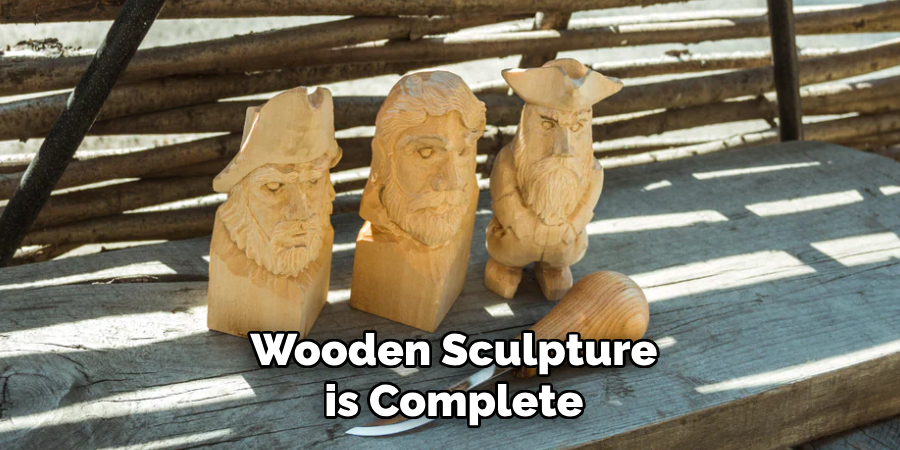
Step 8: Display Your Sculpture
Congratulations, your wooden sculpture is complete! The final step is to display it in a place where it can be appreciated and admired. This could be in your home, office, or at a local art gallery. Be proud of your creation and share it with others who appreciate the beauty of handcrafted art.
Following these step-by-step guidelines on how to make wooden sculpture will help you create a stunning wooden sculpture that reflects your creativity and personal style. Remember to have fun, take your time, and enjoy the process! Happy carving!
Frequently Asked Questions
Q: What Type of Wood is Best for Carving?
A: The best type of wood for carving depends on personal preference and the project at hand. Softwoods such as pine, basswood, and cedar are great for beginners as they are easy to carve and readily available. Hardwoods like oak, maple, and cherry are more challenging to work with but produce stunning results. Experiment with different types of wood to find the one that best suits your carving style and preferences.
Q: Do I Need Special Tools for Wood Carving?
A: While there are plenty of specialized tools available for wood carving, you can also achieve excellent results with a basic set of tools. These include chisels, gouges, mallets, and a wood carving knife. As you progress in your skills and tackle more complex projects, you may want to invest in additional tools such as power carvers or specialized blades.
Q: How Long Does it Take to Make a Wooden Sculpture?
A: The time it takes to complete a wooden sculpture varies depending on the size, complexity, and personal pace of the artist. Beginners may take several hours or days to complete a small sculpture, while experienced carvers can create larger pieces in a matter of hours. It’s important to remember that wood carving is a labor-intensive process that requires patience and dedication.
Q: Can I Create Wooden Sculptures Without Any Prior Experience?
A: While some natural artistic ability and familiarity with tools may be helpful, anyone can learn how to make wooden sculptures with practice and determination. There are also plenty of resources available such as books, videos, classes, and workshops that can help beginners get started. With time and patience, anyone can become a skilled wood carver.
Conclusion
Wood carving is an art form that allows you to transform a simple block of wood into a unique and meaningful sculpture. By following the steps outlined in this guide on how to make wooden sculpture, from selecting the right tools and materials to adding intricate details and applying a finish, you can create a masterpiece that reflects your creativity and dedication.
Whether you’re a beginner or an experienced carver, the key is to practice, be patient, and enjoy the process of bringing your ideas to life. Remember, every sculpture you create is a testament to your skills and imagination. Wooden sculpture art offers a unique way to bring natural beauty and craftsmanship into your home, with each piece telling its own story. Happy carving!
About the Author
Adrian Green, a lifelong woodworking enthusiast, shares his passion for the craft through The Woodenify Blog. With a foundation built on years of hands-on experience in his father’s woodworking shop, Adrian is dedicated to helping others learn and grow in the world of DIY woodworking. His approach to woodworking combines creativity, practicality, and a deep appreciation for the art of building with your own hands. Through his blog, he inspires individuals of all skill levels to embark on their own woodworking journeys, creating beautiful, functional pieces of furniture and décor.
Professional Focus
- Specializes in DIY woodworking projects, from furniture to home décor.
- Provides step-by-step guides and practical tutorials for woodworkers of all skill levels.
- Dedicated to helping readers build confidence and skill through easy-to-follow instructions and tips.
- Passionate about fostering a community of makers who can share, learn, and grow together.
Education History
- University of Craft and Design – Bachelor of Fine Arts (BFA) in Woodworking and Furniture Design
- Woodworking Apprenticeships – Extensive hands-on training with skilled craftsmen to refine carpentry and furniture making techniques.
- Online Courses & Masterclasses – Continued education in advanced woodworking techniques, design principles, and specialized tools
Expertise:
- DIY woodworking, carpentry, furniture making, and home décor projects.
- Creating accessible tutorials and guides for beginner to advanced woodworkers.
- Sharing the joys and satisfaction of woodworking, from raw materials to finished products.