Milling lumber from logs is a rewarding and practical skill, essential for anyone interested in woodworking or sustainable living. This process transforms raw timber into usable boards and planks, ready for a variety of projects, from building furniture to constructing homes. Understanding how to mill lumber effectively not only maximizes the yield from each log but also ensures the quality and durability of the final products.
In this guide on how to mill lumber from logs, we will walk you through the essential steps of milling lumber, from selecting the right logs to operating the mill and properly drying your lumber. Whether you are a seasoned woodworker or a newcomer to the craft, this introduction will set the foundation for producing your own high-quality lumber.
What is Lumber?
Before we get into the milling process, let’s first define what lumber is. Lumber refers to wood that has been sawn and prepared for construction or carpentry purposes. It typically comes in standard dimensions such as 2×4, 2×6, and so on, making it easy to use for building projects.
The type of lumber produced through milling depends on the type of wood used. Some common types of lumber include softwood, such as pine or cedar, and hardwood, like oak or maple.
If you are planning to mill your own lumber, it’s essential to understand the properties and characteristics of different types of wood. This knowledge will help you select the right logs for milling, as well as determine the best cutting patterns and techniques to achieve desired results.
Why Mill Your Own Lumber?
Milling lumber from logs may seem like a daunting and time-consuming task, but it has many benefits. By producing your own lumber, you have control over the entire process, from selecting the trees to cutting and drying the wood. This allows you to tailor the final product to meet your specific needs and preferences.
Moreover, milling your own lumber can save you money in the long run. Instead of buying expensive boards or planks from a store, you can produce them yourself at a fraction of the cost. Plus, by using sustainable practices such as harvesting fallen or damaged trees, you are not only saving money but also promoting environmentally friendly practices.
In addition to these practical benefits, milling lumber from logs is also a rewarding experience. It allows you to connect with the natural world, learn new skills, and create unique pieces of woodwork that reflect your personal style.

Needed Materials
To mill your own lumber from logs, you will need a variety of tools and materials. Here’s a list of the essential items:
Logs:
Select logs based on the type of lumber you want to produce. Consider factors such as wood species, log size, and the condition of the timber. Avoid using logs with knots, rot, or other defects.
Chainsaw:
A chainsaw is a must-have tool for milling lumber. It’s used to cut the logs into smaller sections that are easier to handle and fit into the mill.
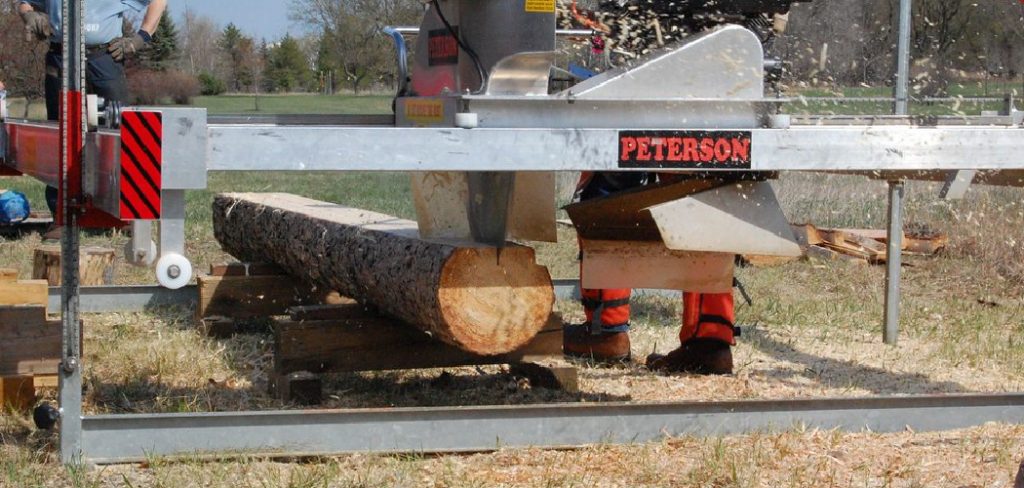
Portable Sawmill:
While it’s possible to manually saw logs with a traditional hand saw, using a portable sawmill will save you time and effort. These mills come in various sizes and designs, so choose one that suits your needs and budget.
Measuring Tools:
Accurate measurements are critical when milling lumber. You will need tools such as a tape measure, ruler, or square to ensure precision in cutting the logs.
Protective Gear:
Safety should always be a top priority when handling sharp tools and machinery. Make sure to wear protective gear such as gloves, safety glasses, and earplugs while operating the chainsaw and sawmill.

7 Step-by-step Guidelines on How to Mill Lumber From Logs
Step 1: Prepare the Logs
Before you begin milling, you need to properly prepare your logs to ensure a smooth and productive milling process. Start by selecting quality logs that are straight and free from defects such as knots, cracks, or rot.
Removing any branches and trimming the ends of the logs can make handling and positioning easier. It’s essential to debark the logs if possible, as bark can harbor dirt and debris that could damage your saw blades and reduce milling efficiency.
Next, thoroughly clean the logs to remove any dirt, rocks, or foreign material embedded in the wood that could impair your equipment. Use a sturdy brush or a power washer for this task. Once your logs are clean, cut them into sections that are manageable for your sawmill. It’s useful to have a plan for the lengths you need based on the final dimensions of the lumber you wish to produce.
Step 2: Set Up the Sawmill
Setting up your sawmill correctly is crucial for efficient and accurate milling. Begin by selecting a flat, stable location for your sawmill. This ensures that the mill operates smoothly and produces uniform cuts. If the ground is uneven, consider using stabilizing blocks or adjusting the legs of the mill to achieve a level setup.
Once the sawmill is in place, make sure all components are securely assembled and tightened. This includes checking the saw blade for proper tension and alignment, as a loose or misaligned blade can lead to inaccurate cuts and potential safety hazards. Consult your portable sawmill’s manual for specific assembly instructions and guidelines on blade adjustments.
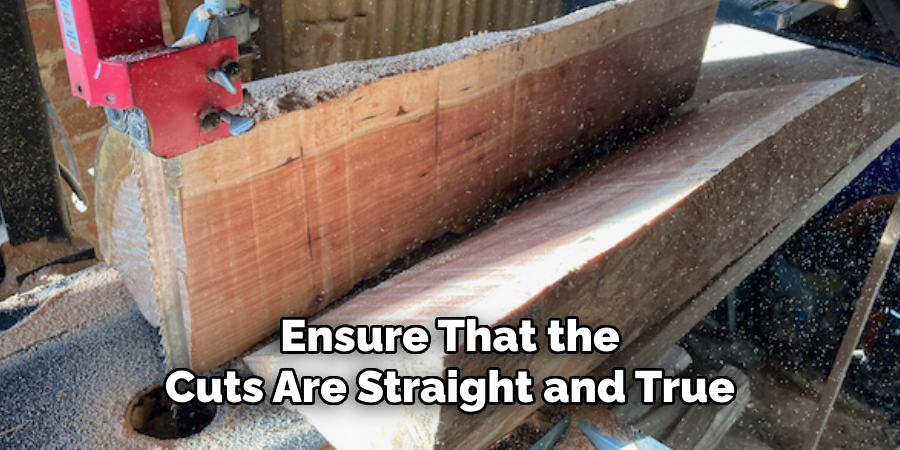
Next, position the log on the sawmill bed. Use securing mechanisms such as log clamps or dogs to hold the log firmly in place. This prevents movement during cutting, which is essential for both safety and precision. Align the log’s centreline with the saw blade to ensure that the cuts are straight and true.
Step 3: Make the First Cut
With your sawmill properly set up and your logs securely in place, it’s time to make the first cut. This initial cut, often referred to as the “slab cut,” removes a portion of the log’s exterior to create a flat reference surface. Start by adjusting the height of the saw blade to remove approximately 1 to 2 inches from the log’s surface, ensuring the cut is shallow enough to just skim the bark and any uneven surface wood.
Turn on your sawmill and guide the blade steadily through the log, maintaining a consistent speed to achieve a smooth, even cut. Patience is key here; rushing can lead to rough cuts and increased wear on your equipment. As the saw blade moves through the wood, keep an eye out for any irregularities or obstructions that may affect the cut.
Once the slab cut is complete, inspect the newly exposed surface. It should be flat and smooth, providing a solid reference point for subsequent cuts. If the surface is uneven, consider making a secondary pass to achieve the desired flatness. This step is crucial, as it ensures the remaining cuts will be accurate and the resulting lumber will have consistent thickness.
Step 4: Measure and Mark Your Cuts
With your reference surface established, it’s time to measure and mark the desired dimensions for your lumber. Use measuring tools such as a tape measure or ruler to determine the width, thickness, and length of each board you wish to produce.
Next, use a straight edge or square to make precise marks on the log’s surface along these measurements. These markings will act as guides for the saw blade as you make your cuts.
When marking your logs, keep in mind that different wood species may have varying shrinkage rates. It’s essential to leave an extra inch or two when marking out your final dimensions to account for any potential changes in size during drying. This ensures that you end up with the desired dimensions for your lumber after the drying process.

Step 5: Make Your Cuts
Now that you have your measurements and markings, it’s time to start making the actual cuts. Gradually adjust the height of the saw blade according to the marked lines, taking care not to cut too deeply or deviate from the marks.
As with the slab cut, maintain a steady pace as you guide the saw through the log. Constantly check for any obstacles or irregularities in the wood that may affect your cuts. It’s also crucial to take breaks occasionally to allow both yourself and your equipment a rest period.
Make sure to rotate and turn your logs after each cut, so you are always working with one flat surface against the sawmill bed. This helps maintain accuracy and ensures consistent thickness throughout the entire log.
Step 6: Repeat Until Finished
Continue the process by repeating the steps of measuring, marking, and cutting until you have milled the entire log into boards of the desired dimensions. After each cut, inspect both the freshly sawn surface and the blade to ensure they remain free from debris and irregularities that might affect subsequent cuts.
This repetitive approach not only maintains the accuracy and quality of your lumber but also helps in managing any wear and tear on your equipment.
Rotate the log after each series of cuts to maintain stability and control. Always work meticulously, ensuring each new surface is smooth and flat before proceeding to the next cut. This attention to detail will ensure that every board you mill is uniform in thickness and width, making it easier for future woodworking projects.
Step 7: Clean Up
Once you have finished milling all your logs, it’s time to clean up. Remove any debris or sawdust from the sawmill bed and surrounding area, ensuring that it is safe and tidy for future use. Also, check and perform any necessary maintenance on your equipment to ensure its longevity.

Congratulations! You have successfully milled your own lumber with a portable sawmill. With practice and attention to detail, you can continue to produce high-quality lumber for all your woodworking needs. Enjoy the satisfaction of using wood from start to finish in your projects, knowing exactly where it came from and how it was milled. Happy milling!
Following these steps on how to mill lumber from logs will give you a solid foundation for using your portable sawmill and producing quality lumber. However, there are always additional tips and techniques to improve your results further.
Consider seeking out resources such as online forums, books, or workshops for more in-depth information on using portable sawmills and milling lumber. With some dedication and practice, you can become a pro at milling your own lumber and create beautiful, one-of-a-kind pieces for your woodworking projects.
Additional Tips and Considerations
- Always wear appropriate personal protective equipment, including safety glasses, earplugs, and gloves, when operating a sawmill.
- Keep your sawmill blades sharp to ensure clean and accurate cuts.
- Never operate the sawmill alone; always have someone nearby who can assist in case of an emergency.
- Regularly maintain your equipment to prolong its lifespan and ensure safe operation.
- Consider using a moisture meter to check the moisture content of your lumber before use. It should be between 12-15% for most woodworking projects.
- Experiment with different wood species and cutting techniques to find what works best for you and your projects. Each type of wood may require slight adjustments in milling methods.
Remember to always prioritize safety first, take your time, and enjoy the process of turning logs into high-quality lumber with a portable sawmill. Happy milling!
Frequently Asked Questions
Q: How Long Does It Take to Mill a Log Into Lumber?
The time it takes to mill a log into lumber can vary significantly based on several factors. These include the size and type of the log, the condition of the wood, the efficiency of the sawmill, and the operator’s experience. On average, milling a moderately sized log into lumber might take anywhere from a couple of hours to a full day.
Large, dense logs such as those from hardwood trees may require more time and effort compared to smaller, softer logs. Additionally, factors such as preparation time, equipment setup, and periodic maintenance can also impact the overall timeframe. As you become more familiar with your equipment and develop a routine, the process may become more efficient, reducing the milling time.

Q: Can You Mill Lumber in Any Season?
Millling lumber can be done in any season, but the ideal time to do so is during dry weather. This is because moisture levels in the wood can affect the milling process and the quality of the lumber produced. During wet or humid seasons, it may take longer for freshly milled boards to dry, potentially leading to warping or cracking. In contrast, milling during drier weather allows for quicker drying times and better overall results.
If you must mill during a rainy or humid season, consider using a dehumidifier or fan to help speed up the drying process. Overall, while it’s possible to mill lumber at any time of year, being mindful of weather conditions can help produce better-quality lumber.
Q: Can You Mill Logs with Knots or Other Imperfections?
While it’s generally recommended to avoid milling logs with knots or other imperfections, it is possible to do so with proper care and technique. These knots and imperfections can cause the saw blade to bind or deflect, leading to uneven cuts and potentially damaging your equipment.
If you must mill logs with knots, consider orienting them away from the blade’s path as much as possible. Additionally, using a slower cutting speed can help reduce binding and improve accuracy. However, keep in mind that milling logs with knots may result in lower-quality lumber compared to those without such imperfections.
It’s always best to inspect logs before milling them and avoid using ones with excessive knots or other defects if possible. This approach ensures higher-quality lumber for your projects and reduces the risk of equipment damage during the milling process.
Q: Can You Use a Portable Sawmill to Mill Lumber for Commercial Purposes?
Yes, a portable sawmill can be used for both personal and commercial purposes. These versatile machines allow you to mill lumber on-site, saving time and expenses associated with transporting logs to a sawmill. Many small-scale woodworkers or businesses use portable sawmills to produce their own lumber for furniture making, construction, or other woodworking projects.
However, if you plan on using a portable sawmill for commercial purposes, be sure to research local laws and regulations regarding milling lumber and obtaining necessary permits or licenses. Additionally, ensure that your equipment is well-maintained and operated safely at all times to avoid any accidents or injuries.

Conclusion
Milling your own lumber with a portable sawmill can be a rewarding and cost-effective way to obtain high-quality wood for your woodworking projects. By following the steps and tips outlined in this guide on how to mill lumber from logs, you can ensure safe and efficient milling practices.
Remember, safety should always be a top priority, and proper maintenance of your equipment is crucial for producing the best results. Whether you are a hobbyist or a small business owner, mastering the art of milling lumber opens up a world of possibilities, allowing you to create unique and beautiful pieces. Take the time to practice, learn from additional resources, and experiment with different techniques to continuously improve your milling skills. Happy milling!
About the Author
Adrian Green, a lifelong woodworking enthusiast, shares his passion for the craft through The Woodenify Blog. With a foundation built on years of hands-on experience in his father’s woodworking shop, Adrian is dedicated to helping others learn and grow in the world of DIY woodworking. His approach to woodworking combines creativity, practicality, and a deep appreciation for the art of building with your own hands. Through his blog, he inspires individuals of all skill levels to embark on their own woodworking journeys, creating beautiful, functional pieces of furniture and décor.
Professional Focus
- Specializes in DIY woodworking projects, from furniture to home décor.
- Provides step-by-step guides and practical tutorials for woodworkers of all skill levels.
- Dedicated to helping readers build confidence and skill through easy-to-follow instructions and tips.
- Passionate about fostering a community of makers who can share, learn, and grow together.
Education History
- University of Craft and Design – Bachelor of Fine Arts (BFA) in Woodworking and Furniture Design
- Woodworking Apprenticeships – Extensive hands-on training with skilled craftsmen to refine carpentry and furniture making techniques.
- Online Courses & Masterclasses – Continued education in advanced woodworking techniques, design principles, and specialized tools
Expertise:
- DIY woodworking, carpentry, furniture making, and home décor projects.
- Creating accessible tutorials and guides for beginner to advanced woodworkers.
- Sharing the joys and satisfaction of woodworking, from raw materials to finished products.