Are you tired of the look of your old, worn-out cabinets but still want to maintain the natural beauty of wood grain?
How to paint cabinets and keep wood grain can breathe new life into your furniture without losing its timeless charm. This process requires careful preparation, the right materials, and attention to detail to ensure the wood’s texture and patterns remain visible. Whether you’re aiming for a modern refresh or just want to enhance the existing look, maintaining the wood grain adds character and depth to your cabinets. Additionally, painting over the wood grain can also help protect and extend the life of your cabinets by preventing moisture and wear from damaging the wood.
In this guide on wood grain kitchen cabinets, you’ll find step-by-step instructions to help you achieve a flawless, professional finish while showcasing the beauty of the wood beneath the paint.
What Are the Benefits of Painting Over Wood Grain?
There are several benefits to painting over wood grain, including:
- Modernize the Look: By covering up the old wood grain, you can give your cabinets a modern and updated appearance.
- Customization: Paint allows you to choose from a wide range of colors and finishes, allowing you to personalize your cabinets to match your style and home decor.
- Protection: As mentioned earlier, painting over the wood grain helps protect the wood against moisture and wear, extending its life and preventing damage.
- Cost-effective: Instead of completely replacing your cabinets, painting over the wood grain is a cost-effective way to give them a new look without breaking the bank.
What Will You Need?
Before starting your painting project, make sure you have the following items on hand:
- Sandpaper or sander
- Tack cloth or microfiber cloth
- Primer
- Paint (choose a high-quality paint suitable for use on wood)
- Paintbrushes and/or rollers
- Painter’s tape
- Drop cloths or old sheets to protect the surrounding areas
Once you have everything ready, it’s time to start painting your cabinets.
10 Easy Steps on How to Paint Cabinets and Keep Wood Grain
Step 1: Remove Cabinet Doors and Hardware
To begin, carefully remove all cabinet doors, drawers, and hardware, including hinges, handles, and knobs. This step is crucial to ensure a smooth and even paint finish, as painting over hardware or keeping doors attached can lead to uneven edges or missed spots. Use a screwdriver or power drill to make the task easier and faster. Be sure to label each door and its corresponding hardware with a piece of painter’s tape or a small sticker to avoid confusion when reassembling. Place the hardware in labeled bags or containers to keep everything organized. Once the doors and hardware are removed, you’re ready to move on to the next step in preparing your cabinets for painting.

Step 2: Clean the Surface
Thoroughly cleaning the surface of your cabinets is a crucial step in ensuring a smooth and long-lasting paint job. Start by using a gentle degreaser or a solution of warm water and dish soap to remove any built-up grease, grime, or residue that has accumulated over time. Pay special attention to areas near handles and edges, as these are often the dirtiest due to frequent contact. Once the grease and dirt are removed, gently scrub the surface with a sponge or cloth to ensure all contaminants are eliminated. After cleaning, rinse the cabinets with clean water to remove any soap residue. Allow the surfaces to dry completely before proceeding.
Step 3: Sand the Surface
Sanding the surface is a crucial step to ensure that the cabinets are adequately prepared for the next stages of the process. Begin by selecting an appropriate grit of sandpaper; a medium grit, such as 120 to 150, is typically suitable for most cabinet surfaces. This step helps to remove the existing finish, smooth out imperfections, and create a slightly rough texture that allows new paint or stain to adhere more effectively.
For flat surfaces, use a sanding block or an electric sander to maintain even pressure and achieve a uniform finish. When working on edges or intricate details, consider using a sanding sponge or sandpaper folded into smaller pieces for precision. Be thorough but cautious, ensuring that you do not oversand and damage the wood beneath.
Step 4: Apply Painter’s Tape
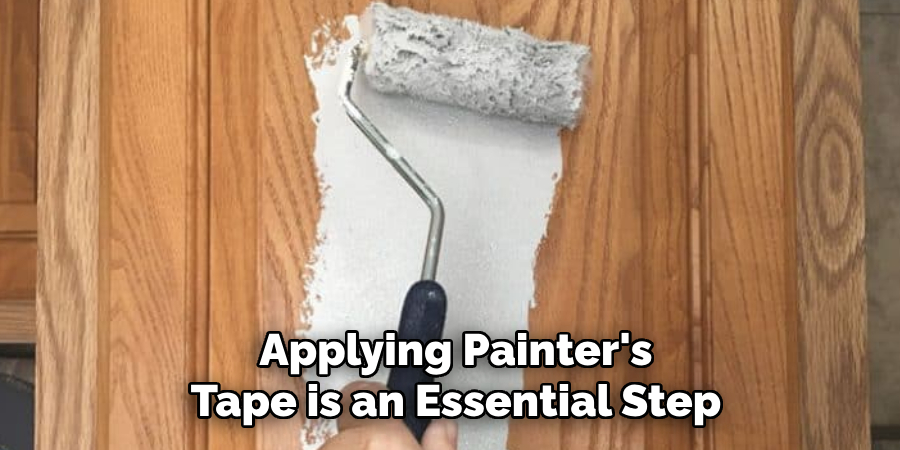
Applying painter’s tape is an essential step to ensure clean, sharp lines and to protect areas that you do not want to be painted or stained. Start by carefully selecting high-quality painter’s tape that is suitable for the surface you’re working on, whether it’s wood, metal, or drywall. Press the tape firmly along the edges of trim, moldings, or any section requiring protection, making sure there are no gaps or bubbles that could allow paint to seep through. Use a plastic putty knife or your fingernail to smooth the tape and secure its adhesion. Take your time to align the tape precisely, as any misalignment can affect the overall finish of your project.
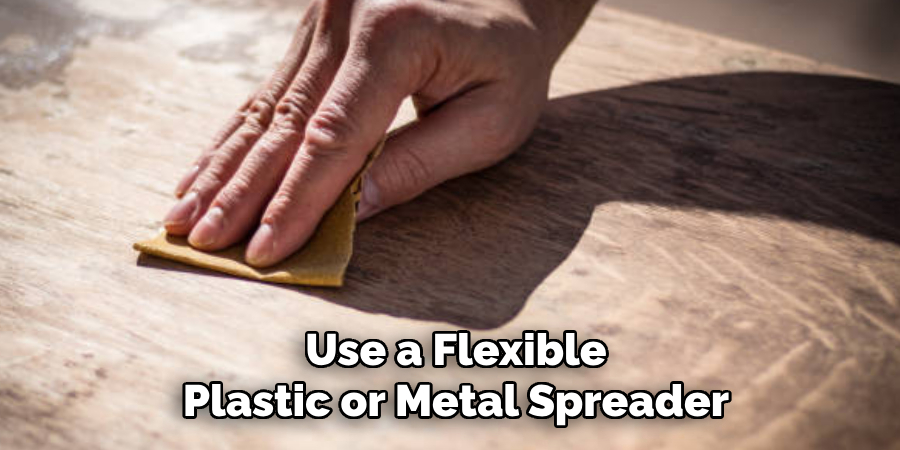
Step 5: Use a Wood Grain Filler
Using a wood grain filler is an essential step if you’re aiming for a smooth, professional finish, especially on porous woods like oak or mahogany. Begin by selecting a filler that matches your desired finish—these come in both water-based and solvent-based options. Water-based fillers are easier to clean and dry quickly, while solvent-based fillers are more durable and better suited for outdoor applications. Before applying the filler, ensure the wood surface is clean, dry, and free of dust.
Use a flexible plastic or metal spreader to apply the filler in thin, even layers, pressing it firmly into the grain. Pay close attention to the direction of the wood grain, as this ensures consistency. Once the filler has dried completely, typically after 30 minutes to an hour, depending on the product, sand the surface lightly with fine-grit sandpaper to remove any excess and achieve a smooth, level finish.
Step 6: Apply Primer
Applying a primer is a crucial step in preparing the wood for painting or staining. Begin by selecting a primer that is suitable for your project, whether it is oil-based, latex-based, or shellac-based, ensuring it is compatible with the type of paint or finish you plan to use. Stir the primer thoroughly before application to ensure an even consistency.
Using a high-quality brush or roller, apply a thin, even coat of primer, working with the grain of the wood to maintain a natural look. Be sure to cover all surfaces, including edges and corners, to provide a uniform base that enhances adhesion and final appearance. Allow the primer to dry completely, which typically takes several hours or overnight, depending on the product and environmental conditions. Inspect the surface after it has dried, and lightly sand it with fine-grit sandpaper to smooth out any imperfections or raised wood fibers.
Step 7: Sand After Priming
Once the primer has dried completely, sanding is an essential step to achieve a flawless finish. Use fine-grit sandpaper, typically between 220 and 320 grit, to gently smooth the primed surface. This process helps eliminate any brush strokes, uneven spots, or raised wood fibers that may have appeared during priming. Be sure to sand evenly and with light pressure to avoid removing too much primer, which could compromise the coating. After sanding, inspect the surface for a smooth and uniform texture. Wipe down the surface with a clean, damp cloth or tack cloth to remove dust particles resulting from sanding, as these can interfere with the adhesion of the paint or final finish.
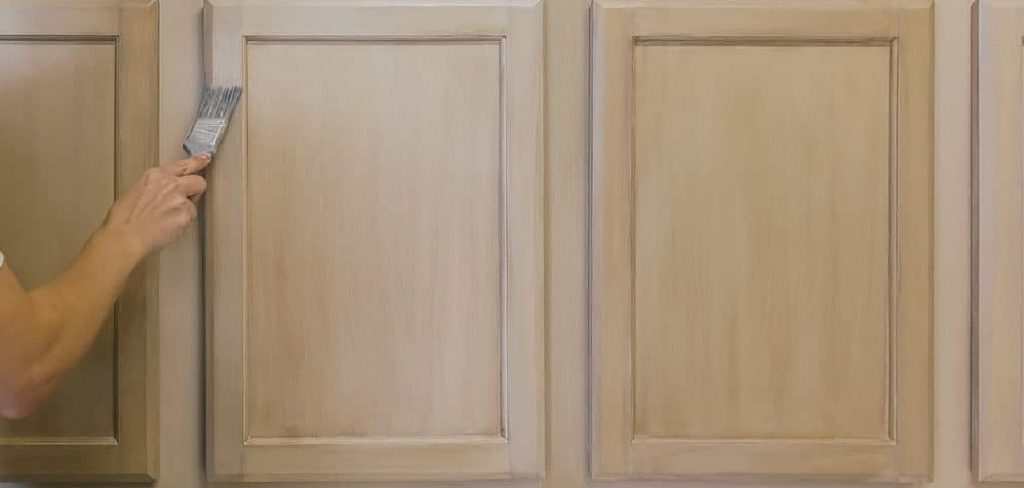
Step 8: Paint Thin Coats
When applying paint, it’s essential to use thin, even coats to achieve a flawless and durable finish. Begin by loading your brush or roller with a moderate amount of paint—overloading can lead to drips, uneven coverage, and a longer drying time. Apply the paint using smooth, consistent strokes and maintain a wet edge. This involves blending each stroke into the previous one before the paint dries, to avoid visible streaks or lap marks. Start in one corner of the surface and work methodically in small sections to maintain control over your application.
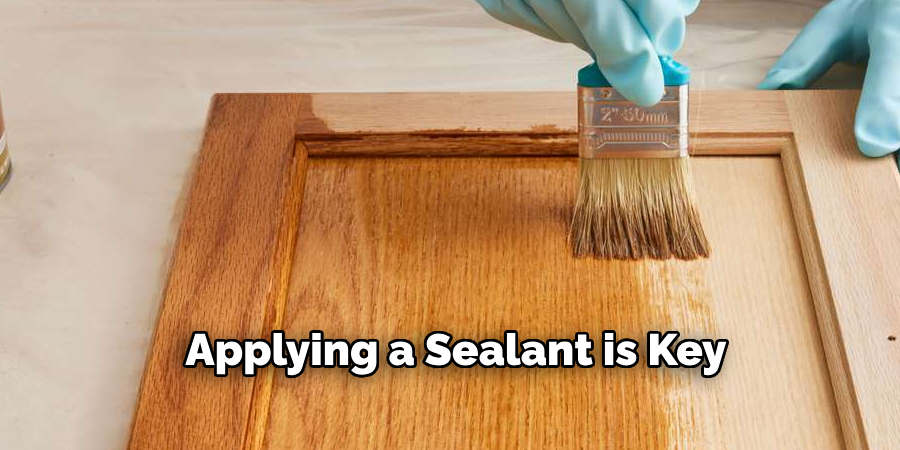
Step 9: Seal the Finish
Once the paint has dried thoroughly, applying a sealant is key to protecting your finished surface and ensuring its durability. Choose a sealant that is suitable for the type of paint and the surface you’ve worked on—options include polyurethane, polycrylic, or specialized sealers for outdoor use if weather resistance is required. Before applying the sealant, ensure the surface is clean and free of dust or debris, as this can compromise the smoothness and adhesion of the protective layer.
Step 10: Reattach the Hardware and Doors
After the sealant has cured, reattach all hardware and reinstall the cabinet doors and drawers. Check to make sure everything is aligned correctly. Now you have beautifully painted cabinets that retain their natural wood grain!
By following these simple steps, you can transform your kitchen cabinets without having to spend a fortune on brand-new ones.
Conclusion
How to paint cabinets and keep wood grain is a rewarding project that combines elegance and practicality.
By carefully preparing the surface, applying the right products, and following each step with precision, you can achieve a professional-quality finish that highlights the natural beauty of the wood. This process not only allows you to refresh the look of your cabinets but also enhances their durability.
With patience and attention to detail, you can transform your space and create a stunning, timeless aesthetic that showcases the charm of natural wood grain.
About the Author
Adrian Green, a lifelong woodworking enthusiast, shares his passion for the craft through The Woodenify Blog. With a foundation built on years of hands-on experience in his father’s woodworking shop, Adrian is dedicated to helping others learn and grow in the world of DIY woodworking. His approach to woodworking combines creativity, practicality, and a deep appreciation for the art of building with your own hands. Through his blog, he inspires individuals of all skill levels to embark on their own woodworking journeys, creating beautiful, functional pieces of furniture and décor.
Professional Focus
- Specializes in DIY woodworking projects, from furniture to home décor.
- Provides step-by-step guides and practical tutorials for woodworkers of all skill levels.
- Dedicated to helping readers build confidence and skill through easy-to-follow instructions and tips.
- Passionate about fostering a community of makers who can share, learn, and grow together.
Education History
- University of Craft and Design – Bachelor of Fine Arts (BFA) in Woodworking and Furniture Design
- Woodworking Apprenticeships – Extensive hands-on training with skilled craftsmen to refine carpentry and furniture making techniques.
- Online Courses & Masterclasses – Continued education in advanced woodworking techniques, design principles, and specialized tools
Expertise:
- DIY woodworking, carpentry, furniture making, and home décor projects.
- Creating accessible tutorials and guides for beginner to advanced woodworkers.
- Sharing the joys and satisfaction of woodworking, from raw materials to finished products.