Are you looking to add a touch of rustic charm to your home? Don’t worry, you don’t have to spend a fortune on expensive wood furniture or flooring.
Painting faux wood grain is a fantastic way to add warmth and elegance to any surface without the expense or weight of real wood. This decorative painting technique mimics the natural grain and texture of wood, making it a popular choice for furniture, doors, and even walls. Whether you’re revitalizing an old piece or creating something entirely new, learning how to paint faux wood grain can transform your project with a stunning, realistic wood-like finish.
With some basic tools, the right materials, and a bit of patience, anyone can master this skill and achieve professional-looking results.
What Are the Benefits of Painting Faux Wood Grain?
Painting faux wood grain offers numerous benefits, making it a popular choice among both DIY decorators and professionals. Here are some of the main advantages of using this decorative painting technique:
- Cost-effective: Instead of buying expensive, high-quality wood for your project, you can achieve the same look with much cheaper materials. This makes faux wood grain painting an affordable option for those on a budget.
- Versatility: Faux wood grain can be painted on almost any surface, including furniture, walls, and floors. This means you can incorporate this technique into various projects and create a unique look for your space.
- Low-maintenance: Real wood requires regular maintenance such as sanding, staining, and sealing to keep it looking its best. With faux wood grain painting, you don’t have to worry about any of that. The painted surface is durable and easy to clean, making it a practical choice for busy households.
- Eco-friendly: By using faux wood-grain painting techniques, you are not contributing to the demand for real wood products. This helps reduce deforestation and promotes sustainable practices in the design industry.
- Customization: Faux wood grain painting allows you to create custom finishes that perfectly match your style and preferences. You can choose the type of wood grain pattern, color, and level of distressing to achieve the desired look for your project.
What Will You Need?
To successfully execute a faux wood grain painting technique, you will need the following materials:
- Base Coat Paint: This can be any type of water-based or oil-based paint that serves as the foundation for your faux wood finish.
- Faux Wood Grain Tool: This specialized tool is used to create a wood grain pattern on a painted surface. It typically has a rubber or plastic head with teeth or patterns that mimic different types of wood grains.
- Acrylic Glaze: This transparent liquid medium is mixed with paint to create a translucent layer for the wood grain effect.
- Paintbrushes: These tools are used to apply the base coat and glaze onto the surface. It is recommended to use different sizes and types of brushes for more precise application.
- Sandpaper: Sandpaper is used to smooth out any imperfections on the surface before applying the base coat. It can also be used to distress the faux wood finish for a more realistic look.
9 Easy Steps on How to Paint Faux Wood Grain
Step 1: Prepare Your Surface
Before starting the faux wood grain painting process, it is essential to properly prepare the surface to ensure a smooth and professional-looking finish. Begin by thoroughly cleaning the surface to remove any dirt, grease, or dust. Use a mild detergent and a soft cloth or sponge, ensuring the surface is completely clean and free of any residues that might interfere with the paint’s adhesion. Allow the surface to dry completely before moving on.
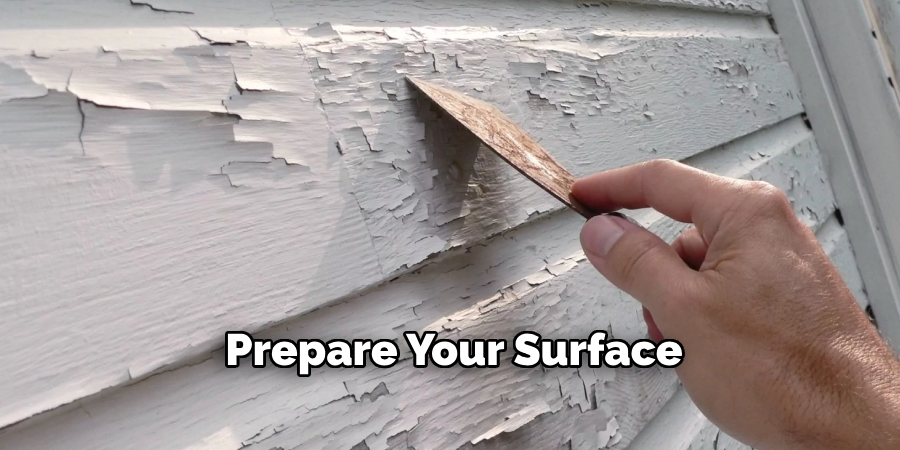
Next, inspect the surface for imperfections such as cracks, holes, or uneven textures. Use a wood filler or joint compound to fill in any gaps or defects, and then let it dry according to the product’s instructions.
Step 2: Apply the Base Coat
Choose a base coat color that complements the desired wood tone. For light wood, opt for beige or light brown, while darker woods work well with deep brown shades. Use a paintbrush or roller to apply the base coat evenly. Allow it to dry completely before proceeding.
Step 3: Mix Your Glaze
Combine your chosen paint color with glaze medium to create a translucent mixture. This glaze will serve as the top layer, mimicking the wood grain effect. Test the mixture on an inconspicuous spot to ensure the color and consistency meet your expectations.
Step 4: Apply the Glaze
Using a wood-graining tool, sponge, or brush, apply the glaze mixture to the surface in long, sweeping motions that resemble natural wood grain. Begin at one edge and work methodically across the surface to ensure a consistent result. Adjust the pressure and angle of your tool to vary the patterns, creating the realistic texture of wood. For a more authentic effect, you can use a comb-like tool or drag a fine paintbrush through the glaze to add intricate details, such as knots or striations. Work in small sections to prevent the glaze from drying before you’ve added the desired texture. Once the entire surface is complete, allow the glaze to dry thoroughly.

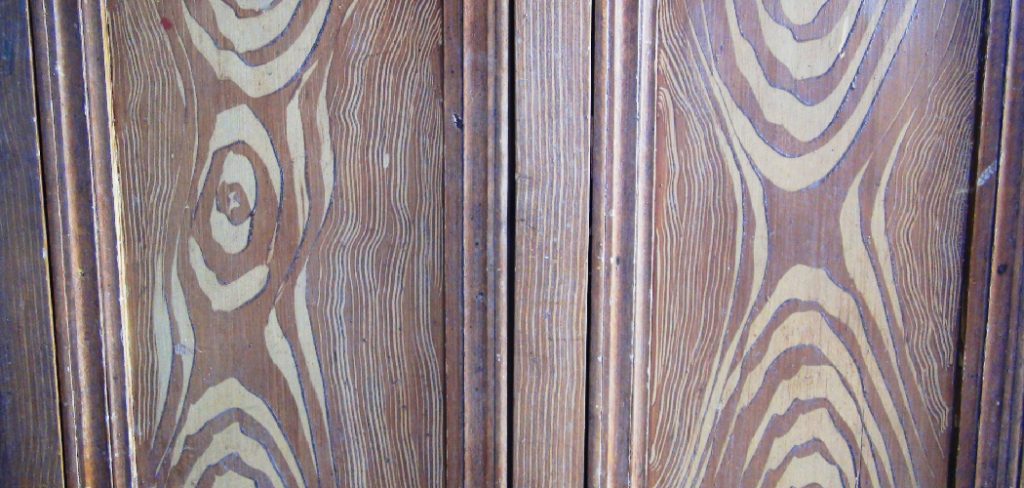
Step 5: Create the Wood Grain Pattern
To create a persuasive wood grain effect, pay close attention to the direction and flow of your patterns. Wood grain naturally follows a linear path, often curving or swirling around knots or irregularities. Use long, smooth strokes for straight grains, and employ gentle, circular motions to mimic the organic loops and waves found in real wood. For added depth, go over certain areas with a darker or lighter shade of glaze to simulate the natural variations seen in timber.
Step 6: Add Details with a Paintbrush
Once your base wood grain effect is in place, it’s time to enhance the realism by adding intricate details with a fine paintbrush. Focus on accentuating key features such as knots, streaks, and subtle imperfections, as these are what give wood its unique character. To create knots, use a circular motion with varying pressure to mimic the irregular patterns found in real wood. Blend the edges of the knots smoothly into the surrounding grain for a natural appearance. For streaks, use light, uneven strokes to add dimension and texture, ensuring they follow the natural grain pattern.
Don’t forget to layer your details for added depth—start with lighter tones to build highlights and then apply darker shades to create shadows or emphasize specific areas. Pay attention to the direction of your brushstrokes, as this will ensure your details integrate seamlessly with the existing grain. If you’re working on a larger surface, step back occasionally to evaluate the overall effect and make adjustments as needed.
Step 7: Allow the Glaze to Dry
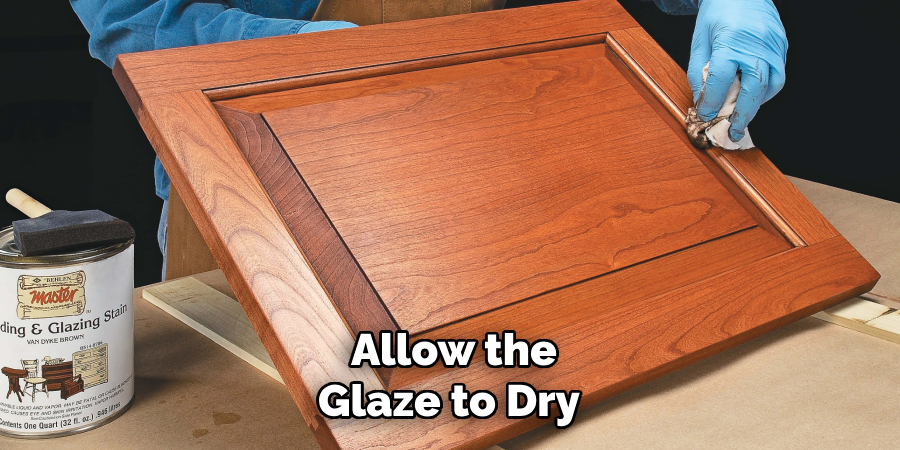
Once you have achieved the desired effect with your glazing, it is crucial to give the surface enough time to dry completely. Drying times can vary depending on factors such as the type of glaze used, the thickness of the application, and environmental conditions like temperature and humidity. Typically, it’s best to refer to the manufacturer’s recommendations on the product label to ensure optimal results. During this process, avoid touching or moving the surface to prevent smudging or disrupting the finish.
Step 8: Apply a Clear Topcoat
Applying a clear topcoat is an essential final step to protect and preserve the finish. A topcoat adds durability, shielding the surface from scratches, stains, and everyday wear and tear. Additionally, it enhances the appearance by providing a smooth, polished look or a desired sheen, whether matte, satin, or glossy. When selecting a topcoat, consider the type of glaze and surface underneath, as different formulations work better for specific materials. Use a clean brush, roller, or spray, as instructed in the product, and apply the topcoat in thin, even layers to prevent drips and uneven coverage. Allow each layer to dry thoroughly before applying the next, as multiple coats often provide the best protection.
Step 9: Sand Lightly Between Coats
Sanding between coats is a crucial step to ensure a smooth and flawless finish. After each layer of topcoat has dried completely, use fine-grit sandpaper, typically between 320-400 grit, to gently sand the surface. This process helps to remove any imperfections, such as dust particles or bubbles, that may have settled during drying. Be sure to sand lightly and evenly, avoiding excessive pressure that could damage the previous coat. After sanding, clean the surface thoroughly with a tack cloth or a damp, lint-free cloth to remove all dust residues before applying the next coat.

By following these steps, you can achieve a smooth and professional finish for your topcoat.
Conclusion
How to paint faux wood grain is a rewarding technique that requires patience and attention to detail.
By starting with a properly prepared surface, selecting the right tools, and using smooth strokes to mimic natural wood patterns, you can achieve a realistic wood grain effect. Remember to take your time, experiment with colors and textures, and practice on scrap pieces if needed.
With dedication and these steps, you can transform a plain surface into a beautiful, wood-like finish that enhances your space.
About the Author
Adrian Green, a lifelong woodworking enthusiast, shares his passion for the craft through The Woodenify Blog. With a foundation built on years of hands-on experience in his father’s woodworking shop, Adrian is dedicated to helping others learn and grow in the world of DIY woodworking. His approach to woodworking combines creativity, practicality, and a deep appreciation for the art of building with your own hands. Through his blog, he inspires individuals of all skill levels to embark on their own woodworking journeys, creating beautiful, functional pieces of furniture and décor.
Professional Focus
- Specializes in DIY woodworking projects, from furniture to home décor.
- Provides step-by-step guides and practical tutorials for woodworkers of all skill levels.
- Dedicated to helping readers build confidence and skill through easy-to-follow instructions and tips.
- Passionate about fostering a community of makers who can share, learn, and grow together.
Education History
- University of Craft and Design – Bachelor of Fine Arts (BFA) in Woodworking and Furniture Design
- Woodworking Apprenticeships – Extensive hands-on training with skilled craftsmen to refine carpentry and furniture making techniques.
- Online Courses & Masterclasses – Continued education in advanced woodworking techniques, design principles, and specialized tools
Expertise:
- DIY woodworking, carpentry, furniture making, and home décor projects.
- Creating accessible tutorials and guides for beginner to advanced woodworkers.
- Sharing the joys and satisfaction of woodworking, from raw materials to finished products.