Ah, the grand adventure of decking out your deck! Have you ever gazed upon a deck and thought, “Wow, that’s one well-dressed outdoor space”? If so, then you, my friend, admire the fine artwork of a picture framing a deck. This isn’t just about throwing some boards together; it’s about giving your deck that extra splash of charm and sophistication.
Picture framing your deck is like giving it a haircut and a new outfit. It’s all about adding that defining edge, a border that says, “Yes, I am more than a mere collection of boards; I am a deck with style and pizzazz.” This simple yet impactful technique can elevate your deck from backyard basic to neighborhood envy.
Now, you might be thinking, “Sure, I want my deck to strut its stuff, but how does one achieve such decking delight?” Fear not! We’re about to break down the hows and whats of picture framing—from choosing the right materials to executing the flawless miter cut that would make any carpenter swoon.
Hold onto your hammers, because we’re diving headfirst into the riveting world of how to picture frame a deck. By the end of this step-by-step guide, you’ll be equipped with the knowledge, techniques, and dazzling dad jokes to transform your deck into a masterpiece of outdoor living.
Stick with us, and soon you’ll be the Picasso of picture framing, hosting BBQs on a deck that’s not just built but beautifully bordered and admired.
Understanding Picture Framing
Alright, folks, grab your popcorn because we’re about to get into the nitty-gritty of picture framing. No, not the kind you hang on your wall, but the sort that turns your deck into the envy of the neighborhood.
A. Explanation of Picture Framing Concept in Deck Construction
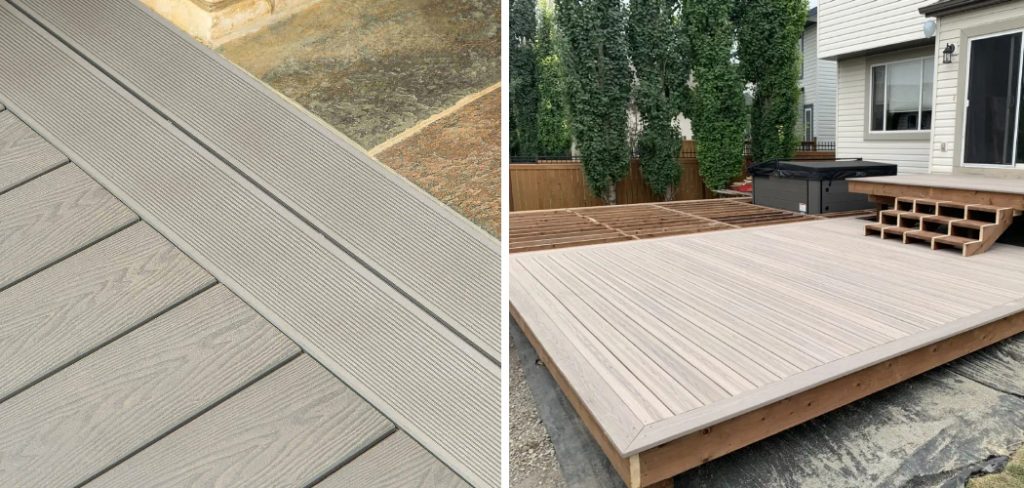
Imagine your deck as a glorious, big ol’ painting. The picture framing technique is essentially adding a border around this artwork, using decking boards that run perpendicular to the main decking area. This not only tidies up the edges but also adds a crisp, aesthetic finish that screams, “Look at me, I’m fancy!” It’s like adding a bow tie to a tuxedo—suddenly, everything looks more put-together.
B. Benefits of Picture Framing for Deck Appearance and Stability
Aside from making your deck look like it stepped out of a home & garden magazine, picture framing has some pretty solid benefits. First off, it adds to the structural integrity of your deck, giving those dangling edges something to hold onto. It also cleverly conceals the end grains of your deck boards, protecting them from moisture and wear. And, of course, it amps up the visual appeal, adding lines and contrast that draw the eye and make your deck’s design pop.
C. Visual Examples of Picture Framing in Deck Design
To truly grasp the splendor of picture framing, think of decking projects that made you stop and stare. That deck with the elegant border seemed to perfectly encapsulate the charm of outdoor living—it was likely using picture framing. Imagine clean lines that frame the deck space, often in a contrasting color to add depth and dimension. These aren’t just decks; they’re outdoor statements.
By including picture framing in your deck’s design, you’re not just building a space; you’re crafting an experience. It’s the difference between wearing socks with sandals and donning a pair of sleek, polished shoes. Both serve their purpose, but one definitely makes you feel more like a rockstar.
Planning and Preparation
Alright, before you start slapping boards together willy-nilly, a bit of forethought is essential. You wouldn’t bake a cake without knowing what ingredients you need, right? The same goes for decking—especially when you’re jazzing it up with some picture framing.
A. Selecting Suitable Decking Material and Design
The first order of business is choosing your deck’s outfit. And by outfit, I mean the material and design. Think of this as the deck’s fashion show. You’ve got options for galore—wood, composite, plastic, and aluminum? And each has its own runway-worthy attributes.
Wood is classic and warm, but it demands maintenance. Composite? Less fussy and still fabulous. Your choice here sets the stage for everything that follows, so pick a material and design that reflects your style and meets your maintenance willingness.
B. Calculating Material Requirements Based on Deck Size
Now, for the part that feels a bit like doing your taxes but way more rewarding—calculating material requirements. You’ll need to figure out how much decking material you need, not forgetting the extra for the picture frame itself.
Grab your deck’s dimensions and a calculator (or your smartphone because honestly, who owns a calculator these days?), and get to matching. Remember, it’s better to have a bit too much than to be a few boards short mid-project, leaving your deck in a state of undress.
C. Creating a Detailed Plan for Picture Framing Layout
Last but not least, sketch out your masterpiece. This doesn’t mean you need DaVinci-level drawing skills. A simple blueprint that outlines where each piece of your picture frame will go is perfect.

This plan will be your roadmap, guiding you through the construction process, ensuring your frame is symmetrical, and, most importantly, preventing those “oh no” moments when something doesn’t line up right. Measure twice, cut once, and all that jazz.
By the end of this planning and preparation phase, you’ll be like a deck-building superhero, cape and all, ready to tackle the actual construction with the confidence of a thousand carpenters. And remember, in the decking world, patience and preparation are the dynamic duo of success.
How to Picture Frame a Deck: Installing Deck Frame
Gather ’round, future deck masters, because it’s showtime! This part is where your deck starts to take shape, transforming from a pile of materials into the envy of the neighborhood. Remember, patience is your best pal during this phase. Rushing now is like trying to put on socks while running—you’re bound to trip up.
A. Erecting Main Joists and Ledger Board for Deck Structure
First up, we’re building the skeleton of our deck with the main joists and ledger board. Think of this as setting up the bones of a dinosaur skeleton in a museum; every piece needs to connect just right.
The ledger board is like the spine, attached to the side of your house, providing support and ensuring your deck doesn’t wander off. The joists are the ribs, spaced evenly across the ledger board, creating a sturdy base for the decking boards. Ensure everything is level and secure because nobody wants a sloping deck—unless you’re aiming for a skate park vibe.
B. Installing Decking Boards Along Perimeter for Picture Frame
Now, for the pièce de résistance—the picture frame. This step turns your deck from “just another outdoor space” to “Wow, do you host garden magazine photoshoots here?” Start by installing the decking boards around the perimeter.

These boards set the stage for your dazzling picture frame. Choosing a contrasting color for these boards is crucial to make your deck pop like a celebrity on the red carpet. Precision is key; each board needs to align with the grace of a ballet dancer, ensuring the entire frame looks seamless.
C. Ensuring Proper Spacing and Alignment for Picture Framing Boards
This is where your keen eye for detail comes into play. Ensuring proper spacing and alignment for your picture framing boards is like trying to hang pictures in your living room; a little off, and it’s all anyone will notice.
Use spacers to maintain even gaps between boards, allowing for wood expansion (because of science). This step is crucial for avoiding a wonky-looking frame that resembles a funhouse mirror. Double-check alignment with a spirit level because guessing here is like trying to cut your hair with your eyes closed—not advisable.
By the end of these steps, your deck’s frame will be looking so good that you’ll be tempted to throw a party on it immediately. Resist that urge! There’s still work to be done, but take a moment to admire your handiwork.
You’re not just building a deck; you’re crafting an outdoor sanctuary, a retreat where memories will be made, jokes will be shared, and perhaps a few BBQs will be slightly overcooked. Onward, brave builder, the best is yet to come!
How to Picture Frame a Deck: Mitering Corners and Angles
Ah, mitering corners and angles—the part where your deck’s picture frame goes from being merely good-looking to drop-dead gorgeous. It’s like giving your deck an elegant suit tailored to perfection. But don’t sweat it; I’ve got you covered with some tips that’ll make you a mitering maestro in no time.
A. Understanding Miter Cuts for Picture Frame Corners
First off, what the heck is a miter cut? Imagine slicing a piece of cake in a way that it forms a perfect corner with another slice. That, my friend, is essentially a miter cut but with wood instead of cake. It’s all about cutting pieces at angles that, when joined, form the perfect 90-degree corners. For your deck’s picture frame, getting these angles right means the difference between a “Wow!” and a “Well, it’s the effort that counts.”
B. Techniques for Achieving Clean and Accurate Miter Joints

Now, onto the magic tricks for crisp miter joints. First, you’ll want a miter saw that’s as precise as a cat stalking its prey. Ensure your saw blade is sharp, your measurements are exact (to the millimeter, people!), and your hand is steady.
When cutting, take it slow—think sloth-moving-through-molasses slow. This isn’t a race; precision is key. And remember, practice on some scrap wood first. Better to goof up on a piece nobody will see than on your shiny new decking boards.
C. Tips for Handling Angles and Transitions in Picture Framing
Angles and transitions can be tricky beasts. They’re like the puzzles of the decking world, but fear not! Here’s how to tame them:
- Measure Thrice, Cut Once: Yeah, I know I said “measure twice” before, but when it comes to angles, extra caution won’t hurt.
- Use a Protractor or Angle Finder: This handy tool is like a compass for grown-ups, guiding you through the wilderness of angles.
- Always Dry-Fit First: Think of it as a rehearsal dinner before the big wedding day. It ensures everything fits just right before you commit.
- Be Patient with Complex Angles: Sometimes, your deck design might include angles that make you scratch your head. Take a deep breath, consult YouTube, and tackle them one step at a time.
By mastering miter cuts and handling those pesky angles with finesse, you’ll ensure your deck’s picture frame is nothing short of spectacular. It’ll be the kind of deck that makes your neighbors peek over the fence and wonder if HGTV has started filming in your backyard. Crack open a cold one and pat yourself on the back; you’re becoming quite the deck designer and builder. Go ahead and take a moment to bask in the glory of your burgeoning craftsmanship. The grand finale of deck building awaits!
How to Picture Frame a Deck: Attaching Picture Framing Boards
Alrighty, folks! We’ve carved, measured, and admired our way through the miter cuts, and now it’s time to attach those stunning picture-framing boards to the joists. This is when your deck starts to really look like the envy of the neighborhood—or, at least, less like a skeleton and more like a deck.
A. Securing Picture Framing Boards to Joists Using Deck Screws
First up, we’re going to secure those picture framing boards tighter than a jar lid that’s been closed by your strongest friend. Grab your deck screws, a powerful drill, and maybe a superhero cape because you’re about to save the day.

Place the screws at strategic points, ensuring they’re evenly spaced because consistency is key; think of them as the polka dots on your deck’s outfit. A bit of pre-drilling can help avoid splitting the wood—because the only thing we want splitting is bananas for our morning cereal.
B. Ensuring Boards are Level and Flush with the Deck Surface
Now, to ensure those boards are as level as a sea horizon at sunset. Grab your trusty level and check that everything’s perfectly horizontal. You’ll want your deck as flush as a royal flush in poker—a winning hand, metaphorically speaking. If anything’s off, now’s the time to adjust. You don’t want a trip hazard that’s a lawsuit waiting to happen or, worse, a spilled cocktail.
C. Double-Checking Alignment and Spacing Throughout Installation
Lastly, let’s play the alignment and spacing game one more time. For example, check your hair in the mirror before a date and make sure everything looks good from every angle. Use spacers to maintain that perfect gap, keeping in mind wood’s tendency to play the expansion game when it gets hot. You’re aiming for a deck that’s as cohesive as a well-rehearsed boy band.
By the end of these steps, your deck’s picture frame should be attached with the confidence of a pirate sailing the seven seas. Smooth, secure, and ready to dazzle. Take a step back, admire your work, and maybe even snap a picture—it’s not every day you build something this magnificent.
Your deck is no longer just a project; it’s a masterpiece, a testament to the sweat, possibly tears, and hopefully minimal swearing that went into making it. Prepare to bask in the glory of outdoor gatherings, where your deck will be the star of the show, second only to your grilling skills, of course.
Sealing and Finishing
Now, hang onto your hats because it’s time to seal the deal—literally. We’re about to make sure your deck stands the test of time, elements, and those unexpected wine spills.
A. Applying Waterproof Sealant or Stain to Picture Framing Boards
First things first, slap on that waterproof sealant or stain like it’s sunscreen at the beach. You want every nook and cranny covered, ensuring longevity and that spiffy look doesn’t fade away with the first rain. Choosing the right sealant or stain is like picking the perfect hat; you’ve got to make sure it fits the vibe of your deck and offers the protection it promises.
Apply it with the grace of a butter knife, spreading cream cheese on a bagel—smoothly and evenly. And, yes, multiple coats are a thing. Think of each layer as an extra level of armor against Mother Nature’s mood swings.

B. Protecting Picture Framing from Moisture, UV Damage, and Wear
This step is all about giving your deck the shield it deserves from moisture, UV rays, and the wear and tear of deck parties. Remember, UV rays are to decks what kryptonite is to Superman—only you have the power to prevent the damage.
A good sealant not only keeps the water out but also acts as sunglasses for your deck, filtering out those harmful UV rays. And when it comes to wear, think of it as teaching your deck some self-defense moves against the stomping of feet and dragging of chairs.
C. Enhancing Deck Aesthetics with Matching or Contrasting Finish
Finally, it’s time to turn your deck into the George Clooney of backyards—timelessly handsome and charming. Selecting a finish that complements or contrasts with your home’s exterior is like choosing the right tie for a suit—it can make or break the look. If your house flaunts a modern vibe, maybe go for a sleek, dark stain. More of a rustic charm kind of person? Opt for a natural, lighter finish.
The goal is to achieve that “Wow, you look amazing!” reaction from your friends, family, and maybe even that nosy neighbor peering over the fence.
And there you have it, the cherry on top of your deck-building adventure. Sealed, protected, and dressed to impress. Step back, pop open that bottle of celebration, and prepare to welcome a parade of compliments. Your deck isn’t just ready for a season of fun; it’s set to be the backdrop of memories for years to come. Cheers to you, the newly crowned monarch of deck-dom!
Adding Decorative Accents

Alright, brace yourselves because we’re about to add some serious pizzazz to your deck. You’ve built it, you’ve sealed it, and now it’s time to glam it up. Think of this step as accessorizing your favorite outfit—because even decks need a little bling.
A. Incorporating Inlays, Borders, or Patterns in Picture Framing
Time to get fancy with inlays, borders, or patterns within your picture framing. Imagine decking out your deck (pun totally intended) with a compass rose inlay right in the center or perhaps adding a zigzag border for that extra wow factor.
It’s like giving your deck a tattoo but without the commitment issues. Play around with designs that reflect your personal style or perhaps mimic the aesthetics of your favorite vacation spot. Just remember, measure twice and cut once because there’s no “Ctrl+Z” in woodworking.
B. Installing Deck Lighting Along with Picture Framing for Enhanced Ambiance
Next up, let’s talk about setting the mood with some deck lighting. Installing soft, ambient lights along your picture framing can transform your deck from a daytime BBQ spot to an elegant evening oasis. It’s like putting up Christmas lights but classier, and you don’t have to take them down in January.
Solar-powered LED lights are a great option for an eco-friendly glow, or you might opt for low-voltage lights that plug into your home’s electrical system. Either way, you’re one step closer to not tripping over that one sneaky step when carrying out the trash at night.
C. Considering Additional Features for Personalization and Style
Lastly, don’t be afraid to get creative with additional features that scream “you.” Maybe it’s a built-in bench for those sunset-watching sessions, planters for your burgeoning herb garden, or a slick fire pit area for those marshmallow-roasting nights.
Perhaps a sleek bar rail for those leisurely weekend cocktails. This is your chance to make your deck, not just any deck, but your deck. Like giving it a secret handshake, but visually.
By the time you’ve jazzed up your deck with these decorative accents, your backyard will be the envy of the neighborhood. Not only will your deck have the structural integrity of a well-oiled ship, but it will also have the charm and charisma of a Gatsby party.
Now, step back, give yourself a hearty pat on the back, and get ready to host some epic gatherings. Congratulations, you’ve officially elevated your deck to celebrity status in the neighborhood. Curtain call!
Testing and Inspection
All right, take off that construction hat and put on your detective cap because it’s time for Sherlock Holmes to go your way through testing and inspection. You’ve done the building, the sealing, and the blinging out—now let’s make sure your masterpiece is as sturdy as it looks.
A. Conducting Visual Inspection for Any Defects or Issues
Begin with a visual inspection that’s more detailed than your grandma examining your outfit at a family gathering. Look out for anything amiss—uneven boards, missed nail heads, or the dreaded splinter territory. This is your chance to catch any small issues before they turn into big problems. Think of yourself as the guardian of the deck realm, protecting it from the forces of evil (also known as wear and tear).
B. Testing Stability and Durability of Picture Framing Structure
Next up, it’s time for the wobble test. Grab a buddy and gently try to rock the picture framing. If it moves like it’s dancing to its own tune, you’ve got some tightening to do. Testing the stability and durability of your structure is crucial—after all, nobody wants their deck to be the talk of the town for all the wrong reasons. You’re aiming for steadfastness, not swaying in the wind.
C. Making Adjustments or Repairs as Necessary
Found an issue? No sweat! It’s tweaking time. Whether it’s reinforcing a loose board, adding an extra coat of sealant, or going back in with more secure fastenings, this is your chance to nip any potential problems in the bud. Think of it as deck surgery—precision is key, and the goal is a healthy, happy deck that’s ready to face the elements (and the party guests).
By the end of this rigorous testing and inspection phase, your deck should not only look the part but act it, too—ready to face whatever life throws at it, from wild weather to even wilder parties. Give yourself a high five; you’ve earned it!
Maintenance and Care
Alright, folks. We’ve hammered and blinged, and now it’s time to chat about how to keep your deck looking as fresh as a TikTok dance trend. Because guess what? Maintenance is the secret sauce to ensuring your deck remains the hot spot for backyard shenanigans for years to come.
A. Regularly Inspecting Picture Framing for Damage or Wear
First up on our deck-care playlist is the regular inspection. Think of it as your deck’s annual check-up, except more often. You’re looking for anything that screams “Help me!” like cracks, splinters (the bane of bare feet), or any signs that your deck is wearing down faster than your enthusiasm for New Year’s resolutions. Catching these early is like catching plot holes in your favorite TV show – better sooner than later.
B. Cleaning and Treating Picture Framing Boards as Needed
Now, let’s move on to the spa treatment for your deck – cleaning and treating those picture-framing boards. Mixing up a gentle cleaning solution and giving your deck a good scrub is akin to exfoliating, removing all the grime and gunk that accumulates like unwanted party guests.
After a thorough clean, treat your boards with a sealer or stain recommended for your type of wood. Consider this the moisturizer step, locking in the beauty and ensuring your deck is protected from UV rays, rain dances, and accidental BBQ sauce spills.
C. Implementing Routine Maintenance to Extend Lifan of Deck Structure
And finally, the grand finale of deck care – implementing routine maintenance. This isn’t just about fixing things when they break; it’s about the ongoing TLC that keeps your deck in tip-top shape, like choosing the right deck furniture, not dragging chairs like it’s a chair-dragging competition, and occasionally tightening loose screws that decided to wiggle free. Think of your deck as a pet needing regular attention and care to stay healthy and happy.
With this blueprint for maintenance and care, your deck won’t just survive; it’ll thrive, becoming the legend of backyard bashes, serene morning coffees, and everything in between. Here’s to the deck life – long may it reign!
Conclusion
We kicked off this DIY adventure with a dream and a hammer, navigating the ins and outs of how to picture frame a deck. From choosing the right materials and tools, laying down the foundation, and measuring twice so we only had to cut once to the grand finale of sealing and decorating, it’s been a wild ride. Every step, meticulously planned and executed, ensures your deck isn’t just built but crafted.
If there’s one thing we’ve learned (besides how not to hammer a thumb), it’s that the devil really is in the details. Attention to detail and a commitment to craftsmanship are what transform a regular deck into your backyard’s main attraction. It’s the precision in each cut, the care in choosing materials, and the patience in assembly that make the magic happen.
And now, the moment of truth—sitting back and enjoying the fruits of your labor. Your beautifully framed deck is not just a testament to your DIY prowess but a functional outdoor living space that’s ready for anything. Whether it’s hosting epic BBQs, serene morning coffees, or simply watching the world go by, your deck is ready to play its part in your life’s best moments. Here’s to creating memories on a foundation built with your own two hands. Cheers to deck life, the pinnacle of outdoor living!
About the Author
Adrian Green, a lifelong woodworking enthusiast, shares his passion for the craft through The Woodenify Blog. With a foundation built on years of hands-on experience in his father’s woodworking shop, Adrian is dedicated to helping others learn and grow in the world of DIY woodworking. His approach to woodworking combines creativity, practicality, and a deep appreciation for the art of building with your own hands. Through his blog, he inspires individuals of all skill levels to embark on their own woodworking journeys, creating beautiful, functional pieces of furniture and décor.
Professional Focus
- Specializes in DIY woodworking projects, from furniture to home décor.
- Provides step-by-step guides and practical tutorials for woodworkers of all skill levels.
- Dedicated to helping readers build confidence and skill through easy-to-follow instructions and tips.
- Passionate about fostering a community of makers who can share, learn, and grow together.
Education History
- University of Craft and Design – Bachelor of Fine Arts (BFA) in Woodworking and Furniture Design
- Woodworking Apprenticeships – Extensive hands-on training with skilled craftsmen to refine carpentry and furniture making techniques.
- Online Courses & Masterclasses – Continued education in advanced woodworking techniques, design principles, and specialized tools
Expertise:
- DIY woodworking, carpentry, furniture making, and home décor projects.
- Creating accessible tutorials and guides for beginner to advanced woodworkers.
- Sharing the joys and satisfaction of woodworking, from raw materials to finished products.