Are you tired of your bookcase being cluttered? Do you want to add a touch of style and function to your living space? Putting doors on your bookcase can help solve these problems.

Adding doors to a bookcase can transform its appearance and functionality, providing a polished look while protecting your books and decorative items from dust and damage. This simple yet effective upgrade enhances your space’s aesthetic and allows for better organization and privacy.
Whether you’re looking to create a closed storage solution or simply add a stylish touch to your existing furniture, this guide will walk you through the essential steps and considerations on how to put doors on bookcase. With the right tools and patience, you’ll be able to elevate your bookcase into a beautiful and practical storage piece.
What Will You Need?
- Bookcase
- Doors (pre-made or custom-sized)
- Hinges and screws
- Screwdriver or drill
- Measuring tape
- Pencil
- Leveler
- Wood filler (optional)
Before you begin, ensure you have all the necessary materials. This will save you time and allow for a smooth installation process. Also, consider measuring your bookcase beforehand to ensure the doors fit correctly. If you’re using pre-made doors, double-check their dimensions and compare them with your bookcase’s measurements.
10 Easy Steps on How to Put Doors on Bookcase
Step 1: Prepare Your Bookcase
Before starting the installation process, preparing your bookcase correctly is crucial. First, clear out all the items stored on the shelves to prevent any damage or clutter during the installation. This will give you a clean workspace and allow you to access the area where the doors will be attached easily. Next, inspect the structure of the bookcase to ensure that it’s stable and sturdy.

Look for any loose parts or weak points that might need reinforcement, as the added weight of the doors could stress an unstable unit. If necessary, use wood filler to fill in any holes or imperfections in the wood surface, allowing for a smooth and attractive finish once the doors are installed. Finally, wipe down the surfaces to remove dust and debris, preparing them for a fresh look with the new doors.
Step 2: Measure and Mark the Hinges
Once your bookcase is prepared, the next step is to measure and mark where the hinges will be attached. Using your measuring tape, determine the desired height for the doors and mark that point on the side of the bookcase.
Typically, hinges are positioned about 2-3 inches from the top and bottom edges of the door for optimal support. Use a leveler to ensure your markings are straight and even. This will help guarantee that your doors hang correctly and open smoothly.
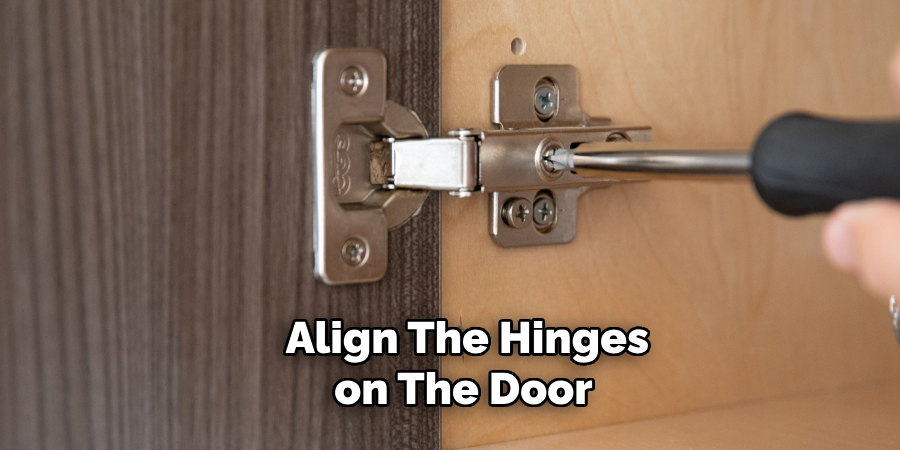
Step 3: Attach the Hinges to the Doors
With your hinge locations marked, attaching the hinges to the doors is time. Lay the door flat on a sturdy surface to make the process easier.
Position each hinge on the previously marked area, ensuring that it aligns properly with the edge of the door. Use your pencil to mark the screw holes, then remove the hinge and pre-drill holes if necessary to prevent the wood from splitting.
Next, reattach the hinge to the door by securing it with screws using a screwdriver or drill. Make sure the hinges are tightly fastened for stability. Repeat this process for the remaining door, ensuring both doors will open and close effectively once installed.
Step 4: Install the Hinges to the Bookcase
Now that the hinges are securely attached to the doors, it’s time to install them onto the bookcase. Align the hinges with the previously marked spots on the side of the bookcase, ensuring they are level and positioned correctly.
Secure the hinges to the bookcase using screws, making sure they are tightly fastened for added support. It’s important to carefully check the alignment before fully tightening the screws, as this will ensure that the doors hang straight and function properly.
Once both hinges are attached to the bookcase for each door, gently test the door to ensure it opens and closes smoothly. If adjustments are needed, consider loosening the screws slightly and repositioning the hinges until the desired fit is achieved.
Step 5: Attach the Doors
With the hinges securely fixed to the bookcase, it’s time to attach the doors themselves. Carefully lift each door and align the hinges on the door with the hinges attached to the bookcase.
Gently position the door so it hangs freely, ensuring it is level and aligned correctly. Once you are satisfied with the positioning, secure the door by fastening the hinges to the bookcase with screws. Make sure each screw is tightly fastened to provide stability and proper support for the door.
After attaching both doors, take a moment to check their alignment; adjust if necessary to ensure that they open and close smoothly without any obstructions. This marks a significant step toward completing your bookcase project, as you can now appreciate the new functionality of your enhanced storage piece.
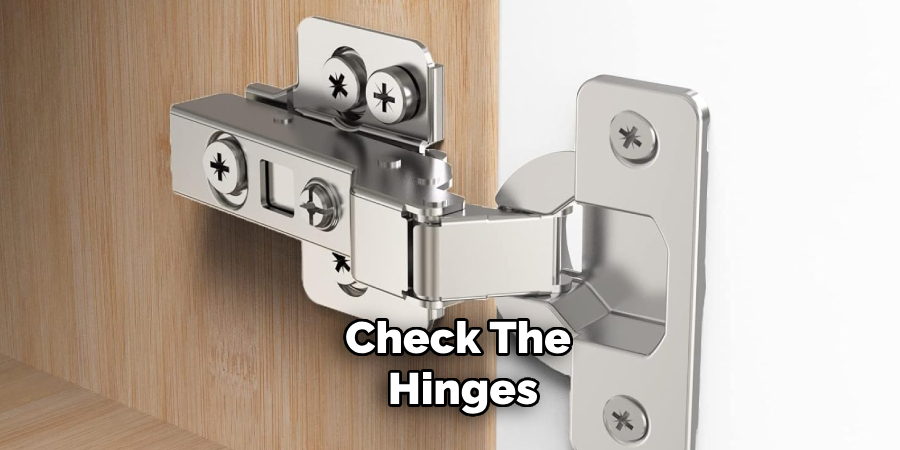
Step 6: Test the Doors
Now that both doors are attached testing their functionality is essential. Gently open and close each door several times to ensure they operate smoothly without sticking or wobbling. Pay attention to the alignment; the doors should sit flush with the bookcase and not rub against each other or the frame.
If you notice any issues, you may need to adjust the hinges. Loosen the hinge screws slightly and reposition the doors until they’re aligned correctly, then retighten the screws. This testing phase is crucial to confirm that your installation is successful and that the doors can withstand regular use.
Step 7: Install the Door Handles
With the doors functioning correctly, the next step is to install the door handles or knobs. Choose handles that complement the style of your bookcase and are comfortable to use. Begin by marking the desired location for the handles on each door, typically centered vertically and positioned about 2-3 inches from the edge. Use a leveler to ensure the marks are straight.
Once marked, drill holes at the indicated locations, ensuring you follow the manufacturer’s guidelines for the handle installation. After drilling, insert the screws provided with the handles, securing them tightly to both the door and the back plate. After the handles are installed, test them to make sure they operate smoothly, adding the finishing touch to your newly improved bookcase.
Step 8: Final Touches and Clean Up
With the handles installed and the doors functioning well, it’s time to add some final touches to your bookcase project. Begin by inspecting the installation to ensure everything is secure and aligned correctly.

If imperfections or markings are visible on the surface, consider touch-up painting or staining to maintain a polished look. Finally, remove any dust or debris that may have accumulated during installation, wiping down the bookcase with a damp cloth.
A good clean-up enhances the bookcase’s appearance and prepares it for its new embellishments and contents.
Step 9: Organize Your Books and Items
Once the installation and finishing touches are complete, it’s time to organize your books and other items on the newly enhanced bookcase.
Begin by sorting your books by size, genre, or color, depending on your preference and the aesthetic you wish to achieve. Place larger books on the bottom shelves for stability and smaller books on higher shelves for easy access.
Additionally, consider incorporating decorative items such as plants, framed photos, or art pieces to create visual interest and break up the rows of books.
Step 10: Maintain Your Bookcase
Regular maintenance is essential to ensure longevity and keep your bookcase looking its best. Dust the shelves periodically to prevent build-up and ensure your items remain clean.
Check the hinges and handles for any signs of wear or loosening and tighten them to maintain smooth operation. Additionally, avoid overloading the shelves to prevent sagging or damage over time.
By following these installation and maintenance steps, your bookcase will continue to provide you with functional storage and aesthetic appeal for years to come.
5 Things You Should Avoid
- Skipping Measurements: Failing to measure the hinge placement and door dimensions accurately can lead to misaligned doors that won’t function properly. Always double-check your measurements before drilling.
- Overtightening Screws: While it’s vital to secure the hinges and handles, overtightening screws can strip the holes and damage the wood. Tighten screws just enough to hold components securely without forcing them.
- Forgetting to Check for Level: Doors not installed at the level can cause issues with opening and closing smoothly, leading to potential damage over time. Make sure to use a leveler when marking the placement of hinges and handles and check the alignment before finalizing the installation.
- Using Incorrect Hardware: It’s essential to use the correct size and type of screws provided by the manufacturer for your specific bookcase model. Using incorrect hardware can lead to instability and improper door function.
- Not Maintaining Regularly: Neglecting regular maintenance, such as dusting and checking for loose hardware, can result in an unsightly or dysfunctional bookcase over time. Take a
Conclusion
In conclusion, adding doors to your bookcase enhances its functionality and elevates the overall aesthetic of your space.
Following the outlined steps on how to put doors on bookcase, from securing the hinges and testing the door functionality to installing suitable handles and maintaining your newly improved piece, you ensure a successful installation that meets your needs. Remember to take care during each stage, including checking measurements and avoiding common pitfalls, to achieve a polished result.
With some maintenance and organization, your bookcase will remain a beautiful and practical addition to your home for years. Enjoy the satisfaction of your handiwork as you showcase your books and cherished items behind elegant doors!
About the Author
Adrian Green, a lifelong woodworking enthusiast, shares his passion for the craft through The Woodenify Blog. With a foundation built on years of hands-on experience in his father’s woodworking shop, Adrian is dedicated to helping others learn and grow in the world of DIY woodworking. His approach to woodworking combines creativity, practicality, and a deep appreciation for the art of building with your own hands. Through his blog, he inspires individuals of all skill levels to embark on their own woodworking journeys, creating beautiful, functional pieces of furniture and décor.
Professional Focus
- Specializes in DIY woodworking projects, from furniture to home décor.
- Provides step-by-step guides and practical tutorials for woodworkers of all skill levels.
- Dedicated to helping readers build confidence and skill through easy-to-follow instructions and tips.
- Passionate about fostering a community of makers who can share, learn, and grow together.
Education History
- University of Craft and Design – Bachelor of Fine Arts (BFA) in Woodworking and Furniture Design
- Woodworking Apprenticeships – Extensive hands-on training with skilled craftsmen to refine carpentry and furniture making techniques.
- Online Courses & Masterclasses – Continued education in advanced woodworking techniques, design principles, and specialized tools
Expertise:
- DIY woodworking, carpentry, furniture making, and home décor projects.
- Creating accessible tutorials and guides for beginner to advanced woodworkers.
- Sharing the joys and satisfaction of woodworking, from raw materials to finished products.