Upcycling furniture has gained popularity as a sustainable and creative way to breathe new life into old pieces, reducing waste and enhancing home aesthetics. By repurposing items, not only can you enjoy a unique piece that reflects your personal style, but you also contribute to environmental conservation. One intriguing project is learning how to turn a nightstand into a chair, which combines functionality with creativity.
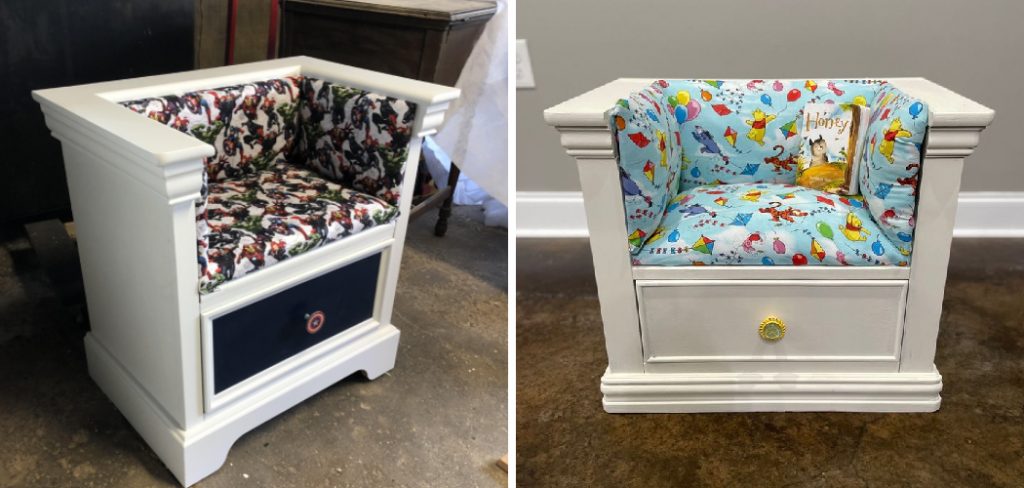
This transformation involves several key steps, starting from selecting the right nightstand and preparing it for construction. You’ll then build the seat and backrest, followed by finishing touches that elevate your chair’s appearance. By the end of this project, you’ll have a beautifully reimagined piece of furniture that serves a new purpose and showcases your DIY skills.
Materials and Tools Needed
Materials
To successfully transform your nightstand into a chair, gather the following essential materials: a sturdy nightstand, cushion foam for added comfort, fabric to upholster the seat and backrest, screws for secure assembly, and wood glue to reinforce joints. Additionally, consider optional decorative elements like paint, stain, or trim to personalise and enhance the final look of your chair.
Tools
Equip yourself with the tools for this project, including a saw for cutting wood, a drill for making holes and securing parts, a measuring tape to ensure precise dimensions, a staple gun for upholstery, and sandpaper to smooth surfaces. Don’t forget to wear safety equipment such as goggles and gloves to protect yourself during the process.
Planning and Design
Choosing the Right Nightstand
When selecting a nightstand for your transformation project, consider its dimensions and structural integrity. Opt for a tall nightstand to provide a comfortable seat height yet sturdy enough to support weight. Look for models made from solid wood rather than particle board, as these tend to be more durable. Additionally, assess the stability of the nightstand by ensuring it doesn’t wobble when pressure is applied. A well-constructed piece will lay a strong foundation for your new chair.
Design Sketch and Measurements
Creating a detailed design sketch is essential before beginning the transformation. This sketch will serve as a blueprint for your project, helping you visualize the final product and plan out necessary adjustments. Take accurate measurements of the nightstand, ensuring that you capture the width, depth, and height. These dimensions will guide you in determining the size of the seat and backrest. By mapping out your design and measurements in advance, you set yourself up for success, resulting in a functional and comfortable chair that fits seamlessly into your space.

How to Turn a Nightstand Into a Chair: Preparing the Nightstand
Before diving into transforming your nightstand into a chair, it’s crucial to prepare the piece properly. This preparation includes disassembling the nightstand, sanding and cleaning its surfaces, and reinforcing its structure to ensure durability. Below, we’ll break down these essential steps.
Disassembling the Nightstand
To begin, carefully disassemble the nightstand by removing any drawers, hardware, and unnecessary components. Start with the drawers: pull them out fully and set them aside. Use a screwdriver to detach handles, knobs, and any decorative elements. It’s important to handle the parts gently to avoid damage, ensuring that you can reuse them in the project if desired. Store these components safely, as they can add character to your finished chair or be repurposed for future projects.
Sanding and Cleaning
Once disassembled, the next step is sanding and cleaning the nightstand. Start by using sandpaper to remove any old finishes, which will help create a smooth surface for painting or staining. Focus on rough areas and edges to achieve an even texture. After sanding, thoroughly clean the nightstand using a damp cloth to remove dust and debris. This step ensures that the surface is ready for the finish of your choice, whether it’s paint or stain, resulting in a polished final product that showcases your craftsmanship.

Reinforcing the Structure
Lastly, reinforcing the structure of the nightstand is essential for its new function as a chair. Inspect the piece for any weak areas and add extra supports where necessary—this may involve installing brackets or additional wooden supports to enhance stability. It’s crucial to ensure that the nightstand can withstand weight, so pay particular attention to the legs and joints. By strengthening these components, you’ll create a sturdy error that occurred during generation. Please try again or contact support if it continues.
How to Turn a Nightstand Into a Chair: Creating the Seat and Backrest
Transforming your nightstand into a comfortable chair involves building a seat and backrest that are both functional and aesthetically pleasing. This process will require careful planning and execution to ensure that your new chair is sturdy and inviting.
Building the Seat Frame
The first step in creating the seat is constructing a reliable frame using wood that can support both the cushioning and the user’s weight. Start by measuring the width and depth of your nightstand to determine the dimensions of the seat frame. Cut two sides and two front and back pieces to create a rectangular frame.
Use wood glue to bond the corners and strengthen the structure, then secure them together with screws for added stability. It’s essential to ensure the frame is level and firmly attached to the nightstand’s base, providing a solid foundation to build your chair. Once the frame is complete, sand down any rough edges for a smooth finish, preparing it for the following cushioning and upholstery.

Adding Cushioning
After building the seat frame, the next step is to add cushioning for comfort. Begin by measuring and cutting cushion foam to fit both the seat and backrest dimensions. It’s important to choose thick foam to ensure generous padding, enhancing the overall comfort of your chair. After cutting the foam, carefully upholster it with your chosen fabric, ensuring that it wraps tightly around each piece. Use a staple gun to secure the fabric to the wooden frame—start from the center of each side, working outwards to avoid wrinkles and ensure a neat finish. Once upholstered, your seat will look inviting and provide a comfortable place to sit, making your chair both functional and stylish.
Attaching the Backrest
The final step in creating your chair involves installing the backrest to the nightstand. Using the same wood used for the seat frame, cut a piece that will serve as the backrest, ensuring it’s both wide enough for comfort and tall enough to provide support. Position the backrest at the desired angle—typically between 90 and 110 degrees—to allow for a comfortable seating posture.
Securely attach the backrest to the nightstand using screws and brackets to reinforce the connection, ensuring it can withstand pressure without wobbling. Once attached, consider testing the sturdiness of the backrest by applying gentle pressure; it should feel solid and secure. With the backrest in place, your transformed nightstand will be ready to provide a functional seating solution that showcases your creativity and craftsmanship.

Finishing Touches
After the structural components of your nightstand chair are complete, the finishing touches are crucial in creating a polished and aesthetically pleasing piece. This stage involves both painting or staining the chair and adding decorative elements that reflect your personal style.
Painting or Staining
Choosing a finish that complements your room’s decor is essential for harmonizing the new chair with the existing furnishings. Soft pastel colors can create a calming atmosphere, while bold hues can make a striking statement. When applying paint or stain, ensure the surface is clean and dry. For paint, consider using a primer to help the color adhere better. When using a stain, apply it evenly with a brush or cloth, following the wood grain. To protect your finish, consider adding a clear sealer or topcoat, which will shield the surface from wear and tear, ensuring longevity. Allow adequate drying time between coats for the best result, and remember, patience is key to achieving a smooth and flawless finish.
Adding Decorative Elements
With the main finish complete, it’s time to infuse your chair with personality by adding decorative elements. This could include attaching trim along the edges of the seat or backrest, adding decals that reflect your interests, or even applying upholstery tacks for a rustic feel. Personalizing your chair can also incorporate color accents that tie it into your room’s theme, such as cushions or throws that complement the chair’s finish. Explore options that resonate with your style—a modern look with sleek lines or a vintage vibe with ornate details. These final touches will elevate your nightstand chair, transforming it into a unique piece of furniture that enhances the overall aesthetic of your space while showcasing your creativity.
Assembling and Final Adjustments
Final Assembly
With the seat, backrest, and finishing touches complete, it’s time for the final assembly of your nightstand chair. Begin by carefully placing the seat frame onto the nightstand, ensuring it aligns well with the backrest. Use screws to attach the seat firmly to both the nightstand and the backrest, making sure each connection is secure. Double-check that all screws are tightened and that any brackets used are fastened correctly to prevent any wobbling. This step will ensure that your chair is safe and reliable for use, laying a solid foundation for the final adjustments.
Making Adjustments
Once assembled, testing the chair for stability and comfort becomes essential. Gently sit on the chair to assess any potential issues related to balance or wobbling. If you notice any instability, inspect the joints and screws again, making sure everything is secured properly. Additionally, sit for a moment to evaluate the comfort level; if the seat or backrest feels too hard or unyielding, consider adding extra padding or adjusting the angle of the backrest. These minor yet crucial adjustments will enhance the chair’s safety and comfort, ensuring it meets your expectations for functionality and style.

Conclusion
In this guide, we explored how to turn a nightstand into a chair, detailing each step from constructing the seat frame to adding the finishing touches. This transformation breathes new life into an old piece of furniture and allows you to personalize your space with a unique seating solution. Embrace your creativity, and don’t shy away from experimenting with different materials, colors, and decorative elements throughout your upcycling journey.
The satisfaction of completing a DIY furniture project is unparalleled, as you create something functional and stylish with your own hands. Whether you’re an experienced craftsman or a beginner, transforming a simple nightstand can inspire you to tackle more upcycling projects, enriching your home with handmade charm and character.
About the Author
Adrian Green, a lifelong woodworking enthusiast, shares his passion for the craft through The Woodenify Blog. With a foundation built on years of hands-on experience in his father’s woodworking shop, Adrian is dedicated to helping others learn and grow in the world of DIY woodworking. His approach to woodworking combines creativity, practicality, and a deep appreciation for the art of building with your own hands. Through his blog, he inspires individuals of all skill levels to embark on their own woodworking journeys, creating beautiful, functional pieces of furniture and décor.
Professional Focus
- Specializes in DIY woodworking projects, from furniture to home décor.
- Provides step-by-step guides and practical tutorials for woodworkers of all skill levels.
- Dedicated to helping readers build confidence and skill through easy-to-follow instructions and tips.
- Passionate about fostering a community of makers who can share, learn, and grow together.
Education History
- University of Craft and Design – Bachelor of Fine Arts (BFA) in Woodworking and Furniture Design
- Woodworking Apprenticeships – Extensive hands-on training with skilled craftsmen to refine carpentry and furniture making techniques.
- Online Courses & Masterclasses – Continued education in advanced woodworking techniques, design principles, and specialized tools
Expertise:
- DIY woodworking, carpentry, furniture making, and home décor projects.
- Creating accessible tutorials and guides for beginner to advanced woodworkers.
- Sharing the joys and satisfaction of woodworking, from raw materials to finished products.