Are you tired of looking at your dirty, scuffed-up cabinets? Or maybe you just want to give them a fresh new look? Whatever the reason, washing painted cabinets can make a huge difference in the overall appearance of your kitchen or any room with cabinetry.
How to wash painted cabinets is an essential maintenance task that helps preserve their beauty and longevity. Over time, cabinets can accumulate dust, grease, and fingerprints, which can dull their finish and make them appear less inviting. By adopting a gentle yet effective cleaning approach, you can keep your cabinets looking fresh and vibrant.
This guide will walk you through the basic steps and provide valuable tips on the best cleaning products and methods, ensuring that your painted cabinets remain in excellent condition for years to come.
What Will You Need?
Before diving into the cleaning process, gathering all the necessary supplies is important. Here’s a list of items you’ll need to clean your painted cabinets:
- Microfiber cloth or soft sponge
- Warm water
- Mild dish soap or non-abrasive cleaner
- White vinegar (optional)
- Baking soda (optional)
- Lemon juice (optional)
It’s always best to use gentle, non-abrasive cleaners on painted cabinets as harsh chemicals can damage their finish. You can also opt for natural cleaning solutions such as vinegar and baking soda, which are effective yet safe for you and your cabinets.
10 Easy Steps on How to Wash Painted Cabinets
Step 1. Prepare Your Cleaning Solution:
First, fill a clean bucket or bowl with warm water and add a few drops of mild dish soap or a non-abrasive cleaner.
Stir gently to mix the solution until it becomes sudsy. If you prefer a more natural approach, you can opt for a mixture of equal parts warm water and white vinegar. Vinegar not only helps cut through grease but also acts as a disinfectant. For adamant stains or grime, consider adding a tablespoon of baking soda to your mixture for its gentle abrasive quality.
Ensure that your cleaning solution is well-mixed to lift dirt without being overly harsh on the cabinet surfaces. Remember to test any cleaning solution on a hidden area first to confirm that it won’t cause discoloration or damage to the paint.
Step 2. Dust and Wipe Down the Cabinets:

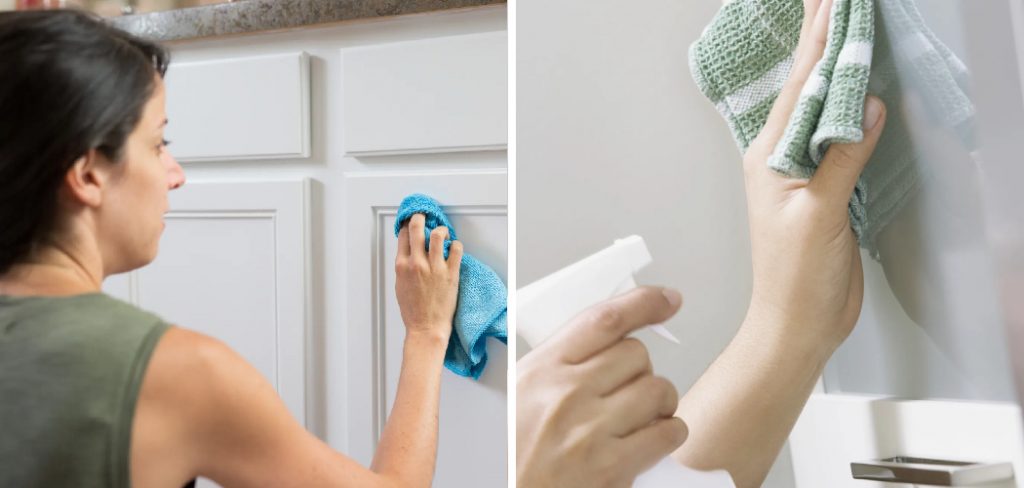
Before applying your cleaning solution, take a microfiber cloth or soft sponge and gently dust off the surfaces of your painted cabinets. This will help remove loose dirt, dust, and cobwebs that may have accumulated. It’s essential to start with a dry cloth, as this method prevents you from rubbing dirt into the paint. Pay special attention to corners and edges where grime tends to gather.
Once the surfaces are dust-free, you are ready to move on to the next step of applying the cleaning solution for a deeper clean.
Step 3. Apply the Cleaning Solution:
After prepping your cabinets, dip your microfiber cloth or soft sponge into the cleaning solution. Wring it out to ensure it’s damp but not soaking wet, as excess water can damage the wood or paint finish.
Begin applying the solution to your cabinets, working in small sections. Start from the top and work your way down to avoid drips from running onto clean areas. Gently scrub the surface using circular motions, paying attention to any spots or stains that need extra care.
Step 4. Rinse with Clean Water:
Once you’ve cleaned a section, it’s crucial to rinse off any residue from your cleaning solution. Fill another bucket or bowl with warm water and use a separate microfiber cloth or sponge for rinsing. Wipe down the cabinets again, ensuring you remove all cleaning solutions and any loosened grime. This step helps prevent any sticky residue from remaining on the cabinets.
Step 5. Dry the Cabinets:
After rinsing, it’s essential to dry the cabinets promptly. Use a dry microfiber cloth to wipe down all surfaces thoroughly. This prevents water spots and helps maintain the finish of the cabinets. Dry any areas that might have collected excess moisture, particularly around hardware and seams.
Step 6. Address Tough Stains:
If you encounter any stubborn stains or marks that didn’t come off during the initial cleaning, create a paste using baking soda and a small amount of water. Apply this gently to the stained area with a soft sponge, and let it sit for a few minutes before scrubbing lightly. Rinse and dry as previously instructed.
Step 7. Inspect and Touch Up:
After ensuring that all surfaces are clean and dry, take a moment to inspect your cabinets thoroughly.
Look for any areas requiring additional touch-ups, particularly around handles, edges, or corners where dirt accumulates. If you notice any minor scratches or chips in the paint, consider using a small paintbrush and the original cabinet paint to make necessary touch-ups.
This not only restores the aesthetic quality of your cabinets but also provides protection against moisture and wear. Remember, addressing these imperfections promptly can help maintain your cabinetry’s overall integrity and appearance.
Additionally, if your cabinets have a protective finish, apply a wood conditioner or polish every few months to keep them looking their best and to enhance their shine.
Step 8. Maintain Regular Cleaning:
To ensure your painted cabinets continue to look pristine, it’s essential to establish a regular cleaning routine. Depending on your kitchen’s usage, you can dust and wipe down the surfaces weekly, while a more profound clean may be done monthly.
Regular maintenance helps prevent dirt and grease buildup, making future cleanings more effortless and less time-consuming. Additionally, keep an eye on high-traffic areas and spots prone to spills to address any messes promptly.
Step 9. Use Cabinet Liners:
Consider utilizing cabinet liners to protect the interiors of your painted cabinets from stains and scratches. These liners can be easily cut to fit the shelves and provide a barrier against spills and everyday wear.
They come in various materials, including vinyl and cloth, offering functionality and aesthetic appeal. Regularly check and clean the liners to keep your cabinets looking neat and organized.
Step 10. Organize Your Cabinets:
Finally, take the opportunity to organize the items stored within your cabinets after a thorough cleaning. Begin by removing everything and evaluating what you really need. Discard any items that are expired or no longer serve a purpose—group similar items together for better accessibility and efficiency.

Consider using storage containers or dividers to maximize space and keep things tidy. A well-organised cabinet not only looks appealing but also makes it easier to maintain cleanliness moving forward.
By following these simple steps and maintaining regular cleaning, you can keep your painted cabinets looking new and fresh for years to come.
5 Additional Tips and Tricks
- Choose the Right Cleaning Solution: Use a mild dish soap mixed with warm water for general cleaning. Avoid harsh chemicals that can damage the paint finish.
- Test a Small Area First: Before applying any cleaning solution, test it in an inconspicuous area to ensure it does not cause discoloration or damage.
- Use Soft Cloths or Sponges: Opt for microfiber cloths or soft sponges to prevent scratching the surface of the painted cabinets while cleaning.
- Avoid Excessive Water: When washing, use a damp cloth rather than soaking the cabinets. Excess water can seep into seams and damage the wood underneath.
- Dry Thoroughly: After cleaning, wipe down the surfaces with a dry cloth to remove any residual moisture, helping to maintain the integrity of the paint and finish.
With these additional tips and tricks, you can ensure that your painted cabinets stay in top condition for years.

5 Things You Should Avoid
- Using Abrasive Cleaners: Avoid cleaners that contain abrasive materials, as they can scratch and damage the painted surface, leading to peeling or fading.
- Scrubbing Too Hard: Excessive scrubbing can wear down the paint finish. Instead, use gentle motions while cleaning to protect the surface.
- Ignoring Stains Promptly: Letting stains sit on the cabinets for too long can make them harder to remove. Address spills and stains immediately for the best results.
- Using Rough Sponges or Brushes: Avoid scouring pads or stiff-bristled brushes that can scratch the paint. Stick to soft, non-abrasive cleaning tools.
- Applying Heat: Never use hot water or steam cleaners on painted cabinets, as the heat can damage the paint and cause it to warp or discolor.
By avoiding these common mistakes, you can maintain the beauty and longevity of your painted cabinets.
Conclusion
In sum, how to wash painted cabinets requires a thoughtful approach to cleaning.
By selecting gentle cleaning solutions, employing soft cloths, and avoiding excessive water, you can effectively clean without compromising the integrity of the paint finish. It’s crucial to promptly address stains and avoid harsh materials that may cause damage. By following the tips outlined above and steering clear of common pitfalls, you can enjoy beautifully clean cabinets that enhance the aesthetic of your kitchen for years to come.
Remember, a little care goes a long way in preserving your investment and ensuring lasting beauty. Happy cleaning! Thank you!
About the Author
Adrian Green, a lifelong woodworking enthusiast, shares his passion for the craft through The Woodenify Blog. With a foundation built on years of hands-on experience in his father’s woodworking shop, Adrian is dedicated to helping others learn and grow in the world of DIY woodworking. His approach to woodworking combines creativity, practicality, and a deep appreciation for the art of building with your own hands. Through his blog, he inspires individuals of all skill levels to embark on their own woodworking journeys, creating beautiful, functional pieces of furniture and décor.
Professional Focus
- Specializes in DIY woodworking projects, from furniture to home décor.
- Provides step-by-step guides and practical tutorials for woodworkers of all skill levels.
- Dedicated to helping readers build confidence and skill through easy-to-follow instructions and tips.
- Passionate about fostering a community of makers who can share, learn, and grow together.
Education History
- University of Craft and Design – Bachelor of Fine Arts (BFA) in Woodworking and Furniture Design
- Woodworking Apprenticeships – Extensive hands-on training with skilled craftsmen to refine carpentry and furniture making techniques.
- Online Courses & Masterclasses – Continued education in advanced woodworking techniques, design principles, and specialized tools
Expertise:
- DIY woodworking, carpentry, furniture making, and home décor projects.
- Creating accessible tutorials and guides for beginner to advanced woodworkers.
- Sharing the joys and satisfaction of woodworking, from raw materials to finished products.